Last winter, I had a student show up to my carbine course with a brand-new red dot mounted ten minutes before class. No zero, no idea where it would hit, and ammo prices being what they were, he couldn’t afford to waste rounds finding out. In twenty minutes, using nothing but a bore sight and some basic knowledge, we had him hitting steel at 50 yards on his first shot. That’s when I realized how many shooters don’t know you can get remarkably close to zero without firing a single round.
After eight years in the Rangers where ammunition was unlimited (taxpayer funded), transitioning to civilian life meant learning to conserve rounds. Now, with ammo prices fluctuating worse than Montana weather, I’ve perfected several methods to get on paper without burning through a box of cartridges. Whether you’re setting up a new optic, switching between rifles, or just trying to save money, these techniques will get you close enough that final zeroing only takes a few rounds.
Your best survival tool is the six inches between your ears – use it to understand the relationship between your bore axis and sight plane. Once you grasp that concept, the rest is just mechanical process.
Understanding What We’re Actually Doing
The Bore-to-Sight Relationship
Every sight sits above your bore by some distance – usually 2.5 to 3 inches for red dots on ARs. Your bullet travels in an arc, rising to meet your line of sight, crossing it twice – once up close and once at your zero distance. We’re trying to align these two paths without seeing where bullets impact.
Think of it like this: your bore is a laser pointing where bullets will initially travel. Your sight is another laser showing where you’re aiming. We need these “lasers” to converge at our desired distance. That’s all zeroing really is – making these two paths meet where we want them.
Why This Works (And When It Doesn’t)
Bore sighting gets you close – usually within 6 inches at 25 yards, often much better. It won’t give you a perfect zero because:
- Barrel harmonics affect point of impact
- Ammunition variations matter
- Environmental conditions change things
- Your mounting might have slight cant
But it will get you on paper, saving ammunition and time. Perfect is the enemy of good enough, and bore sighting is definitely good enough to start.
Method 1: Laser Bore Sighting (The Modern Way)
Equipment Needed
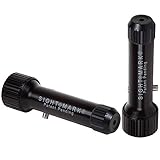
I use a Sightmark Universal Laser Bore Sight for most rifles. Costs about $40, saves hundreds in ammo over its lifetime. The chamber-specific models work better than universal muzzle-mounted types, but both function.
- <5mW 632-650nm Class IIIA Red Laser: Precision boresighting with a safe, visible reference point. Align sights accurately with this low-power output device, ensuring greater zeroing accuracy for enhanced performance.
For precision, chamber-insert models like the Wheeler Professional Bore Sight give best results. They center perfectly in your chamber, eliminating angular error.
- SPECS: Class IIIa with power output of less than 5mW
- Highly Visible Laser: Green laser is easily visible in both bright and dark lighting conditions
The Process That Works
Step 1: Safety First
- Clear your weapon completely
- Remove the bolt if possible (bolt guns)
- Triple-check the chamber
- Point in safe direction always
Step 2: Install the Bore Sight
- Chamber inserts: Close bolt gently on laser
- Muzzle types: Expand arbor until snug (don’t overtighten)
- Magnetic types: Center on muzzle crown
Step 3: Set Your Distance
- 25 yards for initial zero (most common)
- Indoor: Measure exactly with tape
- Outdoor: Pace it off (my stride is almost exactly one yard)
Step 4: Steady the Rifle
- Use a proper rest or bags
- Bipod plus rear bag works great
- Lead sled or gun vise is ideal
- Kitchen table with rolled towels works in a pinch
Step 5: Align the Dots
- Turn on laser (should project clear dot on target)
- Without moving rifle, adjust red dot to cover laser dot
- Make windage adjustments first, then elevation
- Double-check by slightly moving rifle – dots should track together
Real-World Results
Last month, I bore-sighted five rifles for a basic rifle class. Results at 25 yards:
- Rifle 1: 2 inches low, 1 inch right
- Rifle 2: Dead on (lucky)
- Rifle 3: 3 inches high, centered
- Rifle 4: 1 inch low, 2 inches left
- Rifle 5: 4 inches right, centered
All were on paper. Total rounds to complete zeros: 15 rounds across all five rifles.
Method 2: Visual Bore Sighting (The Traditional Way)
When This Works Best
Bolt-action rifles where you can remove the bolt completely. Also works with break-action shotguns and some semi-autos with removable upper receivers (ARs).
The Old-School Process
Step 1: Create a Bore View
- Remove bolt completely (bolt guns)
- Separate upper/lower (ARs)
- Open action fully (break-actions)
Step 2: Secure the Rifle
- Must be absolutely stable
- Sandbags or gun vise required
- Any movement ruins the process
Step 3: Look Through the Bore
- Find distinct aiming point at 25+ yards
- Center target in bore view
- Target should fill about 1/4 of bore view
Step 4: Adjust Sight Without Moving Rifle
- Keep bore centered on target
- Adjust red dot to same point
- Check bore alignment frequently
- Patient, small adjustments
Accuracy Expectations
Visual bore sighting is less precise than laser methods but still effective. Expect to be within 6-8 inches at 25 yards. I’ve gotten within 2 inches with patience, but that’s exceptional.
This method taught me patience during Ranger School when we had no fancy tools. Still works today when batteries die or equipment fails.
Method 3: The Mirror Method (For Indoor Work)
Setting Up Inside
Developed this during a Montana blizzard when I needed to mount a new red dot but couldn’t get to the range for weeks.
Requirements:
- Large mirror (bathroom mirror works)
- 10+ feet of space
- Dim lighting
- Steady rest
Process:
- Set rifle on rest facing mirror at 10 feet
- Look through red dot at reflection
- You’ll see the dot and its reflection
- Adjust until dot covers its own reflection
- This centers the dot in the optic
This doesn’t zero your rifle but centers the dot mechanically. Combined with bore sighting later, it saves time and ensures your dot is optically centered before starting.
Method 4: The Target Grid System
For Precision Shooters
Learned this from a Marine Corps competition shooter. More complex but incredibly accurate.
Setup:
- Print a grid target with 1-inch squares
- Mount at exactly 25 yards
- Laser bore sight to center of grid
- Note which grid square laser hits
- Adjust red dot to same square
- Document offset for future reference
This creates a documented offset you can replicate. I keep notes on all my rifles – saves time when switching optics.
Understanding MOA and Adjustments
Making It Simple
One MOA equals roughly 1 inch at 100 yards. At 25 yards (where we’re bore sighting), one MOA equals 1/4 inch. So:
- 4 clicks of a 1/4 MOA adjustment = 1/4 inch at 25 yards
- 4 clicks = 1 inch at 100 yards
Most red dots adjust in 1/2 MOA clicks. Each click moves impact:
- 1/8 inch at 25 yards
- 1/2 inch at 100 yards
Write this down and tape it to your rifle case. Under stress, math becomes hard.
Common Mistakes to Avoid
Over-Adjusting: Make small adjustments, check, repeat. Large adjustments lead to chasing zero.
Wrong Direction: Remember the arrow indicates where IMPACT moves, not the dot. Confused me for years.
Forgetting Distance: Adjustments at 25 yards have 4x the effect at 100 yards.
Assuming Perfect: Bore sighting isn’t zeroing. Always confirm with live fire.
Environmental Considerations
Temperature Effects
Learned this the hard way in Afghanistan: extreme temperature changes affect zero. A rifle zeroed at 70°F might be 2 inches off at -10°F. The bore sight gets you close, but confirm zero in conditions you’ll actually shoot in.
Indoor vs Outdoor
Indoor bore sighting eliminates wind but gives false confidence. That perfect alignment at 25 feet might be 6 inches off at 25 yards outside. Always verify outdoors when possible.
Practical Applications
New Optic Installation
Every new red dot I mount gets bore sighted first. Saves average of 20 rounds per optic. At current ammo prices, the bore sight pays for itself twice per use.
Switching Between Rifles
QD mounts don’t always return to perfect zero. Bore sight verification takes 2 minutes, confirms mount returned correctly. Saved me embarrassment at matches multiple times.
Post-Impact Checks
Dropped your rifle? Took a spill? Airline destroyed your case? Bore sight check tells you if zero shifted without wasting ammo.
Teaching New Shooters
Students appreciate not wasting money while learning. Bore sight their rifles, let them fire 5 rounds to confirm, spend rest on actual training.
Tools Worth Investing In
Essential:
- Quality Laser Bore Sight: Wheeler or Sightmark
- Shooting Rest: Caldwell or MTM
- Target Stand: make your own

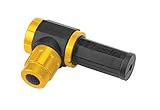
- VERSATILITY: Ideal for sighting in and reducing recoil from magnum rifles and shotguns

- K-Zone Shooting Rest is a fully adjustable rugged rifle and handgun shooting rest
Nice to Have:
- Gun Vise: Tipton or P3 Ultimate
- Rangefinder: Confirms exact distances
- Bubble Level: Ensures rifle is level

- EASE OF USE: L-shape center support holds break-open guns securely and separate quick-release cam blocks move independently to accommodate any stock shape

- The perfect tool for gun maintenance, gun cleaning and boresighting!
- Adjusts to accommodate both rifles and pistols.
Budget Alternative:
Spent $15 total at hardware store for:
- Small laser pointer
- Rubber stoppers
- Electrical tape
MacGyvered a functional bore sight that’s ugly but works.
The Complete Process (My Method)
- Mount red dot properly (correct torque, Loctite, aligned)
- Center dot mechanically (mirror method)
- Laser bore sight at 25 yards (precision method)
- Document adjustments made (future reference)
- Confirm with 3-5 rounds (verify and fine-tune)
- Final zero at desired distance (50, 100, 200 yards)
Total rounds fired: 10-15 maximum for perfect zero
Common Questions Answered
Q: How accurate is bore sighting? A: Typically within 4-6 inches at 25 yards. I’ve achieved 1-inch accuracy with patience, but don’t expect perfection.
Q: Can I bore sight a pistol? A: Yes, but it’s harder due to shorter sight radius. Laser cartridge bore sights work best for handguns.
Q: Do I still need to shoot after bore sighting? A: Absolutely. Bore sighting gets you close, but final zero requires live fire. No exceptions.
Q: How often should I check bore sight? A: After any impact, before important events, when changing ammunition types, or seasonally with temperature changes.
Q: Is expensive bore sight equipment worth it? A: For occasional use, no. Basic $40 laser works fine. For gunsmith or instructor use, yes – precision equipment saves time.
Final Wisdom
Bore sighting is a tool, not a solution. It gets you close enough to finish with minimal ammunition expenditure. In today’s market, that matters.
Practice makes permanent, so practice the process correctly. The more you bore sight, the better you’ll understand your rifle’s relationship between bore and sight. That understanding makes you a better shooter.
The wilderness doesn’t care if you’re zeroed – but you will when that trophy buck appears at 200 yards or when defending your home. Take the time, use these methods, save ammunition for actual training.
Remember: bullets confirm zeros, but bore sights save money getting there.
Want to master your rifle setup? Check out my guides on proper scope mounting, understanding MOA vs MIL, and building a dope card for your rifle.
About Flint: After 8 years as an Army Ranger and 15+ years teaching marksmanship, I’ve zeroed more rifles than I can count. When not instructing or guiding hunts, you’ll find me testing new methods with Scout and River, always seeking ways to save ammunition while maintaining precision.