Last elk season, I watched a client burn through a $60 box of premium ammunition trying to zero his new scope at the range. Twenty rounds later, he was still chasing impacts around the target like a drunk trying to find his keys. That’s when I pulled out my bore sighter—five minutes later, his next shot was within two inches of center. He looked at me like I’d performed magic. It wasn’t magic; it was basic field craft that’ll save you time, money, and frustration.
After thirty years of mounting scopes—from hasty field repairs in Afghanistan to precision setups for long-range competitions—I’ve learned that bore sighting isn’t just helpful, it’s essential. Skip this step, and you might waste half your ammo just getting on paper.
Let me show you how to bore sight an AR-15 properly, plus some tricks they don’t teach at the gun counter.
The Five-Minute Method
Here’s the quick version for those who need it now:
- Clear your rifle completely (check three times)
- Set target at 25 yards
- Remove upper from lower (two pins on AR-15)
- Insert laser bore sight in chamber
- Close bolt gently until laser activates
- Aim laser at target center
- Adjust scope to match laser point
- Remove bore sight, reassemble rifle
- Fire confirmation group
That’s it. But the details matter, so let’s dive deeper.
Understanding Bore Sighting
What It Actually Does (And Doesn’t)
Bore sighting aligns your scope’s line of sight with your rifle’s bore axis—roughly. It’s not zeroing; it’s pre-zeroing. Think of it as getting you in the neighborhood instead of the next county.
Your bullet doesn’t fly straight—it arcs. At 25 yards, it’s rising. At 100 yards, it might be at peak trajectory. At 300 yards, it’s dropping fast. Bore sighting just ensures your scope and bore are looking at the same ZIP code, not that they’re perfectly aligned for any specific distance.
I’ve seen too many hunters think bore sighting equals zeroing. It doesn’t. You still need to shoot and adjust. But instead of being two feet off target at 100 yards, you’ll be within a few inches.
Why ARs Are Actually Easier
The AR-15’s modular design makes bore sighting simpler than most rifles. Pop two pins, separate upper from lower, and you’ve got straight-line access to the chamber. No removing bolts, no awkward positions, just simple access.
Plus, the flat-top rail system means most scopes sit at a consistent height above bore. This predictability makes initial alignment more accurate than with hunting rifles where ring height varies wildly.
Types of Bore Sighters
Laser Cartridge Style (My Preference)
These look like a cartridge for your specific caliber (.223/5.56 for most ARs) with a laser in place of the bullet. Insert in chamber, close bolt partially, laser activates.
What I Use: SiteLite Ultra Mag Green Laser
- Works for .22 to .50 caliber (one tool, many rifles)
- Green laser visible to 100 yards in daylight
- 15-hour battery life
- Price: $90-120
I’ve used this same bore sighter for eight years on everything from .223 varmint rifles to .375 H&H dangerous game rifles. Still works perfectly.
Magnetic Barrel Attachments
These attach to your muzzle magnetically. A laser shines back through your bore. Works, but I don’t trust them on stainless barrels or in wind.
Optical Bore Sighters
Old school. A grid pattern you look through. Precise but slow, and useless in low light. I keep one as backup, but haven’t used it in years.
The Free Method (Eyeball Bore Sighting)
Remove upper from lower, look through bore at distant target, adjust scope to match. Costs nothing, works adequately for getting on paper at 25 yards. This is how my grandfather did it, and it still works.
Step-by-Step: The Right Way
Step 1: Safety First (No Exceptions)
Clear your rifle. Then clear it again. Then have someone else verify it’s clear. I’ve seen negligent discharges from “unloaded” rifles too many times.
- Remove magazine
- Lock bolt back
- Visual inspection of chamber
- Finger sweep of chamber
- Let bolt close on empty chamber
- Point in safe direction, pull trigger (should click)
Now you’re ready to start.
Step 2: Target Setup
Distance matters. Here’s what works:
25 Yards: Best for initial bore sighting. Bullet trajectory is flattest here. You can see laser clearly. Adjustment errors are minimized.
50 Yards: Good if you have a quality green laser and stable shooting position.
100 Yards: Only with premium green lasers in low light. Too many variables for most setups.
I use 25 yards religiously. It’s close enough to be precise, far enough to be meaningful.
Step 3: Rifle Preparation
For AR-15s:
- Push out rear takedown pin (fully)
- Push out front pivot pin (fully)
- Separate upper from lower
- Set lower aside safely
You now have clear access to the chamber from the rear. No bolt removal needed—that’s the AR advantage.
Step 4: Insert Bore Sighter
This is where people mess up. Don’t ram it home like you’re in combat. The bore sighter is a precision instrument.
- Insert laser bore sight gently into chamber
- Let it seat naturally (don’t force it)
- Slowly close bolt until it touches the bore sight
- You’ll feel slight resistance—stop there
- Laser should activate (if not, slightly more pressure)
The bolt doesn’t need to close completely. Just enough contact to activate the laser’s pressure switch.
Step 5: Aim and Align
- Support rifle solidly (sandbags, bipod, or rest)
- Aim laser at target center
- Look through scope
- Note where crosshairs are relative to laser dot
- Adjust windage (left/right) first
- Adjust elevation (up/down) second
- Verify both adjustments didn’t shift the other
Take your time here. Rushed bore sighting is worthless bore sighting.
Step 6: Fine Tuning
The laser won’t be perfectly still—it’ll dance slightly. That’s normal. Center your adjustments on the laser’s average position, not its exact momentary position.
If your scope has target turrets, note your starting position. You might need to return here if something goes wrong at the range.
Step 7: Removal and Reassembly
- Open bolt carefully
- Remove bore sighter (it might stick slightly—normal)
- Verify chamber is clear
- Reassemble upper to lower
- Function check (charge and release bolt)
- You’re ready for the range
Real-World Adjustments
The 25-Yard Zero Method
After bore sighting at 25 yards, your first group should be within 3 inches of point of aim. If not, something’s wrong—check mount tightness, scope function, or bore sight battery.
For most AR-15s with standard 55-grain ammunition:
- Zero at 25 yards hitting 1/2 inch low
- This gives approximate 200-yard zero
- You’ll be within 2 inches high or low from 25-250 yards
This is my standard field zero for general use.
The 50/200 Zero
Popular with military and law enforcement:
- Bore sight at 25 yards
- Move to 50 yards
- Zero to hit point of aim at 50
- Confirms zero at 200 yards
- Maximum rise of 1.5 inches at 100 yards
This works well for defensive carbines but requires verification at distance.
The 100-Yard Zero
For precision work:
- Bore sight at 25 yards
- Fire group at 25 to confirm on paper
- Move to 100 yards
- Zero for point of aim = point of impact
- Most straightforward for known-distance shooting
Common Mistakes (And How to Avoid Them)
Mistake 1: Over-Tightening the Bolt
Forcing the bolt closed on the bore sighter can damage:
- The bore sighter ($100 mistake)
- Your bolt face (much worse)
- Chamber dimensions (catastrophic)
Just kiss the bore sighter with the bolt. That’s enough.
Mistake 2: Bore Sighting at Wrong Distance
I’ve seen guys try to bore sight at 200 yards with a red laser in bright sunlight. Waste of time. The laser’s invisible, and trajectory variables multiply with distance.
Stick to 25 yards unless you have exceptional equipment and conditions.
Mistake 3: Not Verifying Mount Tightness
Bore sight with loose scope mounts, and you’re wasting time. Before bore sighting:
- Check ring screws (15-20 inch-pounds)
- Verify base screws (25-30 inch-pounds)
- Ensure scope doesn’t shift when twisted gently
Mistake 4: Believing Bore Sighting Equals Zero
Had a client once who bore sighted his rifle, then went elk hunting without firing a shot. “But I bore sighted it!” he said after missing a bull at 150 yards.
Bore sighting gets you close. Shooting gets you zeroed. No exceptions.
Field Expedient Bore Sighting
Sometimes you need to bore sight without tools. Here’s how:
The Barn Door Method
- Separate upper from lower
- Rest upper solidly, pointing at large target (barn door at 50 yards works)
- Look through bore from rear
- Center bore on distinct aiming point
- Without moving rifle, adjust scope to same point
- Reassemble and verify
This got me on paper in Afghanistan when my laser bore sighter took shrapnel. It’s crude but effective.
The Mirror Method
For indoor work:
- Set up mirror at 10 feet
- Look through bore at your own eye in mirror
- Adjust scope to center on same eye
- Multiplies effective distance without space
Learned this from an old Marine armorer. Works better than you’d think.
Equipment Recommendations
Best Overall: SiteLite Ultra Mag Green
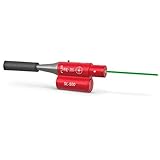
- Guaranteed superior accuracy with a lifetime warranty
- Fits all calibers from .22 to .50 cal. plus 20 & 12 ga. Shotguns
- Universal caliber fit
- Visible to 100 yards
- Proven durability
- Price: $90-120
Best Budget: Sightmark .223 Red Laser
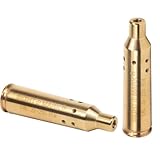
- <5mW 632-650nm Class IIIA Red Laser: Precision boresighting with a safe, visible reference point. Align sights accurately with this low-power output device, ensuring greater zeroing accuracy for enhanced performance.
- Caliber specific
- Works to 50 yards
- Basic but functional
- Price: $25-35
Best Premium: Laserline Quad Beam
- Four-point reference system
- Extreme precision
- Professional grade
- Price: $200-250
Maintenance and Storage
Your bore sighter is a precision instrument. Treat it accordingly:
- Remove batteries when storing long-term
- Clean lens with microfiber only
- Store in padded case (not rattling in tool box)
- Check batteries before each use
- Verify calibration annually (shoot after bore sighting)
The Economics of Bore Sighting
Let’s talk money:
- Box of match ammunition: $30-60
- Shots typically wasted getting on paper: 10-20
- Cost of wasted ammo: $15-60 per scope mounting
- Cost of bore sighter: $25-120
- Break-even point: 2-4 scope mountings
I mount probably 20 scopes per year between my rifles and helping friends. My bore sighter paid for itself the first month.
Troubleshooting Guide
“Laser Won’t Turn On”
- Check battery (usually dead)
- Ensure proper bolt contact
- Verify correct orientation in chamber
“Can’t See Laser at Range”
- Switch to green laser
- Reduce ambient light (early morning/evening)
- Decrease distance to 25 yards
- Clean laser lens
“Still Way Off After Bore Sighting”
- Verify scope mount tightness
- Check scope internals (tap test)
- Ensure bore sighter is calibrated
- Confirm correct ammunition
The Bottom Line
Bore sighting your AR-15 takes five minutes and saves hours of frustration plus boxes of ammunition. It’s not optional for serious shooters—it’s essential.
A $50 bore sighter will serve you for decades if treated properly. That’s the best return on investment in the shooting world, aside from training.
Remember: Bore sighting isn’t zeroing. It’s the first step that makes zeroing possible without wasting ammunition, time, and patience. Do it right, and your first shot at the range will be on paper. Skip it, and you might spend all day chasing impacts.
The wilderness doesn’t care if you’re zeroed. But you should.
Practice makes permanent, so practice it right.
Zero true,
Flint Marshall
Northern Montana
Questions about bore sighting other platforms or specific zero distances? Want to share your field expedient bore sighting methods? Drop a comment below or check out more practical shooting wisdom at Moosir.com. Remember—respect the process, respect the rifle, respect yourself.