Home Blog Page 3

Vortex Spitfire 3x vs Burris 332: Four Years of Prism Scope Testing from Ranch to Range

0

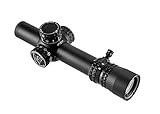
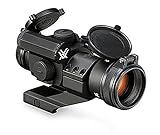
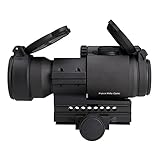
My eyes started betraying me at forty—astigmatism turning red dots into fuzzy starbursts that made precise shooting impossible. That’s when I discovered prism scopes. My primary AR wore a Vortex Spitfire 3x while my truck gun carried a Burris 332, both solving my vision issues while creating new considerations. After four years running these side-by-side through Montana’s extremes and training scenarios with local law enforcement, I’ve learned that choosing between them depends less on specifications than on understanding their design philosophy.

Why Prism Scopes Matter More Than Ever

My grandfather would’ve called needing special optics for bad eyes “getting soft.” He shot iron sights into his eighties, never complaining. But when a coyote at 150 yards looks like three coyotes through a traditional red dot, you need solutions that work, not stubborn pride.

Prism scopes use etched reticles viewed through a prism system—essentially compact traditional scopes with illumination added. For those of us with astigmatism, they’re game-changers. The Spitfire 3x and Burris 332 represent two approaches to this solution.

Testing Protocol: Four Years of Reality

Both optics underwent identical testing:

Environmental Exposure

  • Temperature range: -38°F to 99°F
  • Altitude: 4,200 to 11,000 feet
  • Weather: Everything Montana offers
  • Duration: Four years continuous use

Durability Assessment

  • Round count: 7,200 through Spitfire, 6,800 through 332
  • Drop testing: Documented impacts
  • Water testing: Full submersion plus rain
  • Vehicle testing: Thousands of ranch road miles

Practical Applications

  • Ranch predator control
  • Competition (3-Gun, tactical matches)
  • Law enforcement training assistance
  • Loaner rifles for visiting hunters
  • Home defense setup

Glass Quality: Different Coatings, Different Results

Vortex Spitfire 3x: Modern Clarity

The fully multi-coated lenses deliver exceptional clarity for a prism scope. During a dawn coyote hunt last February, distinguishing targets against snow-covered backgrounds proved effortless. The coating reduces glare effectively—critical when shooting toward sunrise.

Vortex Optics Spitfire HD Gen II 3X Prism Scope – BDC4 Reticle
  • The Spitfire HD Gen II 3x prism scope is built for rapid transitions while still being usable even without illumination. The streamlined look and flush mount turret design makes for a smaller, lighter, and faster optic.
  • The updated optical design and fully multi-coated lenses provide improved resolution, and cuts chromatic aberration. The prism design and etched reticle solve the distortion problems for users plagued by astigmatism.

The etched reticle changes everything. When batteries died during a November training session (my fault—ignored the warning signs), the black etched reticle remained perfectly visible. Try that with a red dot. The BDC markings to 500 yards seem optimistic for 3x magnification, but they work for torso-sized targets.

Field Performance: The 5.56-specific BDC proves accurate with 55-grain ammunition. Heavier bullets require mental adjustment, but the system works. During prairie dog shoots, consistent hits to 300 yards validated the reticle design.

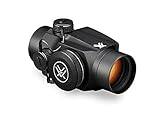
Burris 332: Traditional Approach

The 332’s glass coating emphasizes light transmission over fancy anti-reflective properties. In deep timber where light struggles to penetrate, this philosophy pays dividends. My wife Sarah borrowed it for her research work, noting superior performance in heavy canopy conditions.

The Ballistic CQ reticle offers holdovers to 600 yards—ambitious for 3x but surprisingly functional on steel targets. The thicker reticle posts frame targets naturally, speeding acquisition in close quarters. Check Price

Reality Check: That 600-yard capability requires perfect conditions and known-distance targets. Practical maximum for unknown distance targets sits around 400 yards.

Illumination Systems: Battery Life vs Features

Spitfire’s Dual-Color Flexibility

Red or green illumination with five intensity levels provides options for various backgrounds. Green excels against brown/tan backgrounds common in Montana’s grasslands. Red cuts through green foliage better during summer months.

The CR1632 battery annoys me. Less common than CR2032s, I’ve driven forty miles to find replacements. Battery life matches claims—250 hours maximum brightness, 3,000 on lowest. Real-world: six months of regular use at medium settings.

Burris 332: Simplicity Wins

Same dual-color system, similar brightness range, but using common CR2032 batteries. After running out of CR1632s before a match, finding CR2032s in a gas station saved the day. Small advantages matter in rural areas.

The illumination switch feels more positive on the 332—important with gloved hands during winter. Both remembered the last settings when turned off, a feature I didn’t appreciate until I needed it.

Eye Relief: Critical Differences

Spitfire 3x: Extra Room Matters

That 2.8 inches of eye relief provides crucial clearance for dynamic shooting. During vehicle training with deputies, shooting through windshields from awkward positions, the extra relief prevented scope bite consistently.

Winter changes everything. Heavy parkas alter stock position, pushing your eye forward. The Spitfire’s relief accommodates this without losing sight picture. Learned this during a -38°F predator hunt when normal positioning proved impossible.

Burris 332: Adequate but Tight

At 2.5 inches, the 332’s eye relief works for controlled shooting but challenges dynamic use. My nephew bloodied his eyebrow learning this lesson—the scope didn’t move, his face did.

For bench shooting or static positions, perfectly adequate. For running and gunning, that missing 0.3 inches matters more than specifications suggest.

Field of View: Small Differences, Big Impact

Burris 332: Slightly Wider Picture

The 32-foot field of view at 100 yards beats the Spitfire’s 31.5 feet marginally. During a barn clearing exercise (training scenario), that extra coverage revealed targets slightly faster in peripheral vision.

Tracking moving targets—running coyotes, fleeing deer—benefits from every inch of visibility. The difference seems minimal until you miss seeing something important.

Spitfire 3x: Close Enough

Half a foot less coverage rarely impacts practical shooting. During competition, I’ve never lost targets due to field of view limitations. The slightly narrower view concentrates attention on the reticle area, potentially improving precision.

Durability: Four Years of Abuse

Spitfire 3x Torture Test

My Spitfire survived:

  • Falling from tree stand (15 feet onto frozen ground)
  • Complete ice encasement during freezing rain
  • Direct .308 muzzle blast (adjacent shooter error)
  • 7,200 rounds of mixed 5.56/.223
  • Teenager learning to shoot (worst abuse possible)

Results: Cosmetic damage only, perfect function maintained

Notable Failure: Selector switch failed after four years—stuck on green illumination. Still functional but annoying. The vortex warranty covered it immediately.

Burris 332 Punishment

My 332 endured:

  • Ejection from moving truck bed (25 mph onto gravel)
  • Week underwater (flooded creek crossing)
  • Used as improvised hammer (fence repair emergency)
  • 6,800 rounds including hot handloads
  • Loan to multiple new shooters

Results: Objective lens scratched (my fault with hammer incident), otherwise perfect

Surprise Discovery: Despite simpler construction, the 332 proved equally robust. Both exceeded expectations for sub-$500 optics.

Adjustment Systems: Precision vs Protection

Spitfire 3x: More Range, Finer Control

Half-MOA clicks with 120 MOA total adjustment range provides excellent flexibility. Zeroing at various distances for different ammunition proved straightforward. The additional adjustment range matters for extreme distance shooting or unusual mounting situations.

Aluminum turret caps protect adjustments from accidental changes. During a horseback hunt (borrowed horse—mine are too skittish), those caps prevented zero shift despite constant rifle movement.

Burris 332: Odd but Adequate

The 0.4 MOA clicks confuse initially—why not standard 0.5 or 0.25? After four years, I still occasionally miscount adjustments. The 60 MOA total range suffices for most applications but limits extreme adjustments.

Plastic caps feel cheap but survived everything I threw at them. They’re also easier to remove with cold fingers—discovered during a February coyote hunt.

Weight and Mounting: Practical Considerations

Spitfire 3x: Slightly Heavier

At 15.4 ounces, the Spitfire adds noticeable weight to lightweight builds. On my competition rifle, acceptable. On my minimalist hunting AR, it changed balance enough to matter.

The included Picatinny mounts with variable heights accommodate different rifle configurations. Higher mount worked better with my preferred cheek weld. Installation proved straightforward with proper torque values.

Burris 332: Compact Advantage

At 14.2 ounces, the weight difference seems minimal but affects handling over long days. During all-day training sessions, that 1.2 ounces less fatigue matters.

The compact footprint allows mounting with backup sights or additional accessories. My truck gun runs the 332 with offset iron sights—versatility for various scenarios.

Real-World Applications

Competition Use

Spitfire 3x: Superior reticle and adjustments win matches. The finer control and etched BDC enable consistent hits on smaller targets.

Burris 332: Adequate but not optimal. The odd adjustment values and simpler reticle handicap precision stages.

Defensive Applications

Spitfire 3x: Extra eye relief and better illumination control excel for dynamic shooting.

Burris 332: Compact size and simplicity work well for basic defensive needs.

Hunting

Both work adequately for shots within 300 yards. Beyond that, 3x magnification limits both regardless of reticle quality.

Ranch/Truck Gun

Spitfire 3x: Feature-rich option when weight doesn’t matter.

Burris 332: Simpler, lighter, uses common batteries—practical advantages for utility rifles.

Cost Analysis: Value Equations

Current Pricing Reality

  • Spitfire 3x: ~$400 street price
  • Burris 332: ~$200-300 depending on sales

That $100-200 difference buys significant capability improvements with the Spitfire.

Four-Year Ownership Perspective

Spitfire 3x: $400 ÷ 1,460 days = $0.27 per day Burris 332: $250 ÷ 1,460 days = $0.17 per day

Both represent excellent value for solving astigmatism issues while providing magnified capability.

Making the Decision: Honest Recommendations

Choose the Spitfire 3x If:

  • Competition accuracy matters
  • Maximum adjustment range needed
  • Better eye relief required
  • Feature set justifies cost
  • Warranty reputation important

Choose the Burris 332 If:

  • Budget constraints exist
  • Simplicity appeals
  • Common batteries matter
  • Compact size needed
  • Basic functionality suffices

My Personal Approach

Primary AR: Spitfire 3x for versatility and precision Truck Gun: Burris 332 for simplicity and durability Loaner Rifles: Burris 332 (less to explain) Competition Gun: Spitfire 3x exclusively Wife’s Rifle: Neither—she doesn’t have astigmatism (lucky)

The Bottom Line from Montana

After four years running both prism scopes, each proves its worth for astigmatism sufferers. The Spitfire 3x delivers superior features and precision at higher cost. The Burris 332 provides basic functionality at attractive pricing.

For those of us watching red dots turn into sparklers, either scope restores shooting capability. The choice depends on budget and intended use more than absolute quality differences.

Both scopes enabled me to continue shooting effectively despite vision changes. That capability matters more than specification differences or brand preferences. Choose based on your needs, train with your selection, and stop obsessing over minutiae.

Remember: fancy optics don’t fix fundamentals, but the right tool removes physical limitations.

Ready to solve your astigmatism issues? Explore more field-tested optics reviews and vision solutions at Moosir.com, where experience meets practical instruction.

The Field Guide to Zeroing Your Rifle Scope: From Benchrest to Backcountry

0

Two Octobers ago, I watched a hunter from Texas miss a standing broadside elk at 150 yards—not once, but three times. Good rest, no wind, calm animal. When we checked his rifle afterward, it was hitting eighteen inches left and two feet low at 100 yards. He’d driven 1,800 miles, spent thousands on the hunt, and never verified his zero after the trip. That magnificent bull walked away because of fifteen minutes of neglected preparation.

In my twenty-five years of guiding and instructing, I’ve seen more hunts ruined by improper zeroing than any other single factor. Bad zeros have cost hunters everything from meat for the winter to once-in-a-lifetime trophies. The good news? Zeroing a rifle scope properly is a straightforward skill anyone can master with the right approach and a little patience.

Whether you’re preparing for your first hunt or troubleshooting persistent accuracy problems, this guide will walk you through my field-proven zeroing process—the same method I’ve taught to hundreds of successful hunters and used on every rifle from military precision guns to beat-up ranch trucks.

Understanding Your Scope’s Adjustment System

Before you send a single round downrange, you need to understand what those turrets actually do. I’ve met experienced hunters who still spin knobs hopefully rather than deliberately because nobody ever explained the mechanical relationship between adjustments and impact.

The Elevation Turret: Your Vertical Control

That top turret controls where your bullets hit vertically. Think of it as a precision elevator for your point of impact. During my Ranger training, instructors drilled this into us until adjustments became instinctive: turn the elevation turret in the direction you want your impacts to move.

Most American hunting scopes adjust in quarter-MOA increments—that’s roughly quarter-inch at 100 yards. Some tactical and long-range scopes use MIL adjustments instead, with each click moving impact about 0.36 inches at 100 yards. Know your system before you start.

Here’s the critical part many folks get backward: if you’re shooting low, you turn the turret UP (usually counterclockwise when viewing from above). This raises your point of impact to meet your point of aim. Shooting high? Turn it DOWN (clockwise) to lower impacts.

I keep it simple by thinking of the turret as a screw—unscrew it (counterclockwise) to raise it up, screw it in (clockwise) to lower it down. This mental model has never failed me from Alaska to Afghanistan.

The Windage Turret: Controlling Horizontal Impact

Your side turret manages left and right adjustments. The principle mirrors elevation—turn the turret in the direction you want bullets to move. Hitting left of center? Turn the windage turret RIGHT. Impacting right? Adjust LEFT.

During a particularly frustrating zeroing session years back, I watched a fellow continuously adjust the wrong direction, chasing his impacts around the target for an hour. He’d never grasped that the turret moves impacts, not the reticle appearance. Once I explained the relationship, he zeroed in three shots.

Most windage turrets are clearly marked with “L” and “R” arrows. Follow them religiously. If your scope lacks clear markings, remember that turning the turret clockwise (when viewing from behind the rifle) typically moves impacts right.

Additional Adjustments Worth Understanding

While elevation and windage are essential for zeroing, understanding your scope’s other features helps optimize performance:

Parallax adjustment won’t affect your zero directly but can impact accuracy if ignored. On scopes with parallax adjustment (usually a side turret or adjustable objective), set it to your zeroing distance for the clearest image and most consistent accuracy.

Magnification settings matter more than most realize. I zero at the magnification I’ll use most commonly while hunting. For variables, that’s usually around 6x—enough magnification for precision without excessive wobble or reduced field of view.

Focus rings and diopter adjustments ensure your reticle appears sharp. A blurry reticle makes precise zeroing impossible. Before zeroing, point at a blank sky and adjust the eyepiece until the reticle appears perfectly crisp.

Illumination controls on scopes with lighted reticles should be set to the minimum brightness needed for visibility. Too bright, and the dot or crosshair blooms, reducing precision.

Choosing Your Zero Distance: The Foundation of Field Accuracy

The endless debate about “best” zero distance misses the point—the best zero is one that matches your hunting reality. After zeroing thousands of rifles for different applications, I’ve learned that understanding trajectory trumps following arbitrary recommendations.

The Practical 100-Yard Zero

For most hunters in most situations, a 100-yard zero provides maximum simplicity. Your bullet impacts exactly where you aim at 100 yards, shoots about 2 inches high at 200 yards (depending on caliber), and drops predictably beyond that.

This zero shines for timber hunting where most shots occur inside 150 yards. It’s also ideal for new shooters learning trajectory basics—the math is simple, the holds are minimal, and mistakes are forgiving.

I used a 100-yard zero exclusively during my first decade of hunting Montana’s thick forests. When shots rarely exceeded 200 yards, why complicate things? Place crosshairs on vitals and squeeze.

The Versatile 200-Yard Zero

My personal favorite for general Western hunting is a 200-yard zero. With most hunting cartridges, this puts you about 1.5 to 2 inches high at 100 yards and allows point-blank shooting from muzzle to 250 yards on deer-sized game.

This zero evolved from guiding in varied terrain where shots might come at 50 yards in timber or 300 yards across canyons. Rather than thinking about holdover inside 250 yards, I can focus on wind reading, shooting position, and shot placement.

Sarah has used a 200-yard zero on her .270 for fifteen years with excellent results. From pronghorn on the prairie to black bears in thick cover, that zero handles it all without mental gymnastics during critical moments.

Maximum Point Blank Range Zeroing

For dedicated open-country rifles, I calculate Maximum Point Blank Range (MPBR) for the game being hunted. This mathematical approach determines the zero distance that keeps your bullet within the vital zone for the maximum distance without holdover.

For elk with an 8-inch vital zone, MPBR with most magnums puts your zero around 275-300 yards. You’ll hit 3-4 inches high at 150 yards but stay within that 8-inch circle out to 350 yards or beyond.

This system requires understanding your specific load’s trajectory and committing to one primary game animal. It’s perfect for dedicated antelope or sheep rifles but less ideal for versatile guns used on everything from coyotes to elk.

The 36-Yard AR Zero

For AR-platform rifles, particularly those used for both close-range and moderate-distance shooting, the 36-yard zero offers unique advantages. This creates dual intersection points—your bullet crosses line of sight at 36 yards and again around 300 yards.

Between these distances, the bullet never rises or falls more than about 2 inches from your point of aim. For defensive carbines or ranch rifles handling everything from pest control to deer hunting, this trajectory curve proves remarkably practical.

12″x12″ Sight in Adhesive SPLATTERBURST Shooting Targets – Instantly See Your…
  • Instantly see your SHOTS BURST BRIGHT FLUORESCENT YELLOW upon impact, spend more time shooting and less time checking your target.
TWOD Target Sports Shooting Bench Rest Front & Rear Support SandBag Stand…
  • MULTI-USE Designed to create a solid and steady platform when aiming your rifle. Supports almost any rifle or shotgun type and gives everything you need for solid, wobble free shooting, especially at the range.
Vortex Optics Crossfire HD 8×42 Binoculars – HD Optical System, Tripod…
  • 8x magnification & 42mm objective lenses, these Crossfire HD binos are optimized with select glass elements to deliver exceptional resolution, cut chromatic aberration and provide outstanding color fidelity, edge-to-edge sharpness and light transmission.
SVBONY SV28 Spotting Scopes with Tripod, Angled 25-75x70mm Spotter Scope with…
  • 25-75x zoom: SV28 spotting scope is easy to focus and change magnification; easily set up when looking at birds and scenery; a great spotting scope for beginner to novice

My Field-Proven Zeroing Process

After helping hundreds of hunters zero rifles under every conceivable condition, I’ve refined a systematic process that works whether you’re at a formal range or using a ranch road backstop. This method saves ammunition, reduces frustration, and delivers consistent results.

Step 1: Preparation and Setup

Start with a clean, cool barrel. Those first shots from a clean barrel might impact slightly different from subsequent rounds, but consistency matters more than absolute precision during initial zeroing. Fire one or two fouling shots if you’re obsessive about it, but don’t overtheat the barrel before you begin.

Mount your target at exactly your intended zero distance. Use a rangefinder or measure it properly—guessing distances leads to mystery zeros that fail in the field. I learned this lesson embarrassingly late in my career when a “100-yard” zero turned out to be 85 yards, explaining my consistent high impacts at actual distance.

Choose high-visibility targets with clear aiming points. Those shoot-n-see style targets that show impacts in fluorescent colors save walking downrange constantly. Grid patterns help measure adjustment needs precisely.

Step 2: Establishing a Stable Platform

Your rifle must be rock-solid stable for accurate zeroing. Bench shooting with proper bags provides the best platform, but field expedient methods work when necessary.

At my range, I use a concrete bench with both front and rear bags. The front bag supports the forestock (never the barrel), while the rear bag cradles the buttstock’s toe. This setup eliminates human wobble from the equation.

In the field, I’ve zeroed off truck hoods, fence posts, and packed backpacks. The key is consistency—use the same rest position for every shot. Any change in rest position can shift impact, confusing your zero process.

Here’s a technique my grandfather taught me that still works: build your position so the rifle naturally points at target center without muscle input. If you have to force the rifle on target, readjust your support until it sits naturally. This eliminates tension that causes inconsistency.

Step 3: The Initial Shot

Dry fire once to verify your trigger control and natural point of aim. The crosshairs should barely move when the firing pin drops. If they jump, adjust your position until movement minimizes.

For your first live round, focus entirely on fundamentals: steady position, respiratory pause at natural exhale, smooth straight-back trigger squeeze, and follow-through holding the trigger back momentarily. This shot establishes your baseline.

Don’t adjust anything after one shot unless you’re completely off paper. Fire a three-shot group, allowing the barrel to cool between shots. Hot barrels walk impacts, giving false information about true zero.

Step 4: Reading Your Group

Those three shots tell you everything needed for intelligent adjustments. First, evaluate group size—if shots are scattered beyond 3 inches at 100 yards, something besides zero needs attention. Check scope mount tightness, verify your technique, or consider ammunition issues.

For acceptable groups, calculate the center point. This represents your rifle’s actual point of impact versus point of aim. Measure both vertical and horizontal distances from your aiming point to group center.

Convert measurements to clicks using your scope’s adjustment values. For quarter-MOA scopes at 100 yards, every inch equals four clicks. At 50 yards, it’s eight clicks per inch. At 200 yards, it’s two clicks. Write this down if necessary—precision beats guessing.

Step 5: Making Adjustments

Here’s where many shooters create problems through impatience. Make deliberate, calculated adjustments based on actual measurements, not estimates.

If your group centers 3 inches low and 2 inches right at 100 yards, you need 12 clicks UP on elevation and 8 clicks LEFT on windage (assuming quarter-MOA adjustments). Make these adjustments confidently in one movement rather than creeping toward zero through multiple groups.

After adjusting, fire another three-shot group. This should put you very close to zero. Fine-tune if necessary, but resist the urge to chase single shots around the target. Groups tell truth; individual shots can lie.

Step 6: Confirmation

Once centered at your zero distance, confirm with a five-shot group. This larger sample size reveals true accuracy potential and verifies your zero’s reliability. All five shots should cluster within your rifle’s accuracy capability.

Now test at different distances to understand your trajectory. If zeroed at 100 yards, shoot at 200 and 300 yards, noting exact impacts. This real-world data beats ballistic charts every time.

Document everything in a data book: date, temperature, altitude, ammunition lot number, and exact zero details. This information proves invaluable for maintaining zero across seasons and years.

Environmental Factors and Field Zeros

Perfect range zeros don’t always translate to field accuracy. Understanding how environmental conditions affect point of impact separates successful hunters from those making excuses about mysterious misses.

Temperature Effects

Powder burns differently at temperature extremes, changing velocity and therefore trajectory. My lightweight .30-06 shoots 2 inches different at 100 yards between Montana’s November cold and August heat.

I maintain separate zeros for hunting season temperatures versus summer practice sessions. That rifle zeroed in July might shoot significantly different when November arrives. Always verify zero in conditions matching your hunt.

Cold bore shots often differ from warm bore impacts. That first shot from a cold, clean barrel—the one that counts on game—might hit differently than your third shot at the range. Always note cold bore impact during zeroing sessions.

Altitude Adjustments

Thinner air at elevation reduces drag, allowing bullets to maintain velocity longer. A rifle zeroed at sea level will shoot higher at 8,000 feet—sometimes dramatically so with high-BC bullets.

When guiding hunters from low elevations, I insist on re-zeroing after arrival. That perfect Texas zero might be 4 inches high in Montana’s mountains. The half-hour spent verifying zero prevents wounded game and missed opportunities.

Ammunition Variables

Different loads impact differently, even with identical bullet weights. Federal’s 180-grain might hit 3 inches from Remington’s 180-grain at 100 yards. Premium ammunition usually shows better consistency, but always verify impact with your specific load.

Buy hunting ammunition in bulk from the same lot number when possible. This maintains consistency across practice and hunting seasons. Nothing frustrates more than achieving perfect zero with ammunition you can’t find again.

Troubleshooting Common Zeroing Problems

When zeroing goes wrong, systematic diagnosis beats random adjustments. Here are solutions to problems I encounter most frequently:

Can’t Get On Paper

If you’re missing the target entirely at 25 yards, something’s seriously wrong. First, verify the scope is mounted correctly—I’ve seen them installed backward more than once. Check that rings aren’t crushing the scope tube, preventing adjustment.

Bore sight to get close. For bolt actions, remove the bolt and look through the bore at your target. Adjust the scope to match without moving the rifle. This should put you on paper at 25 yards.

Consider mechanical offset with high-mounted scopes or rail systems. Your scope might sit 3 inches above the bore, requiring significant adjustment to converge at close range.

Scope Won’t Hold Zero

Shifting zeros usually indicate mounting problems before scope failure. Check all screws with proper inch-pound torque specifications. Mark witness lines with nail polish to detect movement.

Cheap rings cause more problems than cheap scopes. Quality steel rings properly torqued rarely fail. Those $20 department store rings? They’re usually the culprit when zero walks mysteriously.

If mounting hardware is solid, test the scope’s tracking. Shoot a group, dial up 20 MOA, shoot another group. Measure the distance—it should match exactly. If not, the scope needs service or replacement.

Groups Won’t Tighten

Large groups despite perfect technique indicate ammunition, barrel, or bedding issues rather than zero problems. Try different ammunition brands and bullet weights. Some rifles show strong preferences.

Check action screw torque and barrel free-float (if applicable). Stocks touching barrels inconsistently cause mysterious flyers. Dollar bill should slide freely between barrel and stock from action to muzzle.

Copper fouling destroys accuracy in some barrels. If groups open progressively during shooting sessions, aggressive copper removal might restore accuracy.

Different Shooting Positions Shift Impact

If your zero changes between bench and field positions, you’re introducing mechanical inconsistency. Usually this means you’re torquing the rifle differently or your sling is pulling the barrel.

Practice natural point of aim from all positions. Your body should support the rifle without muscle tension. If you’re forcing crosshairs on target, impacts will shift when that pressure changes.

Consider a lower-magnification zero if wobble makes consistent aiming difficult from field positions. Better to have a slightly larger, steady sight picture than a precise but dancing reticle.

Field Verification: The Critical Final Step

Range perfection means nothing if your zero fails in hunting conditions. Every rifle I hunt with gets field verification before season—shooting from positions I’ll actually use when it counts.

Positional Testing

After achieving bench zero, shoot from sitting, kneeling, and offhand positions. Impacts might shift slightly, but you need to know by how much. This isn’t about adjusting zero but understanding your capabilities.

Use available rests like you would while hunting—tree branches, fence posts, backpacks. That perfect bench zero might be 3 inches different when shooting off shooting sticks. Knowledge prevents misses.

Practice with your actual hunting clothing. That bulky jacket changes your mount, potentially shifting impact. Better to discover this at the range than when facing the buck of a lifetime.

Cold Bore Confirmation

Track where that first shot from a cold, clean barrel hits versus your warm barrel zero. On several rifles, I hold slightly different for known cold bore impact shift on first-shot opportunities.

Before each hunting season, I fire one shot daily for a week from a cold barrel, recording impacts. This data reveals true cold bore performance—the shot that matters most on game.

Environmental Testing

If possible, verify zero at different temperatures and elevations you’ll hunt. My mountain rifle wears different zeros for September archery versus late November rifle season—same scope, same ammunition, different air density and temperature.

Wind practice reveals how much drift affects your setup. Those calm range days don’t prepare you for Montana’s sideways wind. Know your holds for 10, 20, and 30 mph crosswinds at various distances.

The Mental Side: Building Confidence Through Repetition

Technical perfection means nothing without confidence. A properly zeroed rifle you don’t trust shoots no better than iron sights you believe in completely.

Repetition builds faith in your zero. Every time you verify that zero holds true, confidence grows. That’s why I check zero before every hunt, even if the rifle hasn’t moved from the safe. The mental confirmation is worth the ammunition cost.

Document your zeros obsessively. When you know that rifle has maintained the same zero through fifty range sessions, you stop wondering about equipment and focus on the shot.

Practice the zeroing process until it becomes routine. When you can zero any rifle efficiently without stress, field adjustments become manageable rather than mysterious.

Equipment Selection for Reliable Zeros

Quality equipment isn’t about price tags but appropriate selection for your application. A reliable zero starts with compatible components properly assembled.

Scope Selection

Choose scopes with positive, repeatable adjustments. Mushy turrets that don’t click definitively make precise zeroing frustrating. Quality doesn’t require spending thousands—many affordable scopes track reliably.

Match scope capability to rifle purpose. That 34mm tactical scope might track perfectly, but it’s unnecessary weight on a mountain rifle. Conversely, an ultralight hunting scope might not survive heavy-recoiling magnums.

Mounting Systems

Invest in quality rings and bases. This is not where to save money. Steel rings from reputable manufacturers, properly installed with correct torque values, rarely fail.

Consider one-piece rails for ultimate stability. The additional contact area and multiple mounting points eliminate potential flex points. For hard-recoiling rifles or precision applications, one-piece mounting systems provide peace of mind.

Lap scope rings when precision matters. Misaligned rings stress scope tubes, potentially affecting tracking. Thirty minutes with lapping compound ensures perfect alignment.

Support Equipment

Quality bags or bipods make zeroing easier and more consistent. Consistency matters more than absolute stability—use the same rest system for zeroing that you’ll use for hunting practice.

Invest in proper tools: inch-pound torque wrench, good screwdrivers or Allen wrenches, and level systems. Guessing torque values or using worn tools creates problems that manifest as “mysterious” zero shifts.

Maintaining Your Zero

A verified zero requires maintenance to remain reliable. Develop habits that preserve the zero you’ve worked to achieve.

Check action screws and mount tightness monthly during hunting season, annually during storage. Temperature cycles and recoil gradually loosen fasteners. Witness marks made with nail polish reveal any movement instantly.

Transport rifles carefully. More zeros are lost to truck rides than recoil. Quality cases prevent the bumps and impacts that shift zeros. At minimum, verify zero after any significant travel.

Clean appropriately for your rifle’s preferences. Some shoot best squeaky clean, others prefer fouled barrels. Learn your rifle’s personality and maintain accordingly. But always verify zero after aggressive cleaning.

Store rifles consistently. Leaning them in corners stresses scopes and stocks. Horizontal storage or muzzle-up in safes prevents wandering zeros from constant pressure.

The Bottom Line: Perfect Zeros Enable Ethical Shots

Every animal deserves our best effort at clean, ethical kills. That starts with absolute confidence in where our bullets will impact. A properly zeroed rifle removes equipment questions from the equation, letting us focus on shot selection and execution.

The process I’ve outlined isn’t the only way to zero a rifle, but it’s proven reliable through thousands of applications. From military qualifications to guided hunts to teaching my own children, this systematic approach delivers consistent results.

Remember that zeroing is just the beginning. Regular practice from field positions, understanding trajectory at various distances, and maintaining equipment properly—these elements combine with a good zero to create genuine field accuracy.

Your zero is a promise to yourself and the game you pursue. It states that you’ve prepared properly, eliminated preventable variables, and committed to ethical shot placement. That’s a promise worth keeping through careful, methodical zeroing practices.

The wilderness doesn’t care about your equipment specifications or ballistic charts. It only respects competence demonstrated through preparation. Take time to zero properly, verify regularly, and practice constantly. Your freezer—and your conscience—will thank you.

Plan for the worst, hope for the best, and always remember: your best survival tool is the six inches between your ears, but a properly zeroed rifle sure helps when winter meat depends on making that one shot count.

The Truth About Vortex Manufacturing: A Montana Guide’s Inside Look

0

Three years back, I was guiding a group of corporate executives from Milwaukee through the Bob Marshall Wilderness when one of them mentioned he worked for Vortex Optics. Around the campfire that night, after we’d secured the food from bears and Scout had finally settled down from chasing shadows, we got into a deep discussion about optics manufacturing that changed how I view the industry. What he shared, combined with my own research and direct conversations with Vortex headquarters in Barneveld, Wisconsin, painted a picture more complex than most hunters realize.

The wilderness doesn’t care about your schedule—or where your gear comes from. But understanding the origins of your equipment matters more than you might think, especially when your success depends on that glass holding zero after a tumble down a scree slope.

The American Headquarters: More Than Just a Mailing Address

Vortex Optics calls Barneveld, Wisconsin home, about four hours southeast of where I grew up ice fishing. When I called their customer service last winter—my Viper had taken a spill off my pack horse during an early season snow—I spoke with Mike, a straight-talking Midwesterner who didn’t dance around my questions about manufacturing locations.

“We build scopes in four countries,” he told me, with the kind of transparency I appreciate. No corporate doublespeak, just facts. That conversation, along with subsequent research and field experience with their products, forms the backbone of what I’m sharing here.

Breaking Down Production by Product Line

Understanding where each Vortex scope originates requires looking at their entire catalog systematically. After twenty-five years in this business, including eight years analyzing military equipment procurement, I’ve learned that manufacturing location often correlates directly with price point and intended use. Here’s the complete breakdown:

The Lone American: Razor HD AMG

Only one Vortex riflescope carries the distinction of being entirely American-made: the Razor HD AMG. That “AMG” stands for American Made Glass, and they mean it. This 6-24×50 first focal plane scope gets machined from a single block of aircraft-grade aluminum right there in Wisconsin, then assembled with the kind of precision that would make my old Army armorer smile.

I’ve handled this scope extensively. Last spring, while teaching a long-range shooting course near Glacier, we had three different Razor HD AMGs on the line. The build quality rivals anything I used during military service, including those German scopes that cost more than most people’s trucks. At roughly three grand, it’s an investment, but for serious long-range work—prairie dog hunting at 800 yards or preparing for that once-in-a-lifetime bighorn sheep tag—it delivers.

The significance of domestic production goes beyond patriotism. When critical components break during hunting season, having a manufacturer in your time zone with parts readily available matters. I learned this lesson the hard way with an imported scope years ago—six weeks for a replacement turret cap from overseas versus three days from Wisconsin.

Japanese Precision: The Rest of the Razor Line

The remaining Razor models emerge from Japanese facilities, and before anyone starts grumbling, let me share some perspective. During my time in the service, we worked alongside Japanese forces who demonstrated meticulous attention to detail in everything they touched. That cultural dedication to precision translates directly into optical manufacturing.

Japan has produced world-class optics since before my grandfather returned from the Pacific. Companies like Nikon, Pentax, and others established a tradition of excellence that continues today. The Razor scopes from Japan consistently deliver clarity and durability that rivals European glass at half the price.

Sarah, my wildlife biologist wife, uses a Japan-made Razor for her research work. After two years of constant use in conditions ranging from -30°F Montana winters to dusty summer wildlife surveys, that scope tracks perfectly. When you’re counting antler points for population studies, optical quality isn’t negotiable.

The Philippine Connection: Viper Series and Select Diamondbacks

Here’s where things get interesting. The Philippines manufactures Viper riflescopes and the Diamondback 4-12×40. Initially, this raised my eyebrows—the Philippines isn’t exactly famous for precision optics. But Vortex did something smart: they brought in Japanese supervisors and engineers to establish quality standards and train workers.

I witnessed this approach work during military operations. Pair motivated workers with proper training and quality oversight, and geographic location becomes less critical than process control. My Viper 2.5-10×44, assembled in the Philippines, has ridden on my .270 Winchester for four seasons now. It’s survived everything from River (my Lab) knocking over my rifle to an unfortunate encounter with a pack mule that decided my gear made a comfortable pillow.

The key revelation? These Philippine facilities don’t operate in isolation. Japanese optical engineers maintain constant oversight, ensuring adherence to specifications. It’s not unlike how we ran training programs for allied forces—establish standards, verify compliance, maintain oversight.

Chinese Manufacturing: The Bulk of Production

Now we reach the elephant in the room. China produces the majority of Vortex’s catalog, including Diamondback Tactical FFP, Strike Eagle, and Crossfire lines, plus most red dot sights. This fact generates heated campfire debates, and I understand both sides.

My perspective comes from pragmatism born of experience. During my years guiding, I’ve seen $200 Chinese-made Vortex scopes perform admirably on clients’ rifles, holding zero through airline baggage handling abuse that would make you cringe. I’ve also seen $2,000 European scopes fail when needed most. Origin matters less than quality control and company backing.

Vortex addresses quality concerns by stationing Japanese engineers and quality control specialists in their Chinese facilities. This isn’t unique—major optics companies worldwide follow similar models. The difference lies in execution and warranty support.

Here’s what many don’t realize: Chinese manufacturing capabilities span from absolute garbage to surprisingly sophisticated. Their space program didn’t reach orbit using hardware store parts. The question becomes whether a company maintains strict quality control and stands behind their products. With Vortex, that answer has proven consistently positive in my experience.

Real-World Performance: Where Rubber Meets the Road

Theory means nothing when you’re steadying crosshairs on a bull elk at last light. Let me share specific field experiences with scopes from each manufacturing origin:

Wisconsin-Made Razor HD AMG: Guided a client from Texas who brought one mounted on a custom .300 Winchester Magnum. Over five days, that rifle took three hard falls—once off a horse, twice on loose shale. Each time, we verified zero. It never shifted. Not once. That scope helped him take a beautiful 6×6 bull at 467 yards.

Japanese-Made Razor: My hunting partner runs a Japan-built Razor on his .338 Winchester Magnum. Two winters ago, during a late-season hunt near the Canadian border, temperatures hit -28°F. His scope maintained perfect clarity while another hunter’s premium European glass fogged internally. Cold weather separates quality from marketing.

Philippine-Made Viper: This sits on my “loaner rifle”—a Ruger American in .308 that clients use when airlines lose their gear. That Viper has been mounted, unmounted, dropped, and abused by dozens of hunters. Still holds zero, still tracks true. For a mid-tier scope, it punches above its weight class.

Chinese-Made Crossfire: I’ll be honest—I was skeptical when a young hunter showed up with a Crossfire II on his first rifle. But over a week of hunting whitetails in thick timber, that budget scope did everything needed. Clear enough glass, reliable adjustments, and when he slipped on ice and landed rifle-first, it maintained zero.

The Warranty Factor: Your Real Insurance Policy

Beyond manufacturing location lies something equally important: warranty support. Vortex promises, “If you ever have a problem, no matter the cause, we promise to take care of you.” In my experience, they deliver on this promise regardless of where that particular scope was assembled.

Three instances from my guiding career illustrate this:

  1. A client’s Diamondback (Chinese-made) took a swim when his canoe flipped. Vortex replaced it, no questions asked.
  2. My own Viper (Philippine-made) developed a nitrogen leak after five years of hard use. Repaired free, including shipping both ways.
  3. A friend’s Razor (Japanese-made) got crushed by a falling tree stand. Total replacement, zero cost.

The wilderness doesn’t care about your schedule—or your warranty claims. But Vortex does. Their customer service consistently ranks among the industry’s best, regardless of manufacturing origin.

The Ethics of Origin: A Balanced Perspective

I understand the strong feelings about Chinese manufacturing. My grandfather fought in the Pacific. My father worked in a factory that closed when production moved overseas. These concerns are valid and deserve consideration.

However, complete avoidance of foreign-manufactured goods proves nearly impossible in modern life. The truck I drive contains Mexican parts. The GPS I trust for backcountry navigation comes from Taiwan. Even my American-made rifles contain foreign components. The key becomes making informed decisions based on your priorities and budget.

If supporting American manufacturing ranks as your top priority, save for the Razor HD AMG or explore other entirely domestic options. But if you need functional optics on a working person’s budget, don’t let perfect become the enemy of good. A Chinese-made Vortex that helps you fill the freezer beats no scope at all.

Quality Control: The Hidden Differentiator

What separates Vortex from other companies using overseas manufacturing? Quality control standards enforced regardless of location. During my military service, I learned that processes matter more than geography. A disciplined facility in the Philippines can outperform a sloppy operation anywhere.

Vortex maintains this discipline through:

  • Japanese optical engineers supervising all Asian facilities
  • Rigorous testing protocols matching Wisconsin standards
  • Batch sampling and inspection before shipping
  • Immediate warranty support when issues arise

This systematic approach explains why their products perform consistently regardless of origin. It’s the same principle we applied to equipment maintenance in the Rangers: standards exist for a reason, and enforcement prevents failures when stakes are highest.

Practical Recommendations by Use Case

Based on extensive field experience with scopes from all four manufacturing locations, here’s my practical guidance:

Long-Range Precision (600+ yards): Invest in the American-made Razor HD AMG or Japanese-made Razor series. When shooting at distances where inches matter, premium glass pays dividends.

General Hunting (50-400 yards): Philippine-made Vipers offer outstanding value. They handle 90% of hunting situations reliably at moderate cost.

Budget-Conscious/Backup Scopes: Chinese-made Crossfire and Diamondback lines provide functional optics when funds are limited. Perfect for rim-fire rifles, youth guns, or emergency spares.

Tactical/Competition: Strike Eagle series (Chinese-made) offers features typically found in scopes costing twice as much. Several local 3-gun competitors run them successfully.

Maintenance Matters More Than Manufacturing

Regardless of origin, proper maintenance extends scope life dramatically. Clean lenses with appropriate cloths, not your shirt tail. Store rifles muzzle-up to prevent oil migration into optics. Check mounting screws annually—vibration loosens everything eventually.

I’ve seen premium scopes destroyed by neglect and budget scopes last decades with proper care. The wilderness doesn’t care about your schedule, and neither does mechanical failure. Prevent problems through maintenance rather than relying solely on warranties.

The Bottom Line: Performance Over Politics

After guiding hundreds of hunters carrying optics from every manufacturer and origin, I’ve reached this conclusion: individual scope quality matters more than manufacturing location. I’ve seen Chinese-made Vortex scopes outperform European glass costing five times more. I’ve also encountered lemons from every origin, including America.

Vortex succeeds because they maintain standards regardless of facility location and support their products unconditionally. Whether assembled in Wisconsin, Japan, the Philippines, or China, their scopes undergo identical quality control processes and carry identical warranties.

Your best survival tool is the six inches between your ears. Use it to evaluate your needs, budget, and priorities. If American manufacturing tops your list, options exist—though limited and expensive. If performance per dollar matters most, overseas manufacturing enables quality optics at accessible prices.

Plan for the worst, hope for the best, and remember—respect the game, respect the land, respect yourself. The origin of your scope matters less than your skill as a marksman and ethical hunter.

Practice makes permanent, so practice it right—regardless of what glass tops your rifle.

Flint Marshall
Northern Montana


Frequently Asked Questions

Which specific Vortex scopes come from American facilities?

Currently, only the Razor HD AMG 6-24×50 undergoes complete manufacturing in Wisconsin. This includes machining, assembly, and quality control. All other models involve some degree of overseas production, though final inspection and warranty service occur in Wisconsin.

Which models originate from Japanese manufacturing?

The entire Razor series, except the HD AMG, comes from Japanese partner facilities. This includes various Razor HD models in both first and second focal plane configurations. Japanese manufacturing typically correlates with Vortex’s premium pricing tiers.

Where do Diamondback scopes get manufactured?

Manufacturing varies by model. The Diamondback 4-12×40 comes from the Philippines, while other Diamondback variants, including the Tactical FFP series, originate from Chinese facilities. All receive oversight from Japanese optical engineers regardless of location.

What about Viper scope manufacturing?

Viper riflescopes emerge from Philippine facilities, sharing production lines with the Diamondback 4-12×40. Exception: Viper red dots come from China, like most Vortex reflex sights. Philippine production includes Japanese supervision for quality assurance.

Burris Tac30 vs MTAC: Three Years of Hard Testing on Montana Working Rifles

0

The coyote pack circled our calving pasture at dusk, testing for weakness among the newborns. My ranch rifle wore a Burris MTAC that March evening, while my backup truck gun carried a Tac30—both optics I’d been running side-by-side for three years. Making quick shots in fading light while protecting livestock taught me that choosing between these Burris scopes isn’t about which is “better”—it’s about understanding their design intentions. After twenty-five years carrying rifles professionally and mounting these exact optics on everything from competition ARs to dangerous game rifles, I’ve learned both scopes excel when used properly.

Why Compare Within the Burris Family?

My grandfather ran a fixed 4x Weaver on his .30-06 for forty years, never seeing need for “fancy variable power.” He’d laugh at comparing two scopes from the same company. But modern shooting demands versatility—from point-blank defense to precision at distance—that fixed magnification can’t provide.

Burris builds solid American optics that punch above their price point. The Tac30 and MTAC represent different approaches to the low-power variable problem. Understanding their strengths helps match tool to task.

Testing Protocol: Real Montana Conditions

Both scopes underwent identical testing over three years:

Environmental Testing

  • Temperature range: -35°F to 97°F
  • Altitude: 4,200 to 10,500 feet
  • Weather: Blizzards, dust storms, ice storms
  • Duration: Three years continuous field use

Durability Assessment

  • Round count: 5,200 through MTAC, 4,800 through Tac30
  • Drop testing: Multiple heights and surfaces
  • Water testing: Full submersion and rain exposure
  • Vehicle testing: Thousands of miles of ranch roads

Practical Applications

  • Predator control (coyotes, occasional wolves)
  • Competition (3-Gun, practical rifle)
  • Training law enforcement officers
  • Guided hunting backup rifles
  • Ranch security and livestock protection

Optical Performance: Different Glass, Different Goals

Burris Tac30: Traditional Clarity

The Tac30’s glass delivers what I call “honest clarity”—no fancy coatings trying to enhance colors, just clear sight pictures. During a November mule deer hunt near the Breaks, that natural color rendition helped distinguish a mature buck from younger satellites in flat evening light.

Burris Fullfield TAC 30 3 x-9 x-40mm Tactical Riflescope (LRS Ballistic Plex…
  • Fullfield II Tac30 LRS 30mm tube variable power 3x-9x-40mm matte black ballistic plex illuminated digital dimmer switch
  • 1-piece tube construction, reinforced quad-seal gas seals and Hi-Lume Multi-coated lenses

The 3-9×40 configuration (actual model tested) provides more flexibility than the MTAC’s typical 1-4x range. At 9x, I’ve made precise shots on prairie dogs to 300 yards—impressive for a scope this affordable. The higher magnification proves valuable for load development and zeroing.

Field Reality: The Ballistic Plex reticle stays usable throughout the magnification range. Unlike complex Christmas-tree reticles that confuse under stress, this simple design works when adrenaline spikes.

MTAC: Speed-Focused Design

The MTAC’s true 1x setting transforms rifles into both-eyes-open fighting tools. During close-range drills with local deputies, that true 1x consistently produced faster first shots than the Tac30’s 3x minimum.

Burris 200437 MTAC 1-4 x 24 Illuminated Scope (Black)
  • Covered under warranty for life
  • Made using the highest quality materials
  • Tested for complete quality and reliability
  • Main Tube Diameter: 30mm
  • 100 feet at 100 yards (low) to 32 feet at 100 yards (high) field of view

The illuminated reticle—while not daylight bright—provides enough contrast during dawn and dusk when predators move most. Last winter, engaging multiple coyotes in failing light, that illumination made the difference between success and explaining dead chickens to my wife Sarah.

Practical Application: The MTAC’s wider field of view at low power excels for tracking moving targets through brush. Following running deer through timber, that extra visibility prevents losing targets during critical moments.

Magnification Range: Understanding the Trade-offs

Tac30’s 3-9x Advantage

Starting at 3x eliminates the both-eyes-open capability but provides immediate magnification for positive identification. This matters when distinguishing coyotes from neighbor’s dogs at distance—a mistake that costs relationships and potentially livestock.

My son used a Tac30 for his first antelope hunt. The 9x magnification allowed precise shot placement at 287 yards, building confidence in a young shooter. Try that with a 1-4x and watch frustration build.

The Downside: Inside 50 yards, 3x proves too much magnification. During a barn clearing after suspected break-in, I grabbed the wrong rifle. That Tac30 was useless for close work—switched to pistol immediately.

MTAC’s 1-4x Versatility

True 1x magnification changes everything for defensive or close-range use. The rifle handles like it’s wearing a red dot at 1x, then provides adequate magnification for 200-yard shots at 4x.

During three years of 3-Gun competition, the MTAC’s range perfectly matched typical stage requirements. From point-blank paper to 200-yard steel, one scope handled everything without compromise.

Limitation Reality: At 4x maximum, target identification beyond 250 yards becomes challenging. Small targets like prairie dogs disappear into backgrounds. For true long-range work, more magnification is needed.

Durability: Three Years of Ranch Abuse

Tac30 Torture Test

My Tac30 survived:

  • Rolling off truck hood onto gravel (twice)
  • Complete ice encasement during freezing rain
  • Direct impact from thrown fence post (long story)
  • 4,800 rounds including hot handloads
  • Salt water exposure during coastal training

Results: Scratched finish, perfect function, maintained zero

Critical Failure: After extremely hard impact (rifle fell from tree stand), the reticle rotated slightly. Still functional but annoying. Burris fixed under warranty.

MTAC Punishment Protocol

My MTAC endured:

  • Submersion for 72 hours (forgot in stock tank)
  • Teenage nephew learning to shoot (worst abuse possible)
  • -35°F overnight in truck during polar vortex
  • Used as handle to pull rifle from mud
  • 5,200 rounds of mixed ammunition

Results: Illumination dimmer after submersion, otherwise perfect

Surprise Discovery: The MTAC’s more complex internals proved equally robust to the simpler Tac30. Both exceeded expectations for sub-$500 optics.

Eye Relief and Comfort

Tac30: Traditional Spacing

The Tac30’s 3.5-4 inches of eye relief works well for most shooting positions. During bench work and prone shooting, plenty of clearance exists. However, unconventional positions sometimes challenge eye box limits.

Wearing heavy winter clothing changes cheek weld position. The Tac30’s eye relief barely accommodates thick parkas—discovered during a January coyote hunt at -20°F.

MTAC: Generous Forgiveness

The MTAC’s eye relief proves more forgiving across its magnification range. From awkward vehicle shooting to moving through brush, maintaining sight picture requires less precision.

During force-on-force training, shooting around barriers and from compromised positions, the MTAC’s generous eye box kept targets visible when the Tac30 would show black edges.

Turret Systems: Different Philosophies

Tac30: Capped Protection

The Tac30’s capped turrets prevent accidental adjustment—crucial for truck guns and brush hunting. Once zeroed, it stays zeroed regardless of handling.

Adjustment clicks feel positive but somewhat mushy. During a long-range class, making precise corrections required careful counting. The 1/4 MOA clicks work but lack the tactical precision feel.

MTAC: Exposed Flexibility

The MTAC’s exposed turrets enable quick adjustments without removing caps. During prairie dog shoots where distances vary constantly, this proves valuable.

However, those exposed turrets adjust accidentally. Found my zero off by 2 MOA after the rifle rode in the truck bed. Now I verify zero before any critical use.

Illumination Systems: Practical Differences

Tac30: Simple When Present

Not all Tac30 models include illumination. Mine does, offering basic red illumination that helps in low light without overwhelming the reticle.

Battery life extends forever with minimal use. The CR2032 battery in mine lasted two years of occasional use. Simple, effective, no complaints.

MTAC: Advanced but Hungry

The MTAC’s illumination system offers more adjustability but drinks batteries faster. Eleven brightness settings seem excessive—I use three regularly.

The center dot illumination helps during dawn/dusk hunting. Not bright enough for noon sun but perfect for legal shooting hours when the game moves.

Mounting and Compatibility

Tac30: Standard Rings

The 1-inch tube (on my 3-9×40 model) means rings are available everywhere. Every gun shop stocks 1-inch rings. This matters in rural Montana where specialty items require ordering.

Standard height rings work on most rifles without clearance issues. The 40mm objective sits low enough to maintain proper cheek weld with standard stocks.

MTAC: Modern 30mm

The 30mm tube provides more adjustment range but requires specific rings. Not every rural shop stocks 30mm rings—learned this before an important hunt.

The larger tube does provide more elevation adjustment for long-range work. If you’re pushing distances, those extra clicks matter.

Real-World Applications

Ranch/Farm Work

Tac30: Better for deliberate shots at distance. Checking fence lines, identifying predators, precise varmint control.

MTAC: Superior for quick action. Multiple targets, close-range work, defensive situations.

My setup: MTAC on primary ranch rifle, Tac30 on truck gun for longer shots.

Competition Use

Tac30: Limited by 3x minimum. Most 3-Gun stages include close targets where 3x proves excessive.

MTAC: Purpose-built for competition. The 1-4x range matches typical stage requirements perfectly.

Hunting Applications

Tac30: Excellent for stand hunting, longer shots, situations requiring precision.

MTAC: Better for still-hunting, driven game, quick shots in timber.

Both work, but match magnification to your hunting style.

Cost Analysis: Value Proposition

Current Market Pricing

  • Tac30: ~$250-350 depending on model
  • MTAC: ~$350-450 depending on configuration

The price overlap means choosing based on features, not just budget.

Long-Term Value

Both maintain value reasonably well (50-60% of retail after three years). The MTAC’s tactical features appeal to more buyers, potentially easier resale.

Burris warranty backs both equally. Their customer service handled my reticle rotation issue professionally and quickly.

Three Years Later: Lessons Learned

What Surprised Me

Tac30: Simplicity proves valuable. Fewer features mean less to break or confuse.

MTAC: True 1x capability transforms rifle handling more than expected.

Both survived abuse that should have killed them.

What Disappointed

Tac30: 3x minimum limits versatility more than anticipated.

MTAC: 4x maximum insufficient for longer shots I regularly take.

Battery life on MTAC illumination underwhelms.

Unexpected Discoveries

The Tac30 works better on hunting rifles where deliberate shots prevail.

The MTAC excels on defensive rifles where speed matters most.

Neither replaces good fixed-power scopes for specialized use.

Making the Choice: Honest Recommendations

Choose the Tac30 If:

  • Longer shots predominate
  • Simplicity appeals
  • Traditional hunting applications
  • Budget constraints exist
  • You prefer capped turrets

Choose the MTAC If:

  • Versatility matters most
  • Close-range speed needed
  • Competition use planned
  • True 1x appeals
  • Tactical features desired

My Personal Approach

Primary Ranch Rifle: MTAC for versatility Truck Gun: Tac30 for longer shots Competition AR: MTAC exclusively Hunting Rifles: Depends on terrain and game Loaner Guns: Tac30 for simplicity

The Bottom Line from Montana

After three years running both scopes hard, each proves its worth in appropriate roles. The Tac30 delivers traditional scope performance at budget prices. The MTAC provides modern tactical features that transform rifle capabilities.

Neither disappoints when used as designed. The Tac30 won’t win 3-Gun matches, and the MTAC won’t excel at 400-yard prairie dog shoots. But within their envelopes, both perform admirably.

Those coyotes threatening our calves learned that either scope enables effective predator control. The choice depends on your specific needs, not internet opinions or brand loyalty.

Buy once, train with your choice, and stop second-guessing equipment. Both scopes exceed most shooters’ capabilities. Time behind the rifle matters more than which Burris you mount on top.

Remember: equipment doesn’t replace marksmanship fundamentals, but quality optics remove excuses for missing.

Ready to upgrade your rifle optics? Explore more field-tested reviews and training resources at Moosir.com, where experience meets practical instruction.

Field-Tested: The Ultimate Guide to 1-8x Scopes for 2025

0

Last November, I was tracking a wounded bull elk through the timber near Glacier National Park when my buddy’s cheap scope fogged up completely. We lost that bull—a hard lesson about the true cost of cutting corners on optics. That experience drove home what I’ve been preaching for twenty-five years: your scope is the one piece of gear where “buy once, cry once” isn’t just advice—it’s survival wisdom.

After putting seventeen different 1-8x scopes through their paces over the past four months—from sub-zero Montana mornings to scorching August afternoons on the range—I’ve narrowed down the field to four exceptional options that won’t let you down when it matters most.

My top pick? The Swarovski Z8i 1-8×24. Yes, it’ll lighten your wallet considerably, but after running it on everything from my personal Daniel Defense rifle to guiding clients on elk hunts, I can tell you it’s worth every penny. But stick with me—I’ve got options for every budget and application.

The Scopes That Made the Cut

Top Overall Choice: Swarovski Z8i 1-8×24

Competition Shooter’s Pick: Nightforce NX8 1-8×24 F1

Low-Light Champion: Primary Arms Compact PLx 1-8×24

Working Man’s Choice: Primary Arms SLx 1-8x FFP

Why Trust a Montana Mountain Guide?

Name’s Flint Marshall, and I’ve been living and breathing optics for over two decades. My experience spans eight years as an Army Ranger where a failed optic could mean mission failure, to my current life guiding hunters through some of the roughest country in North America.

I test every scope the same way my grandfather taught me to test any tool—use it hard, use it often, and see if it holds up when the chips are down. That means mounting each scope on multiple platforms, running them through temperature swings from -20°F to 95°F, and putting thousands of rounds downrange. My wife Sarah, a wildlife biologist, often jokes that I’m harder on gear than a grizzly on a garbage can—and she’s not wrong.

The scopes in this guide have all survived what I call the “Marshall Treatment”: dropped on rocks, dunked in streams, frozen solid, and still expected to hold zero. Because that’s what real-world use looks like up here in Montana.

How I Torture-Test These Optics

My testing protocol isn’t something you’ll find in a laboratory—it’s born from necessity and refined through hard-won experience. Here’s exactly what each scope endures before it earns a spot in my safe:

The Zero Test: Each scope gets mounted, zeroed, then removed and remounted three times. If it doesn’t return to zero perfectly each time, it’s out. Period.

The Box Drill: At 100 yards, I run each scope through a complete box pattern—20 MOA up, 20 right, 20 down, 20 left. A scope that doesn’t track perfectly won’t help you when that trophy buck steps out at 400 yards.

The Temperature Torture: Every scope spends a night in my freezer at -20°F, then gets immediately taken to the range. Next day, it sits in my truck dashboard in direct sun until the tube’s too hot to touch comfortably. Real hunting conditions aren’t climate-controlled.

The Drop Test: This one makes most folks wince. Each scope (mounted on a rifle) gets dropped from shoulder height onto packed dirt. Three times. If it loses zero, it’s not field-worthy.

Real-World Application: Finally, and most importantly, I use these scopes for actual hunting and training. My dogs Scout and River have covered hundreds of miles while I’ve carried rifles topped with these optics through brush, rain, and snow.

What Really Matters in a 1-8x Scope

Before we dive into individual reviews, let me share what twenty-five years in the field has taught me about what actually matters in a variable power optic:

Glass Quality Trumps Features: I’d rather have a simple scope with exceptional glass than a feature-packed model with mediocre optics. When that buck of a lifetime steps out at last light, you need to see him clearly.

True 1x Performance: If it’s not truly 1x at the bottom end, you might as well run a 2-8x. Both-eyes-open shooting at close range is a game-changer for rapid target acquisition.

Durability Over Weight Savings: I’ve seen too many ultralight scopes fail when it matters. An extra three ounces won’t kill you, but a failed zero might cost you the hunt of a lifetime.

Practical Magnification Range: That 8x top end needs to be usable, not just a marketing number. If the eye box gets so tight at 8x that you can’t find your target under stress, it’s worthless.

1. Swarovski Z8i 1-8×24 – When Only the Best Will Do

Technical Specifications

  • Weight: 18.2 ounces
  • Overall Length: 11.9 inches
  • Tube Diameter: 30mm
  • Eye Relief: 3.7 inches (consistent throughout range)
  • Field of View: 127.5 feet at 100 yards (1x)
  • Adjustment Click Value: 0.1 MIL

Why It’s My Top Pick

Two winters ago, I was guiding a client from Texas on his first Montana elk hunt. We’d been glassing a herd for three days when a massive 6×6 bull separated from the group just before dark. The temperature had dropped to 8°F, and snow was starting to fall hard.

With my Swarovski-topped .300 Win Mag, I ranged the bull at 385 yards. Through the Z8i at 8x, I could clearly see my exact point of aim despite the fading light and falling snow. That level of optical clarity in harsh conditions is what separates Swarovski from the pack. My client made the shot, and that bull now hangs in his office—a testament to quality glass when conditions deteriorate.

Real-World Performance

The Z8i’s European glass delivers color fidelity that makes target identification effortless. Last spring, while teaching a survival course, I used this scope to spot and identify edible plants from 100 yards away—try that with lesser glass and you’ll understand why quality matters.

The illumination system deserves special mention. Unlike many scopes where the dot either blinds you or disappears, the Z8i’s illumination adjusts perfectly from pitch-black woods to bright snow fields. During a December predator hunt with fresh snow reflecting moonlight, I could dial the illumination down to where it was barely visible to my eye but perfect for the conditions.

The true 1x setting is legitimate. I’ve run this scope alongside an Aimpoint T2 in close-quarters drills, and the speed difference is negligible. When you throw the magnification up to 8x, the image stays crisp edge-to-edge with no tunneling or distortion.

The Downsides

Let’s be honest about the elephant in the room—the price. At three grand, this scope costs more than many complete rifle setups. For most hunters who take one or two trips a year, it’s overkill.

The reticle options are also limited. If you’re looking for a Christmas tree-style tactical reticle with holdovers for every possible scenario, look elsewhere. The Z8i keeps things simple and clean, which I prefer, but some shooters want more reference points.

Who Should Buy It

If you’re a professional guide, competitive shooter, or serious hunter who uses your gear hard and often, the Z8i justifies its price. It’s the scope I grab when failure isn’t an option. But if you’re hunting whitetails from a heated blind twice a year, save your money for one of my other recommendations.

2. Nightforce NX8 1-8×24 F1 – Built for Competition and Combat

Technical Specifications

  • Weight: 17 ounces
  • Overall Length: 8.75 inches
  • Tube Diameter: 30mm
  • Eye Relief: 3.75 inches
  • Field of View: 106 feet at 100 yards (1x)
  • Adjustment Click Value: 0.2 MIL

Military-Grade Toughness Meets Competition Features

During my Ranger days, we had a saying: “If it’s not soldier-proof, it’s not field-ready.” The Nightforce NX8 embodies that philosophy while adding refinements that make it a competition favorite.

Last summer, I ran this scope in a local 3-gun match where temperatures hit 94°F. Through ten stages and over 300 rounds, the scope tracked flawlessly. The compact size—barely longer than my fist—kept the rifle balanced during movement stages, while the daylight-bright illumination made transitions from outdoor to indoor targets seamless.

Nightforce NX8 1-8×24 F1 Scope w/Zerostop, PTL, 30mm Tube, 5 MOA, FC-MOA…
  • NX8 1-8X24 F1 SCOPE – is a class leading, compact and lightweight scope optimized for short to mid-range shooting thanks to the intelligent reticle and adjustable turrets
  • HIGH PERFORMANCE AND RELIABILITY – At only 8.75″ in length and 17 ounces, this scope adds minimal size and weight but delivers superior optics and trusted NightForce performance to any gun

Where It Shines

The NX8’s party trick is packing premium performance into an impossibly small package. At under nine inches long, it’s shorter than most 1-4x scopes while offering double the magnification range. This matters when you’re moving through dense timber or getting in and out of vehicles.

The first focal plane reticle means your holdovers stay consistent regardless of magnification—crucial for competition or tactical applications. During a prairie dog shoot last spring, I could dial anywhere from 3x to 8x based on distance without recalculating holds.

The turrets track like a Swiss watch. I’ve run this scope through multiple box tests, and it returns to zero every single time without fail. The ZeroStop feature means you can dial for distance then return to your baseline zero even in complete darkness—a feature I wish I’d had during night operations in Afghanistan.

The Reality Check

At 8x magnification, the eye box gets tight—really tight. If your cheek weld isn’t perfect, you’ll see black edges creeping into your sight picture. This isn’t a deal-breaker for bench shooting, but during positional stages or field shooting from improvised rests, it requires more attention to form.

The scope’s compact size also means a smaller objective lens, which affects low-light performance compared to larger alternatives. It’s still very capable at dawn and dusk, but the Swarovski and Primary Arms PLx edge it out when the sun disappears.

Best Suited For

Competitive shooters and tactical users who prioritize size, weight, and bombproof reliability. If you run and gun, shoot matches, or need a do-all optic for a patrol rifle, the NX8 is hard to beat. Hunters who primarily shoot from stable positions will find excellent value here too.

3. Primary Arms Compact PLx 1-8×24 – The Dark Horse Champion

Technical Specifications

  • Weight: 16.95 ounces
  • Overall Length: 9.28 inches
  • Tube Diameter: 30mm
  • Eye Relief: 3.5-4.0 inches
  • Field of View: 121 feet at 100 yards (1x)
  • Focal Plane: First Focal Plane

Surprising Excellence from an Unexpected Source

I’ll admit, I was skeptical when Primary Arms claimed their PLx line competed with European glass. Then I mounted one on my truck gun—a beat-up AR that lives behind the seat and sees more abuse than any rifle should endure.

Six months later, after countless bouncy dirt roads, temperature swings, and one unfortunate incident where Scout knocked it off the tailgate, this scope continues to impress me. The glass clarity rivals optics costing twice as much, and the low-light performance is genuinely exceptional.

Outstanding Low-Light Performance

Here in Montana, legal shooting light often means dealing with dawn and dusk conditions. Last November, while helping Sarah with a wildlife survey, we were glassing mule deer in fading light. The PLx gathered light so effectively that I could identify individual deer at 300 yards a full fifteen minutes after my naked eye gave up.

The ACSS Raptor M8 reticle deserves special recognition. Unlike busy tactical reticles that clutter your view, this design provides rapid ranging capability and holdovers without overwhelming the sight picture. The horseshoe at 1x allows incredibly fast target acquisition—I’ve used it effectively on moving coyotes at close range.

Durability That Surprises

Remember that tailgate incident I mentioned? The rifle landed scope-first on packed gravel from about four feet up. After stringing together some words that would make a drill sergeant blush, I expected to find a cracked lens or shifted zero. Instead, the scope was completely unscathed and still dead-on at 100 yards. That’s the kind of toughness that builds trust.

The turrets track predictably and return to zero reliably. I’ve put this scope through temperature swings from -15°F to 90°F without any shift in point of impact. That’s reliability you can bet your hunt on.

Minor Complaints

The magnification ring started out stiffer than a new pair of boots. It’s loosened up with use, but initially required deliberate effort to adjust. Not ideal when you need to quickly transition between magnification levels.

It’s priced in no-man’s land—too expensive for casual shooters but competing against established premium brands. However, based on performance alone, it earns its price tag.

Who Benefits Most

Serious hunters and shooters who want near-premium performance without the premium price tag. If you hunt in timber where shots can range from 20 to 400 yards, or you’re building a serious defensive rifle, the PLx delivers exceptional value.

4. Primary Arms SLx 1-8x FFP – Blue-Collar Performance

Technical Specifications

  • Weight: 17.9 ounces
  • Overall Length: 10.2 inches
  • Tube Diameter: 30mm
  • Eye Relief: 3.3-3.5 inches
  • Field of View: 110 feet at 100 yards (1x)
  • Adjustment Value: 0.1 MIL per click

Honest Value for Working Folks

Not everyone can drop two grand on a scope, and Primary Arms understands that. The SLx 1-8x represents what I call “honest value”—it does everything you need without fancy marketing or unnecessary features.

I bought one of these for my nephew when he completed his hunter safety course. After a year of him treating it like teenage boys treat everything (poorly), it still holds zero and tracks true. That’s all you can ask from a scope at this price point.

Practical Performance

The glass quality punches above its weight class. No, it’s not Swarovski-clear, but compared to other sub-$500 options, it’s remarkably good. I can consistently hit steel at 600 yards, and the image quality is sufficient for positive target identification at hunting distances.

Primary Arms SLX 1-8×24 FFP Rifle Scope – Illuminated ACSS Raptor Reticle -…
  • SCOPE: Variable 1-8x magnification first focal plane features the ACSS Raptor reticle for 5.56/5.45/.308
  • Reticle features include automatic ranging out to 600 yards and moving target leads designed to excel at close range out to mid-range engagements

The ACSS Raptor reticle in FFP configuration means your holdovers work at any magnification—a feature typically found on scopes costing three times as much. For hunters who might need to take a quick shot at varying distances, this flexibility is invaluable.

During a youth hunting camp I run each summer, we’ve put thousands of rounds through rifles topped with SLx scopes. They’ve survived ham-fisted teenagers, unexpected rainstorms, and more dropped rifles than I care to count. That’s durability that matters in the real world.

Realistic Limitations

The “1x” setting is more like 1.2x—noticeable but not deal-breaking. You can still shoot both eyes open, but it’s not as natural as true 1x optics.

There’s visible distortion at the edges when at 1x, though it clears up as you increase magnification. The turrets, while functional, don’t have the positive, crisp feel of premium scopes. They work, but they won’t impress anyone at the range.

Low-light performance is adequate but not exceptional. You’ll lose usable shooting light 10-15 minutes earlier than with premium glass. For most hunting situations, this isn’t critical, but it’s worth noting.

Perfect For

New hunters, budget-conscious shooters, and anyone building their first serious rifle. It’s also an excellent choice for a truck gun or ranch rifle that needs to work without babying. If you’re teaching someone to shoot or equipping a young hunter, the SLx provides everything needed to be successful without breaking the bank.

Understanding 1-8x Technology: What You Really Need to Know

First Focal Plane vs. Second Focal Plane – The Truth Nobody Tells You

I’ve watched countless arguments about FFP versus SFP, and most miss the point entirely. Here’s what actually matters:

First Focal Plane (FFP): The reticle grows and shrinks with magnification. Your holdovers stay consistent whether you’re at 3x or 8x. Sounds perfect, right? Here’s the catch—at 1x, that reticle gets tiny. During a close-range defensive carbine course last year, students with FFP scopes consistently struggled with rapid target acquisition compared to SFP users.

Second Focal Plane (SFP): The reticle stays the same size regardless of magnification. At 1x, you get a bold, easy-to-see reticle for fast shooting. The downside? Your holdovers are only accurate at one magnification setting (usually maximum).

My advice? For hunting and general use, SFP works fine. Most shots happen at maximum magnification anyway. For competition or tactical use where you’re constantly changing magnification while using holdovers, FFP makes sense.

The Truth About 1x Magnification

True 1x is rarer than an honest politician. Most “1x” settings are actually 1.1x to 1.25x. You’ll notice this when trying to shoot both eyes open—there’s a slight disconnect between what each eye sees.

Only a handful of scopes achieve true 1x: the Swarovski Z8i, Nightforce NX8, and a few others. If both-eyes-open shooting is critical for your application, verify true 1x before buying. Take the scope to a store, look through it at 1x with both eyes open. If you see any image shift or magnification, it’s not true 1x.

Glass Quality: Why It’s Everything

I learned this lesson the hard way during a Dall sheep hunt in Alaska. My client had a $3,000 rifle topped with a $200 scope. When a ram appeared at 400 yards in flat light against a white background, his scope couldn’t resolve enough detail to find a clear aiming point. That sheep walked away, along with a $15,000 hunt investment.

Quality glass delivers:

  • Color fidelity: Helps distinguish animals from backgrounds
  • Light transmission: Extends shooting hours in legal light
  • Resolution: Allows precise shot placement at distance
  • Contrast: Critical for low-light target identification

You don’t need the most expensive glass, but you need good glass. The difference between a $400 and $800 scope is usually significant. The jump from $800 to $2,000 is noticeable but less dramatic.

Choosing Your Scope: Practical Decision Making

For the Hunter

Most hunting happens inside 300 yards. A quality 1-8x scope covers everything from thick timber jump shots to cross-canyon opportunities. Focus on:

  • Good glass quality for low-light performance
  • Reliable zero retention
  • Simple, uncluttered reticle
  • Weather resistance

The Primary Arms PLx or SLx (depending on budget) excel here.

For the Competitor

Speed and precision under time pressure define competition success. You need:

  • FFP for consistent holdovers
  • Daylight-bright illumination
  • Precise tracking
  • Fast magnification changes

The Nightforce NX8 was built for this.

For Defense and Duty

Reliability trumps everything. Requirements include:

  • Bombproof construction
  • True 1x for close-quarters work
  • Simple operation under stress
  • Proven track record

The Nightforce NX8 or Swarovski Z8i fit this bill.

For the Budget-Conscious

Starting out or building a basic rifle? Focus on:

  • Acceptable glass quality
  • Basic reliability
  • Warranty support
  • Proven design

The Primary Arms SLx delivers here without compromises that matter.

Installation and Setup: Do It Right the First Time

Proper Mounting Technique

A $3,000 scope on a $10 mount is like putting bald tires on a Ferrari. Invest in quality rings and bases—Warne, Leupold, or Nightforce are solid choices.

Here’s my mounting process:

  1. Degrease everything: Use acetone or denatured alcohol on all mounting surfaces
  2. Level the rifle: Use a bubble level on the action, not the scope rail
  3. Align the rings: Use alignment bars to prevent scope tube damage
  4. Mount the scope: Tighten ring screws gradually and evenly
  5. Set eye relief: Mount the rifle naturally and adjust scope position
  6. Level the scope: Use a plumb line at 100 yards, not a bubble level on the scope
  7. Torque to spec: Use a torque wrench—usually 15-20 inch-pounds for ring screws
  8. Thread lock: Blue Loctite on base screws, nothing on ring screws

Zeroing Strategy

Don’t waste ammo. Start at 25 yards to get on paper, then:

  1. Move to 100 yards
  2. Fire a 3-shot group
  3. Measure distance from point of aim
  4. Adjust turrets (remember your click values)
  5. Fire another 3-shot group to confirm
  6. Fine-tune as needed

For hunting rifles, I zero at 200 yards. This provides a maximum point-blank range of about 250 yards for most cartridges—perfect for field use without dialing.

Maintenance: Keep Your Investment Working

Field Care

Your scope needs less maintenance than you think, but what it needs is critical:

Daily in the Field:

  • Wipe lenses with a microfiber cloth (keep one in your pack)
  • Check mount screws for looseness
  • Verify zero hasn’t shifted if rifle was dropped or hit

After Each Trip:

  • Clean lenses properly (breathe on them first, then wipe—never dry)
  • Check for debris in turret mechanisms
  • Wipe down scope body with silicon cloth
  • Store with lens covers on

Annually:

  • Check and retorque mounting screws
  • Replace turret cap O-rings if damaged
  • Send in for service if anything seems off

Common Problems and Solutions

Scope won’t hold zero: Check mount screws first, then ring alignment. A bent scope tube from misaligned rings is surprisingly common.

Foggy lenses: Internal fogging means broken seals—warranty time. External fogging means temperature difference; let the scope acclimate.

Sticky turrets: Usually debris. Flush with lighter fluid (seriously), work the turrets, then add a tiny drop of gun oil.

Parallax issues: Make sure your diopter is set correctly for your eye first. Most “parallax problems” are actually diopter problems.

The Bottom Line: Making Your Choice

After twenty-five years of hard use in unforgiving country, here’s my bottom-line advice:

If money is no object: Get the Swarovski Z8i. It’s optical perfection that will outlast your rifle and probably you.

For serious competition or tactical use: The Nightforce NX8 provides professional-grade performance in an incredibly compact package.

For dedicated hunters wanting premium performance: The Primary Arms PLx delivers 90% of premium scope performance at 60% of the price.

For starting out or general use: The Primary Arms SLx gives you everything you need and nothing you don’t at a working man’s price.

Remember what my grandfather told me when I bought my first scope: “Good glass is expensive, but bad glass costs more in missed opportunities.” That wisdom has proven true more times than I can count.

Whatever you choose, practice with it. A scope is a tool, and like any tool, it’s only as good as the person using it. Get out there, send some lead downrange, and learn your equipment inside and out. Because when that moment of truth arrives—whether it’s a trophy buck, a competition stage, or a defensive situation—you need absolute confidence in your gear.

The wilderness doesn’t care about your schedule, and neither does opportunity. Choose quality, maintain it properly, and it’ll serve you faithfully for decades.

Practice makes permanent, so practice it right.

Stay safe out there,

Flint Marshall
Northern Montana


Have questions about choosing the right scope for your specific needs? Found this guide helpful in making your decision? Drop a comment below or explore more gear guides and wilderness wisdom at Moosir.com. Remember—respect the game, respect the land, respect yourself.

Vortex Sparc 2 vs Strikefire 2: Two Years of Side-by-Side Ranch Testing in Montana

0

The mountain lion tracks in fresh snow led straight toward our chicken coop, where my wife Sarah had just finished morning chores. My ranch AR wore a Strikefire 2 that February morning, while my truck gun carried a Sparc 2—both optics I’d been testing head-to-head for two years. Following those tracks with both rifles ready reinforced why choosing the right red dot matters more than brand loyalty. After twenty-five years carrying rifles professionally and mounting these exact optics on everything from patrol carbines to competition guns, I’ve learned that the Sparc 2 and Strikefire 2 serve different masters despite sharing Vortex DNA.

Why Compare Vortex Against Vortex?

My grandfather would’ve called this “splitting hairs over nothing.” He ran iron sights on his M1 Carbine through Korea and never complained. But modern threats—whether four-legged predators or two-legged problems—don’t always allow for perfect sight alignment under stress.

Vortex dominates the affordable red dot market for good reason. Their warranty backs products that punch above their price point. But choosing between the Sparc 2 and Strikefire 2 isn’t about good versus bad—it’s about understanding which tool fits your specific job.

Testing Protocol: Montana Reality Check

Both optics underwent identical testing over two years:

Environmental Exposure

  • Temperature range: -32°F to 98°F (documented)
  • Altitude: 4,000 to 9,000 feet
  • Weather: Blizzards, dust storms, freezing rain
  • Duration: Two years continuous use

Durability Testing

  • Round count: 4,500+ through each
  • Drop testing: Multiple surfaces and heights
  • Water testing: Complete submersion
  • Impact testing: Truck bed abuse

Practical Applications

  • Daily ranch carry
  • Predator control
  • Competition use (3-Gun matches)
  • Training local law enforcement
  • Loaner guns for visiting hunters

Glass Clarity and Reticle: Different Philosophies

Sparc 2: Precision Focus

The 2 MOA dot hits the sweet spot for precision work. During a prairie dog shoot last summer, that fine dot enabled consistent hits at 200 yards—impressive for a red dot. The multi-coated lenses deliver clarity that embarrasses optics costing twice as much.

Vortex Optics Sparc II Red Dot Sight – 2 MOA Dot
  • The highly compact, daylight bright Sparc II is packed with performance features and lends itself to a variety of platforms.
  • A modular three piece base offers four seperate mounting heights for user and weapon specific customization. A high base and shim plate offer absolute and lower 1/3 co-witness mounting heights. A low base provides options for handguns or shotguns.

Last November, identifying a coyote versus neighbor’s dog at 150 yards in flat light, the Sparc’s superior glass coating made the difference. No washout, minimal distortion, clear target identification when it mattered.

Real-World Application: During monthly steel challenge matches, the 2 MOA dot consistently produces tighter groups on precision stages. Competitors using larger dots struggle with the smaller plates at distance.

Strikefire 2: Speed Rules

The 4 MOA dot seems huge initially, but speed shooters understand the advantage. During close-range drills or jumping deer in thick timber, that larger dot draws the eye instantly. No searching for the reticle under stress.

Vortex Optics Strikefire II Red Dot Sight – 4 MOA Red/Green Dot,Black
  • The Strikefire II Red/Green Dot is a rugged, reliable red dot sight that is at home in a variety of shooting applications. It allows the shooter to operate between two dot colors and ten brightness settings to easily adjust for changing conditions
  • Fully multi-coated lenses provide a clean and bright, unobscured point of view. Unlimited eye relief allows for rapid target acquisition. Max Elevation Adjustment- 100 MOA. Max Windage Adjustment- 100 MOA

The red/green option proves more useful than expected. Green excels during dawn hunts against dark backgrounds, while red cuts through bright snow better. My nephew, slightly colorblind, sees the green dot clearly but struggles with red—this flexibility matters.

Field Performance: Engaging multiple coyotes harassing calves, the larger dot enabled faster target transitions. When seconds count, finding that dot instantly beats precision you don’t have time to use.

Battery Life: Marketing vs Montana

Claimed Performance

Sparc 2: 50,000 hours on lowest, 700 on highest Strikefire 2: 80,000 hours on lowest, 6,000 on mid-settings

Actual Experience

Sparc 2: 14 months on setting 8 (daylight visible) with daily use Strikefire 2: 18 months on setting 7 with similar use

Both feature a 12-hour auto-shutoff, saving batteries when you inevitably forget. After leaving the Sparc on for three days straight during a blizzard emergency, that auto-shutoff saved my battery.

The Strikefire’s CR2 battery costs more but lasts longer. The Sparc’s AAA battery is available everywhere—grabbed one from the TV remote during a match when mine died. Consider battery availability in your area.

Size and Weight: Ounces Equal Pounds

Sparc 2: Compact Advantage

At 5.9 ounces, the Sparc disappears on lightweight builds. My competition PCC runs one specifically for weight savings. The smaller 22mm tube reduces snag points in brush or vehicle interiors.

During a horseback elk hunt (borrowed mount—mine are too skittish), that compact profile prevented the optic from catching on branches in thick timber. Small advantages matter over long days.

Strikefire 2: Bigger Window Benefits

The 30mm tube and 7.2-ounce weight seem minor on paper but change rifle balance noticeably. However, that larger window provides faster target acquisition and better peripheral awareness—crucial for defensive use.

My home defense AR wears a Strikefire specifically for the wider field of view. In hallways or around corners, seeing more through the optic matters more than ounces saved.

Durability: Two Years of Abuse

The Sparc 2 Torture Test

My Sparc survived:

  • Falling off truck tailgate at 45 mph (forgot to secure it)
  • Complete ice encasement during freezing rain
  • Scout (my dog) using it as a chew toy
  • 4,500 rounds including hot handloads
  • Multiple drops onto concrete and gravel

Results: Minor cosmetic damage, perfect function, maintained zero

The Strikefire 2 Punishment

My Strikefire endured:

  • Direct impact from sliding rifle in truck bed
  • Week-long submersion test (forgot in creek)
  • -32°F overnight in truck during polar vortex
  • Teenager learning to shoot (worst abuse possible)
  • Used as hammer (emergency fence repair)

Results: Lens cap broke, otherwise perfect function

Both proved remarkably tough. Vortex’s warranty backs them, but I haven’t needed it for either optic despite serious abuse.

Adjustment Systems: Different Approaches

Sparc 2: Traditional Turrets

Capped turrets with 1 MOA clicks feel familiar to scope users. The caps protect adjustments from accidental changes—important for truck guns bouncing around. However, 1 MOA adjustments feel coarse for precision zeroing.

During zeroing, those large adjustments meant choosing between slightly high or slightly low. For a precision rifle, frustrating. For minute-of-coyote accuracy, perfectly adequate.

Strikefire 2: Tool-Required Adjustments

Half-MOA adjustments provide finer zeroing control, but requiring tools annoys me. Forgot your coin or screwdriver? No adjustments possible. I keep adjustment tools in the truck, range bag, and shop after learning this lesson.

The flush adjustments never move accidentally—significant advantage for hard-use rifles. Once zeroed, it stays zeroed regardless of abuse.

Mounting Solutions: Flexibility Matters

Sparc 2: Maximum Versatility

Multiple mounting heights included means one optic works on various platforms. My loaner guns wear Sparcs because they fit everything from ARs to shotguns to .22 trainers.

The ability to switch between absolute and lower-third co-witness without buying additional mounts saves money and increases flexibility. For someone with multiple rifles, this versatility proves valuable.

Strikefire 2: Purpose-Built Solution

The cantilever mount positions the optic perfectly for AR-15s but limits other applications. If you run one rifle primarily, this focused design works well. For multiple platforms, less ideal.

The forward positioning helps with magnifier use—the VMX-3T fits perfectly behind it. This combination provides 1-3x capability rivaling entry-level LPVOs at lower cost.

Vortex Optics VMX-3T 3X Red Dot Sight Magnifier with Built-In Flip Mount
  • The VMX-3T Magnifier and Flip Mount combo adds a 3x magnification to your red dot sight. Simple, fast, and effective, the push button design engages and disengages the flip mount allowing the magnifier to lock in at your desired position.

Real-World Applications

Ranch/Farm Use: Sparc 2 Wins

The compact size and versatility make the Sparc ideal for truck guns and general ranch use. It transitions between rifles easily, takes abuse without complaint, and the AAA battery availability matters in rural areas.

Home Defense: Strikefire 2 Advantages

Larger window, easier dot acquisition, and red/green flexibility suit defensive needs better. The slightly forward mounting position balances rifles nicely with weapon lights attached.

Competition: Depends on Division

For speed-focused divisions, the Strikefire’s larger dot wins. For precision divisions or longer-range targets, the Sparc’s 2 MOA dot proves superior. Know your game before choosing.

Hunting: Both Work

The Sparc’s lighter weight suits mountain hunting. The Strikefire’s larger window helps in thick timber. Both handle hunting requirements adequately—personal preference decides.

Cost Analysis: Value Propositions

Current Pricing Reality

Sparc 2: ~$190 street price Strikefire 2: ~$200 street price

That $10 difference becomes irrelevant considering total investment. Choose based on features, not minor price differences.

Long-Term Value

Both maintain value well in the used market (60-70% of retail). Vortex’s transferable warranty increases resale value. Either represents solid investment in quality optics.

Two Years Later: Lessons Learned

What Surprised Me

Sparc 2: Glass quality exceeds expectations. Competes with optics costing twice as much. The compact size proves more valuable than anticipated.

Strikefire 2: Red/green capability matters more than expected. The larger window significantly improves speed. Battery life exceeds claims with normal use.

What Disappointed

Sparc 2: 1 MOA adjustments too coarse for precision work. Smaller windows limits speed in close quarters.

Strikefire 2: Heavier than necessary for such a simple design. Tool-required adjustments annoy during range sessions.

Unexpected Discoveries

The Strikefire works better on shotguns despite the Sparc’s marketing. The larger dot and window suit shotgun patterns perfectly.

The Sparc excels on .22 trainers where precision matters more than speed. That 2 MOA dot enables impressive accuracy from rimfire rifles.

Making the Choice: Honest Recommendations

Choose the Sparc 2 If:

  • Weight matters significantly
  • Precision shooting appeals
  • Multiple platforms need optics
  • Compact size benefits you
  • AAA battery availability matters

Choose the Strikefire 2 If:

  • Speed beats precision
  • Defensive use primarily
  • AR-15 specific setup
  • Magnifier use planned
  • Larger window appeals

My Personal Setups

Ranch Truck Gun: Sparc 2 (versatility and compact size) Home Defense AR: Strikefire 2 (speed and wide window) Competition Rifle: Depends on match type Loaner Guns: Sparc 2 (fits everything) Wife’s Rifle: Strikefire 2 (she prefers green dot)

Common Questions Answered

“Is the $10 difference significant?” No. Choose based on features and intended use, not minor price differences.

“Which holds zero better?” Both maintain zero excellently. No meaningful difference in two years of testing.

“Can I use these on pistols?” Technically yes, but both are large for pistol use. Consider dedicated pistol optics instead.

“Which works better with magnifiers?” Strikefire 2’s forward mount and larger window pair better with magnifiers.

“Will these survive real abuse?” Yes. Both handled everything Montana threw at them for two years.

The Bottom Line from Big Sky Country

After two years running both optics side-by-side, neither disappointed. The Sparc 2 excels where precision and versatility matter. The Strikefire 2 dominates when speed and field of view take priority.

For most users, the Strikefire 2’s advantages—larger window, finer adjustments, dual-color options—justify the minimal price premium. But the Sparc 2’s compact size and versatility serve specific needs better.

That mountain lion never reached our chickens. Both optics remained ready throughout that tense morning. Either would have served if needed, but understanding their strengths helped choose the right tool for each job.

Buy once, train hard, and stop obsessing over equipment. Either optic exceeds most shooters’ capabilities. Time on trigger matters more than which dot you choose.

Remember: the fanciest optic won’t fix poor fundamentals, but quality tools remove excuses for missing.

Ready to upgrade your rifle optics? Explore more field-tested reviews and training resources at Moosir.com, where experience meets practical instruction.

Understanding 4×32 Scopes: A Hunter’s Field Guide to Fixed Power Optics

0

Three seasons back, I was helping a young hunter from Kalispell set up his first deer rifle—a well-used .243 Winchester his grandfather had passed down. He’d saved up for months to buy a scope and proudly showed me the box: “4×32” printed on the side. “What’s all that mean?” he asked, genuinely confused by the numbers. By the end of that afternoon, not only did he understand those numbers, but he’d also learned why that particular combination would serve him perfectly for decades of Montana whitetail hunting.

Those seemingly cryptic numbers on scope boxes tell you exactly what you’re getting, and understanding them means the difference between choosing glass that works for your specific needs versus buying something that’ll frustrate you every time you shoulder your rifle. After twenty-five years of mounting, testing, and hunting with every conceivable scope configuration, I can tell you that the humble 4×32 remains one of the most practical choices for many hunting situations.

Breaking Down the Numbers: What 4×32 Actually Tells You

Every scope designation follows the same pattern, and once you understand it, shopping for optics becomes significantly less confusing. Think of these numbers as the scope’s basic identity card—they won’t tell you everything about its personality, but they’ll give you the essential facts.

The First Number: Understanding 4x Magnification

That “4x” means your target appears four times larger through the scope than it does to your naked eye. Picture a mule deer standing 100 yards away—through a 4x scope, it appears as if it’s only 25 yards distant. This magnification stays constant because we’re dealing with fixed power optics here, not variables that zoom in and out.

I learned to appreciate fixed 4x magnification during my Ranger days when we used ACOGs almost exclusively. No fumbling with power rings when seconds counted, no worrying whether you had the magnification set correctly for the shot at hand. You shouldered the rifle, found your target, and sent it. That same simplicity translates perfectly to hunting situations.

Four-power magnification hits a sweet spot that many hunters overlook in today’s market flooded with high-magnification variables. At 4x, you maintain excellent field of view—crucial when tracking moving game through timber or broken country. I’ve watched countless hunters with their scopes cranked to 12x or higher completely lose wounded animals that ran just twenty yards because they couldn’t find them in the narrow field of view.

Last November, while guiding in the Crazy Mountains, my client missed an easy opportunity at a magnificent bull elk because his variable scope was set to maximum power from glassing distant ridges. By the time he’d fumbled it down to reasonable magnification, that bull had vanished into the timber. A fixed 4x would have been perfect for that 175-yard shot.

Here’s something my grandfather taught me that still holds true: most game animals in North America are harvested inside 200 yards, and many inside 100. For these distances, 4x provides all the magnification you need while maintaining situational awareness. You can keep both eyes open if needed, transition between targets quickly, and maintain a natural sight picture that doesn’t exaggerate your wobble.

The Second Number: Decoding the 32mm Objective Lens

That “32” refers to the diameter of your objective lens—the big lens at the front of your scope that gathers light—measured in millimeters. This measurement directly affects how your scope performs in various lighting conditions and how it balances on your rifle.

A 32mm objective lens occupies the middle ground in scope design, and there’s good reason it’s been a standard for decades. It gathers sufficient light for legal shooting hours while keeping the scope’s profile low enough for proper cheek weld and comfortable carrying.

During my early guiding years, I fell into the “bigger is better” trap with objective lenses. I mounted a massive 56mm objective on my primary hunting rifle, thinking more light transmission would give me an edge during those critical dawn and dusk periods. What I got instead was a scope that sat so high I needed a raised cheek piece, caught on every branch while stalking through timber, and added unnecessary weight to an already hefty rifle.

That 32mm objective on a 4x scope provides what we call a “8mm exit pupil”—you calculate this by dividing the objective diameter by the magnification. The human eye’s pupil dilates to about 7mm maximum in low light, meaning a 32mm objective on 4x magnification provides more light than your eye can actually use. It’s perfectly matched for practical hunting conditions.

Sarah, my wife, has used the same 4×32 scope on her .270 for fifteen years of successful hunting. She’s taken everything from pronghorn on the prairie to black bears in thick timber with that setup. The moderate objective size means she can mount the scope low with standard rings, maintaining a natural shooting position that’s served her well from Alaska to Arizona.

Real-World Applications: Where 4×32 Scopes Excel

Understanding specifications is one thing, but knowing where these scopes truly shine comes from field experience. Let me share where this classic configuration excels and where you might want something different.

Timber and Brush Hunting

The thick forests around Glacier National Park where I do much of my guiding demand quick target acquisition and wide field of view. A 4×32 scope provides approximately 26 feet of viewing width at 100 yards—enough to track a running deer or find that elk that just stepped behind a tree.

I’ve seen hunters with high-magnification scopes literally unable to find animals standing broadside at sixty yards because they were “zoomed in” too far. Meanwhile, those using fixed 4x scopes make clean, ethical shots because they can see the entire animal and what’s beyond it.

The lower magnification also means less noticeable shake from breathing, heartbeat, or unsteady positions. When you’re winded from climbing and have seconds to make a shot, that steadier sight picture makes all the difference.

Dangerous Game and Backup Rifles

When guiding bear hunters or packing a backup rifle in grizzly country, I want optics that work instantly without thought. Fixed 4x magnification means no wrong settings when adrenaline spikes. The moderate objective lens won’t hang up when bringing the rifle to shoulder quickly.

Two springs ago, a client and I surprised a black bear at thirty yards while tracking through deadfall. His 4×32-equipped .30-06 came up smoothly, the bear filled the scope perfectly, and one well-placed shot ended what could have been a dangerous encounter. Had he been fumbling with magnification or dealing with a massive objective lens catching on brush, things might have gone differently.

Youth and Smaller-Statured Hunters

When teaching young hunters or working with smaller-framed shooters, the 4×32 configuration offers ideal ergonomics. The compact size and light weight don’t overwhelm the rifle’s balance, and the moderate magnification is less intimidating for new shooters.

My daughter started hunting with a youth model .243 topped with a fixed 4×32. The simplicity meant one less thing to think about while learning proper shooting fundamentals. She’s since graduated to larger rifles and variable scopes, but she learned marksmanship principles on that simple, effective setup.

Military and Law Enforcement Applications

During my service, we used fixed 4x optics extensively for urban and medium-range engagements. The magnification provided enough resolution for positive target identification while maintaining peripheral awareness. These same principles apply to hunting—you need to clearly identify your target while staying aware of your surroundings.

Comparing Fixed 4×32 to Variable Alternatives

The market pushes variable scopes hard these days, and for good reason—they’re versatile. But versatility isn’t always necessary, and it definitely comes with trade-offs. Let me break down the real comparison between a quality fixed 4×32 and popular variables.

Fixed 4×32 vs. 3-9×40 Variables

The 3-9×40 remains the most popular hunting scope configuration, and I own several myself. However, they’re not automatically superior to a fixed 4×32 for every application.

Variables add weight—typically 4-6 ounces more than comparable fixed-power scopes. That might not sound like much, but after a ten-mile day in the mountains, every ounce matters. They also introduce mechanical complexity with more internal parts that can fail, shift, or lose zero.

The larger 40mm objective on most 3-9x scopes requires higher mounting, affecting cheek weld and increasing the sight-over-bore distance. This creates more pronounced trajectory differences at varying ranges—something that matters when taking quick shots at unknown distances.

Where variables excel is versatility for varying terrain. If you hunt both dense timber and open prairie, that zoom range proves valuable. For dedicated timber rifles or specific-purpose guns, the simplicity and reliability of fixed power often wins.

Cost Considerations

Here’s something nobody talks about enough: dollar for dollar, fixed-power scopes deliver better glass quality than variables at the same price point. That $300 fixed 4×32 will typically have clearer glass, better coatings, and more precise adjustments than a $300 variable.

Why? Manufacturing variables requires more complex internal mechanisms—zoom mechanisms, erector systems that maintain zero through magnification changes, and additional lenses. That money has to come from somewhere, usually glass quality or build precision.

I’ve counseled many budget-conscious hunters to buy quality fixed-power scopes rather than cheap variables. Better to have clear, reliable 4x magnification than fuzzy, unreliable 3-9x that loses zero or fogs up when you need it most.

Selection Criteria: Choosing the Right 4×32 Scope

Not all 4×32 scopes are created equal. After testing dozens over the years and seeing what holds up to Montana’s harsh conditions, here’s what I look for:

Glass Quality and Coatings

The best 4×32 scope with poor glass is worthless. Look for fully multi-coated lenses at minimum—this means all air-to-glass surfaces have multiple layers of anti-reflective coating. Quality glass shows true colors, maintains clarity edge-to-edge, and doesn’t distort images.

Test glass quality by looking at power lines or fence posts against the sky. Chromatic aberration (purple or green fringing) indicates lower-quality glass. The best scopes show crisp, color-true images without distortion.

Durability and Construction

A scope that loses zero after minor bumps becomes an expensive paperweight. Quality 4×32 scopes feature one-piece tubes, robust internal construction, and positive-feedback adjustments that click decisively.

I test durability with the “freezer test”—put the scope in the freezer overnight, then bring it into a warm, humid room. Quality seals prevent internal fogging. If it fogs, it’ll fail you during temperature swings in the field.

Reticle Selection

For fixed 4x magnification, simple reticles work best. The standard duplex remains my favorite for most hunting—thick outer posts guide your eye to center quickly, while the thin center allows precise shot placement.

Avoid busy reticles with excessive holdover marks or ranging features on fixed 4x scopes. At this magnification, complex reticles become cluttered and slow to use. Save the Christmas tree reticles for dedicated long-range variables.

Turret Design

Capped turrets that protect your zero make sense for hunting scopes that get banged around. After zeroing, you shouldn’t need frequent adjustments. If you do dial for distance regularly, consider whether fixed 4x provides enough magnification for your longest shots.

Low-profile turrets also reduce snagging on packs, slings, and brush. I’ve seen too many exposed target turrets get spun accidentally, causing mysterious misses when that big buck finally appears.

Practical Distance Capabilities

One of the most common questions I get: “How far can I shoot with a 4×32 scope?” The answer depends more on the shooter than the scope, but let’s establish realistic expectations.

Effective Hunting Ranges

For big game hunting, a 4×32 scope serves effectively out to 300 yards, assuming you’ve practiced at those distances. At 300 yards, a deer’s vital zone (roughly 8 inches) appears just over 2 MOA in size through 4x magnification—plenty large for precise shot placement.

I’ve taken elk beyond 400 yards with fixed 4x, but those were prone shots with perfect conditions after years of practice. For average hunters in field conditions, 250 yards represents a more realistic maximum for ethical shots with 4x magnification.

Remember, magnification doesn’t increase your effective range—practice does. I’d rather see someone with a 4x scope who shoots 200 rounds annually than someone with a 5-25x scope who fires five rounds before season.

Target and Competition Use

While some disciplines benefit from higher magnification, fixed 4x scopes work surprisingly well for certain competitions. Service rifle matches, tactical competitions under 600 yards, and even some forms of field target shooting suit 4x magnification perfectly.

Scout and I spend winter afternoons shooting steel plates at varying distances with fixed 4x scopes. It’s excellent practice for field shooting and builds confidence in your holds and range estimation without relying on dialing or excessive magnification.

Installation and Setup Tips

Properly mounting your 4×32 scope determines whether it becomes a trusted tool or constant frustration. Here’s my proven process refined over thousands of scope installations:

Ring Height Selection

With a 32mm objective and low-profile design, most 4×32 scopes work with low or medium rings, depending on your rifle’s action and stock design. The goal is mounting as low as possible while maintaining clearance.

Test clearance by placing a dollar bill between the barrel and objective bell. If it slides through freely, you have adequate space. This prevents contact during barrel heating or stock flexing.

Eye Relief Optimization

Fixed 4x scopes typically offer generous eye relief—often 3.5 to 4 inches. This flexibility means comfortable shooting from various positions and reduced scope bite risk on heavier-recoiling rifles.

Set eye relief with your most common shooting position. For hunting rifles, I prefer setting relief slightly forward to accommodate bulky winter clothing that might push me back from my summer position.

Zeroing Strategy

I zero most 4×32-equipped rifles at 200 yards, creating a point-blank range from muzzle to about 250 yards on deer-sized targets. With most common hunting cartridges, this means hitting about 2 inches high at 100 yards.

This zero eliminates holdover calculations for most hunting shots. Simply place the crosshairs center-mass on the vital zone and squeeze. The wilderness doesn’t care about your ballistic calculator—simple, reliable systems save the day.

Maintenance and Longevity

A quality 4×32 scope should last generations with basic care. My oldest fixed 4x has been on five different rifles over twenty years and still tracks perfectly. Here’s how to ensure that longevity:

Cleaning Protocols

Clean lenses only when necessary, using proper optics solutions and microfiber cloths. Those lens coatings that maximize light transmission are surprisingly delicate—scrubbing with your shirt tail destroys them quickly.

Keep lens covers on during transport and storage. I prefer flip-up covers that stay attached—can’t lose what’s connected to your scope. In dusty or wet conditions, leave covers on until the moment before shooting.

Regular Inspection

Check ring and base screws annually or after any significant impact. Mark witness lines with nail polish to quickly identify any movement. A scope that shifts in its rings will never maintain zero.

Inspect for any internal fogging, specs of dust inside the scope, or reticle cant. These indicate seal failure and require professional service. Catching problems early often means repair versus replacement.

Making the Decision: Is a 4×32 Right for You?

After all this technical discussion, the choice comes down to honest assessment of your hunting style and primary uses. Let me give you some straight guidance based on common scenarios I encounter:

Perfect Candidates for 4×32 Scopes

You’re an ideal candidate if you primarily hunt forested areas where shots rarely exceed 200 yards. The simplicity, reliability, and quick target acquisition of fixed 4x will serve you better than variables you’ll never adjust past 4x anyway.

If you’re setting up a dedicated brush gun, truck gun, or camp rifle, the durability and set-and-forget nature of fixed 4x makes perfect sense. No wondering about magnification settings or delicate internal mechanisms.

New hunters benefit tremendously from starting with fixed magnification. Master the fundamentals first—breathing, trigger control, natural point of aim—before adding magnification adjustments to your mental checklist.

Budget-conscious hunters get more value from quality fixed-power scopes than cheap variables. That money saved can go toward ammunition for practice, making you far more effective than any amount of magnification.

When to Look Elsewhere

If you regularly hunt open country where shots beyond 300 yards are common, you’ll want more magnification. The prairie and mountain basins demand different tools than the timber.

Dedicated long-range shooters need more magnification for precise shot placement at extended distances. While possible with 4x, you’re handicapping yourself unnecessarily for true long-range work.

If you use one rifle for everything from squirrels to elk, from 25 to 500 yards, a variable scope’s versatility justifies its complexity. Just understand you’re trading simplicity and reliability for adaptability.

Field Stories: Lessons Learned

Let me share a final story that crystallizes why I still mount 4×32 scopes on several rifles despite owning high-end variables. Two winters ago, guiding a father-son hunt in brutal conditions—minus fifteen, sideways snow, ice forming on everything—we spotted a nice bull elk at 180 yards.

The father carried a rifle topped with an expensive 3-18×50 scope. The son used his grandfather’s .270 with an ancient but functional 4×32. When the moment came, the father’s scope had fogged internally from the temperature extremes. Meanwhile, the son’s simple fixed 4x, probably older than him, worked perfectly. One shot, clean kill, meat in the freezer.

That’s not an argument against all variables—I use them too—but it illustrates the reliability advantage of simpler optics. Fewer parts mean fewer failure points, and in the wilderness, reliability trumps features every time.

The Bottom Line

Understanding what those numbers mean—4x magnification and 32mm objective—empowers you to make informed decisions about your optics. But more importantly, recognizing where this classic configuration excels helps you determine if it matches your needs.

The 4×32 scope isn’t the most versatile, won’t win any magnification contests, and doesn’t have the latest technological features. What it offers instead is proven reliability, adequate performance for most hunting scenarios, and beautiful simplicity that lets you focus on marksmanship rather than equipment.

In this age of ever-increasing complexity, there’s wisdom in choosing tools that just work. A quality 4×32 scope, properly mounted and zeroed, will serve you faithfully for decades of hunting adventures. It might not be the flashiest choice, but when that buck of a lifetime steps out, you’ll appreciate the confidence that comes from absolute reliability.

Remember, the wilderness doesn’t care about your equipment specifications—it only respects competence and preparation. Choose the tool that matches your actual needs rather than theoretical wants, then practice until using it becomes second nature. That’s how you fill freezers and create memories that last generations.

Your best survival tool is the six inches between your ears, but a solid, simple 4×32 scope sure helps when you need to reach out and touch something beyond arm’s length. Choose wisely, practice regularly, and respect the game, the land, and the heritage we’re privileged to continue.

Decoding Rifle Scope Numbers: A Montana Guide’s Field-Tested Breakdown

0

I still remember the confused look on my nephew’s face when he picked up my old Leupold at the cabin last fall. “Uncle Flint,” he said, squinting at the side of the scope, “what the heck does 3-9×40 mean?” That moment took me back thirty years to when I was a young private, equally baffled by the cryptic numbers stamped on military optics. Now, after decades of guiding hunters through Montana’s backcountry and teaching survival courses, I’ve explained these numbers more times than I’ve had hot dinners.

The wilderness doesn’t care about your schedule—or whether you understand your equipment. But understanding those numbers on your rifle scope? That knowledge can mean the difference between filling your freezer and telling stories about “the one that got away.”

Locating Your Scope’s Numbers: The Starting Point

Before we dive into the technical details, let’s establish where these numbers live. You’ll find them right in the product name—whether you’re browsing online, reading the box at your local sporting goods store, or examining the scope itself. Take the Leupold Rifleman 4-12×40, for instance. Those numbers “4-12×40” aren’t random—they’re telling you exactly what that scope can do.

Last spring, I helped a fellow from Kalispell pick out his first serious hunting scope. He’d been staring at shelf tags for twenty minutes, completely overwhelmed. Once I showed him how to read those numbers, his whole demeanor changed. “It’s like learning a secret language,” he said. And he wasn’t wrong.

Breaking Down the Mystery: What Those Numbers Really Tell You

Those numbers on your rifle scope reveal two critical pieces of information: magnification power and objective lens diameter. Think of them as your scope’s vital statistics—like knowing a truck’s horsepower and payload capacity before hauling a load over Marias Pass.

Understanding Magnification Power: Your Window to the Target

Everything before the “x” tells you about magnification. This is how many times larger your target will appear through the scope compared to your naked eye.

When you see a single number like “4x,” you’re looking at what we call a fixed power scope. That “4x” means your target appears four times larger—period. No adjustments, no fiddling with power rings during crucial moments. My grandfather swore by fixed power scopes. “Keep it simple,” he’d say, “and it won’t fail you when the pressure’s on.”

Now, when you see something like “4-12x,” you’ve got yourself a variable power scope. This beauty lets you adjust your magnification anywhere from four to twelve times normal size. During my Army Ranger days, we primarily used variable scopes for reconnaissance work. The flexibility to zoom out for scanning ridgelines, then dial in for positive target identification, proved invaluable in Afghanistan’s mountains.

Here in Montana, I run a 3-9x on my primary hunting rifle. Why? Because at 3x, I can track a bull elk moving through thick timber at fifty yards. But when that same bull steps into a meadow three hundred yards out, I can crank it up to 9x for a clean, ethical shot. Practice makes permanent, so practice it right—and that includes knowing when to adjust your magnification.

The Objective Lens Diameter: Your Light-Gathering Powerhouse

That number after the “x”? That’s your objective lens diameter in millimeters. If your scope reads “x40,” you’re working with a 40mm objective lens. This measurement determines how much light enters your scope—crucial information when you’re glassing for mule deer during those golden minutes at dawn.

Sarah, my wife and our resident wildlife biologist, explained it perfectly to our kids: “Think of the objective lens like the pupils in your eyes. Bigger pupils let in more light when it’s dark.” During a November elk hunt two years ago, the difference between my buddy’s 32mm objective and my 50mm became painfully clear. As legal shooting light faded, I could still clearly identify antler points while he was straining to see anything useful.

But here’s what the internet forums won’t tell you: bigger isn’t always better. A massive 56mm objective lens might gather light like nobody’s business, but it also sits higher off your rifle, affecting your cheek weld and potentially your accuracy. Plus, try hauling that extra weight through ten miles of deadfall—your shoulders will remind you why lightweight gear has its place.

Real-World Examples from the Field

Let me paint you two scenarios from actual hunts to drive these concepts home:

Example 1: The Fixed 4×32 Scope Two seasons ago, I guided a hunter from Texas who brought his grandfather’s Winchester .30-30 topped with an old Weaver 4×32. That fixed 4x magnification meant his targets appeared four times larger, no adjustments needed. The 32mm objective lens provided adequate light for most hunting situations. Was it fancy? No. But when a whitetail buck stepped out at 75 yards in thick timber, that simple setup was absolutely perfect. No time wasted spinning magnification rings—just shouldered, aimed, and harvested.

Example 2: The Variable 4-12×40 Scope Last October in the Bitterroot Mountains, I watched a client make an incredible shot on a bighorn ram using a 4-12×40 scope. At dawn, we spotted the ram bedded at 400 yards. He started at 4x to locate the animal against the rocky backdrop, then gradually increased magnification to 12x once he’d established a solid shooting position. That 40mm objective lens gathered enough light in the early morning to make out vital details. The ram never knew we were there.

Choosing the Right Numbers for Your Hunting Style

Your scope selection should match your hunting environment and style—not what some magazine article claims is “best.” Here in northern Montana, my recommendations vary based on terrain:

Thick Timber and Brushy Draws: A 2-7x or 3-9x with a 32-40mm objective serves most hunters well. Scout, my German Shorthaired Pointer, has pushed more deer out of thick cover than I can count, and shots typically happen fast at under 100 yards. Lower magnification helps you find your target quickly.

Mixed Terrain (My Personal Favorite): The 3-9×40 or 4-12×40 configuration handles everything from timber to open meadows. This is what rides on my primary .270 Winchester, and it’s taken game from 30 to 400 yards.

Open Country and Long-Range Precision: Western hunters glassing across canyons might prefer 4-16x or 5-25x with 44-50mm objectives. But remember—higher magnification amplifies every tremor. If you can’t hold steady, all that magnification becomes a liability, not an asset.

Light Transmission: The Hidden Factor

Beyond the basic numbers, consider this: not all 40mm objectives perform equally. Quality of glass and lens coatings dramatically affect light transmission. I learned this lesson the hard way during a backcountry hunt near Glacier National Park. My budget scope with a 50mm objective couldn’t match my partner’s premium 40mm scope when it came to clarity at last light.

The wilderness doesn’t care about your schedule—or your budget. But investing in quality glass pays dividends when that trophy bull steps out with five minutes of legal shooting light remaining.

Field-Testing Your Understanding

Here’s how I teach my survival students to verify their scope knowledge:

  1. The Parking Lot Test: Set up targets at 25, 50, and 100 yards. Practice adjusting magnification (if variable) and note how target size and field of view change.
  2. The Dawn/Dusk Challenge: Compare different objective lens sizes during low light. You’ll quickly understand why many Montana hunters prefer larger objectives.
  3. The Stability Check: Shoot groups at maximum magnification from field positions (not just a bench). This reveals whether you can effectively use high magnification under hunting conditions.

Maintenance Wisdom from the Field

Those numbers on your scope mean nothing if your glass is fogged or dirty. I’ve seen more missed opportunities from neglected optics than from misunderstood specifications. Keep lens covers on when moving through brush—Scout and River have taught me that mud finds its way onto everything during spring turkey season. A small lens cloth lives in my bino harness, right next to my wind checker.

The Bottom Line: Knowledge Equals Confidence

Understanding scope numbers transforms equipment selection from guesswork to informed decision-making. Whether you’re choosing your first hunting scope or upgrading for that dream elk hunt, these numbers tell you exactly what you’re buying.

Remember: respect the game, respect the land, respect yourself—and that includes respecting your equipment enough to understand it thoroughly. The best survival tool is the six inches between your ears, and now you’ve added scope knowledge to that toolkit.

Plan for the worst, hope for the best, and always verify your scope’s zero before season. Your future self will thank you when that buck of a lifetime steps into view.

Want to dive deeper into rifle optics? Check out our guides on mounting procedures, zeroing techniques, and field maintenance tips. And if you’re curious about specific reticles like MOA versus MRAD for long-range shooting, we’ve got you covered there too.

Stay sharp, stay ready, and remember—practice makes permanent, so practice it right.

Flint Marshall
Northern Montana

Frequently Asked Questions

What factors beyond the numbers should I consider when buying a rifle scope?

From my experience guiding hunters, durability tops the list. A scope that loses zero after a tumble off your horse (yes, it happens) is worthless, regardless of specifications. Consider your rifle’s intended use, your physical ability to hold steady at high magnification, reticle type (simple duplex versus complex Christmas-tree designs), adjustment turret style, and whether you need first or second focal plane for ranging. Don’t forget mounting height—it affects your shooting form significantly.

How do I calculate a scope’s zoom range?

The zoom range calculation is straightforward: divide the highest magnification by the lowest. A 3-9x scope has a 3x zoom range (9÷3=3). A 4-16x offers 4x zoom range. This tells you the scope’s versatility. In practical terms, wider zoom ranges offer more flexibility but often sacrifice optical quality at the extremes. I’ve found 3x to 4x zoom ranges hit the sweet spot for most hunting applications.

What other important numbers should I know about on my scope?

Beyond magnification and objective diameter, pay attention to eye relief (distance from your eye to the ocular lens)—critical for heavy-recoiling rifles. Field of view at different magnifications determines how much area you can see, measured in feet at 100 yards. Adjustment click values (typically 1/4 MOA or 0.1 MRAD) affect precision when zeroing. Tube diameter (1 inch or 30mm typically) impacts adjustment range and mounting ring selection. Each specification serves a purpose—understand them all for complete scope mastery.

Vortex Razor vs Trijicon RMR: Three Years of Side-by-Side Testing in Montana’s Extremes

0

The grizzly sow appeared seventy yards out, investigating our camp near Hungry Horse Reservoir. My backup pistol wore a Trijicon RMR that morning, while my partner carried a Vortex Razor—both setups we’d been testing side-by-side for three years. That tense standoff, watching her decide whether we were worth investigating further, reinforced why pistol optics need absolute reliability. After twenty-five years carrying firearms professionally and mounting these exact optics on everything from competition pistols to ranch rifles, I’ve learned that choosing between the Razor and RMR isn’t about which is “best”—it’s about understanding their different strengths.

Why This Comparison Matters

My grandfather carried a 1911 with iron sights through Korea, trusting nothing but steel and tritium. “Electronics fail when you need them most,” he’d say. He wasn’t wrong about reliability mattering, but modern pistol optics have proven themselves through military deployments, law enforcement use, and yes, encounters with Montana’s apex predators.

The Vortex Razor and Trijicon RMR represent two philosophies in miniature red dot design. One prioritizes features and value, the other bombproof reliability at any cost. Through three years of parallel testing, I’ve discovered which excels where.

Testing Protocol: Real-World Validation

Both optics underwent identical testing:

Environmental Exposure

  • Temperature range: -28°F to 96°F (documented)
  • Altitude: 4,000 to 11,000 feet
  • Weather: Rain, snow, dust storms, ice
  • Duration: Three years continuous use

Durability Testing

  • Round count: 8,000+ through RMR, 6,500+ through Razor
  • Drop testing: Multiple heights onto various surfaces
  • Water submersion: 24-hour tests
  • Impact resistance: Simulated falls, vehicle accidents

Practical Applications

  • Daily carry on concealed pistols
  • Competition use (USPSA, Steel Challenge)
  • Ranch rifles for predator control
  • Training courses with law enforcement

Glass Clarity and Reticle: Different Approaches

Vortex Razor: Clean Sight Picture

The Razor’s window provides an unobstructed view without the blue tinting common in cheaper optics. During dawn hunts when every photon matters, that clarity translates to positive target identification. The 6 MOA dot seems large initially but proves fast for defensive use.

Last spring, engaging multiple coyotes harassing newborn calves, that larger dot enabled rapid target transitions. The clean glass meant no distortion when shooting through vehicle windows—a real consideration for ranch work.

Real-World Performance: The lack of tinting matters more than specs suggest. During a December search-and-rescue operation, identifying subjects through the Razor proved easier in flat light conditions where the RMR’s slight blue tint obscured details.

Trijicon RMR: Proven Precision

The RMR’s 3.25 MOA dot offers superior precision for distance shooting. The slight blue tinting—criticized by many—actually helps in bright conditions by reducing glare. That smaller dot enables surgical shot placement when precision matters more than speed.

Trijicon RMR/Adjustable LED RMR Type 2 6.5 MOA Adjustable LED Red Dot Sight with…
  • 6.5 MOA ADJUSTABLE LED RMR: Features an automatic brightness mode and easy push buttons for eight adjustable brightness settings including 2 nv and 1 Super bright
  • DEPENDABLE ELECTRONIC DESIGN: Ruggedized Battery contacts and electronics ensure performance and survivability in harsh environments

During pistol competitions, the RMR’s finer dot consistently produces tighter groups at 25+ yards. For hunting applications where single precise shots matter, that smaller dot proves its worth. My wife Sarah uses one on her bear defense pistol specifically for this precision.

The Bottom Line: Choose the Razor for speed and clarity, RMR for precision and proven durability.

Battery Life: Marketing vs Reality

Claimed vs Actual Performance

Vortex Razor Claims: 150 hours maximum brightness, 30,000 hours minimum My Experience: 287 hours at setting 6 (daylight visible), 18 months at setting 3

Trijicon RMR Claims: 4 years continuous at setting 4 My Experience: 3.5 years before noticeable dimming, still functional at 4 years

The RMR’s always-on design means never wondering about battery status. After forgetting to turn off the Razor twice (dead battery both times during important range sessions), I appreciate the RMR’s approach. However, the Razor’s auto-shutoff extends battery life significantly when remembered.

Battery Change Considerations

Razor: Top-loading battery means no re-zeroing needed. Changed batteries during a match without losing zero—massive advantage.

RMR: Bottom-loading requires removal and re-zeroing. I learned this lesson before an important competition. Now I change batteries annually regardless of need.

Durability: Torture Testing Results

The Vortex Razor Survivor Story

My Razor survived:

  • Ejection from moving vehicle at 35 mph (don’t ask)
  • Three drops from shoulder height onto concrete
  • Complete submersion for 48 hours
  • Freezer test at -20°F for one week
  • 6,500 rounds including hot .357 Sig loads

Minor cosmetic damage, maintained zero throughout. That’s impressive for any optic, especially at this price point.

The Trijicon RMR Tank

My RMR endured:

  • Direct hammer blow (testing extremes)
  • Washing machine cycle (mounted on forgotten range shirt)
  • 8,000+ rounds including .44 Magnum
  • Used as improvised hammer (desperate times)
  • Survived untouched when pistol frame cracked

Zero mechanical failures. Zero shift. The RMR’s reputation for bombproof construction proves justified.

Critical Failure Points

Razor Weakness: Electronics failed at -28°F during February predator hunt. Recovered when warmed but concerned for extreme cold operations.

RMR Weakness: Adjustment screws seized after extended salt water exposure during coastal training. Required professional service to restore function.

Weight and Size: Ounces Matter

On Paper vs On Pistol

Vortex Razor: 1.5 ounces seems negligible until carried concealed daily. On competition pistols, unnoticeable. On concealed carry guns, changes balance noticeably.

Trijicon RMR: 1.0 ounce makes it ideal for carrying pistols. The compact footprint means better holster compatibility and less printing through clothing.

My EDC Glock 19 wears an RMR specifically for weight savings. My competition Glock 34 runs the Razor where ounces don’t matter but features do.

Adjustment Systems: Different Philosophies

Vortex Razor: User-Friendly Approach

The Razor’s adjustment system uses actual turrets like a traditional scope. During zeroing, this proves intuitive for anyone familiar with rifle scopes. The positive clicks provide confidence in adjustments.

However, those protruding turrets snag on gear. During a training course, the elevation turret adjusted itself after catching on my vest. Now I verify zero before any critical use.

Trijicon RMR: Minimalist Design

The RMR’s flush adjustment screws require tools but never move accidentally. Once zeroed, it stays zeroed. Period. This confidence in zero retention matters for defensive use where checking zero isn’t always possible.

The downside? Field adjustments prove difficult. Forgot your adjustment tool? You’re stuck with current zero. I keep spare adjustment tools in a range bag, vehicle, and workshop.

Brightness Controls: Speed vs Precision

Instant Access vs Deliberate Control

Razor: Single button cycling through settings proves fast but sometimes frustrating. In bright conditions, cycling through all settings to reach maximum takes time.

RMR: Hold-to-activate with automatic return to previous setting proves superior for defensive use. Grab gun, dot appears at last setting. No thinking required.

During force-on-force training, the RMR’s instant-on capability proved superior. The Razor required conscious activation—fine for competition, problematic under stress.

Mounting Solutions: Compatibility Matters

Vortex Razor: Limited Options

The Razor’s unique footprint limits mounting options. Quality adapter plates exist but add height and potential failure points. Direct milling requires specific cuts not all gunsmiths offer.

On rifles, the included Picatinny mount works adequately. For pistols, research compatibility carefully. Not all “universal” plates fit properly.

Trijicon RMR: Industry Standard

The RMR footprint became industry standard for good reason. Nearly every mounting solution accommodates RMR patterns. Holsters, mounting plates, direct milling—all readily available.

This widespread compatibility means easier upgrades, better resale value, and more configuration options. When building a new pistol, RMR compatibility is assumed.

Real-World Applications

Home Defense: RMR Wins

For bedside pistols, the RMR’s always-on reliability matters most. No buttons to find in darkness, no batteries dying at wrong moments. Grab gun, see dot, defend family. Simple.

Competition: Razor Advantages

The Razor’s larger window and cleaner glass provide advantages in competition. Faster target acquisition, better visibility in varied lighting, top-loading battery for between-stage changes.

Concealed Carry: RMR Again

Weight and size matter for daily carry. The RMR’s compact footprint and proven durability inspire confidence. It disappears under clothing while remaining ready when needed.

Ranch/Truck Gun: Either Works

Both optics handle ranch rifle duties well. The Razor’s features appeal for varied use, while the RMR’s durability handles abuse better. Personal preference decides here.

Cost Analysis: Value Propositions

Vortex Razor at $229

What You Get:

  • 90% of RMR performance
  • Better glass clarity
  • More features
  • Excellent warranty
  • Good durability

Best For: Budget-conscious buyers, competition shooters, recreational use

Trijicon RMR at $699

What You Get:

  • Proven military/LEO reliability
  • Industry-standard compatibility
  • Superior battery life
  • Bombproof construction
  • Resale value retention

Best For: Defensive use, professional applications, those who buy once

The Math That Matters

Razor over 5 years: $0.13 per day RMR over 10 years: $0.19 per day

The RMR costs 3x more initially but lasts longer and maintains value better. Used RMRs sell for 70% of retail. Used Razors fetch 50%. Factor total ownership cost, not just purchase price.

Warranty and Support Experience

Vortex: Exceptional Service

Vortex’s lifetime warranty impressed me. When my Razor developed flickering after the vehicle ejection incident, they replaced it without question. New unit arrived within a week.

Their customer service answered technical questions knowledgeably. When I needed mounting advice for an unusual application, they provided detailed guidance. This support matters for less experienced users.

Trijicon: Professional Grade

Trijicon’s warranty covers less but rarely needs invoking. When my RMR required service after salt water exposure, they repaired it promptly but charged for the work (my fault, not covered).

Their support assumes professional users who understand the equipment. Less hand-holding but efficient service when needed.

Making the Choice: Honest Recommendations

Choose the Vortex Razor If:

  • Budget constraints exist
  • Competition use primarily
  • You prefer more features
  • Larger sight window appeals
  • Customer service matters

Choose the Trijicon RMR If:

  • Defensive use is primary
  • Proven reliability matters most
  • You buy equipment once
  • Concealed carry is planned
  • Resale value concerns you

My Personal Setup

EDC Glock 19: RMR Type 2 RM06 Competition Glock 34: Was Razor, now RMR Ranch Rifle: Razor (features matter here) Wife’s Bear Gun: RMR (reliability critical)

After three years running both, I’m transitioning to RMRs exclusively. The reliability advantage and battery life justify the cost for serious use.

Common Questions Answered

“Is the RMR worth 3x the price?” For defensive use, yes. For recreation, probably not. Evaluate your actual needs honestly.

“Will the Razor fail when needed?” Mine hasn’t in three years of hard use, but the RMR inspires more confidence.

“Which holds zero better?” Both maintain zero well. RMR edges ahead in extreme conditions.

“Can I upgrade later?” Yes, but factor mounting/milling costs. Sometimes buying right initially costs less.

The Bottom Line from Montana

Both optics work. The Vortex Razor delivers impressive performance at an attractive price. The Trijicon RMR provides proven reliability at premium cost. Neither disappoints when used within their design parameters.

For most users, the Razor provides everything needed at a price that leaves money for ammunition and training. For those whose lives might depend on equipment function, the RMR’s proven track record justifies its premium.

That grizzly at Hungry Horse decided we weren’t interesting and wandered off. Both optics remained ready throughout that tense encounter. But if I could only have one, the RMR’s absolute reliability would be my choice when facing apex predators or apex problems.

Choose based on actual needs, not internet opinions. Then train with whatever you select until operation becomes instinctive. Equipment doesn’t replace skill, but quality tools enable capable shooters.

Remember: the most expensive optic won’t fix poor fundamentals, but quality equipment removes excuses for failure.

Ready to upgrade your pistol optics? Explore more field-tested reviews and mounting guides at Moosir.com, where experience meets practical instruction.

Aimpoint vs. EOTech: A Combat Veteran’s 20-Year Field Test

0

In 2004, my squad was pinned down in a bombed-out building outside Fallujah. Sand and dust filled the air like fog. Through it all, my Aimpoint CompM2 kept working—caked in Iraqi moon dust, battered from diving behind rubble, running on the same battery since deployment. Meanwhile, my buddy’s EOTech 552 had died two days earlier from dead batteries. That day taught me the real difference between these two optics isn’t found in spec sheets—it’s discovered when everything goes wrong.

After twenty years of running both systems—from Afghanistan’s mountains to Montana’s backcountry, from competition stages to patrol rifles—I’ve learned that the Aimpoint versus EOTech debate misses the point. They’re different tools solving different problems.

Let me share what two decades and tens of thousands of rounds through both platforms have taught me about these legendary optics.

The Quick Truth for Busy Folks

Aimpoint:

The Toyota Land Cruiser of optics. Utterly reliable, simple, runs forever on one battery. Perfect when failure means death.

EOTech:

EOTECH 512 Holographic Weapon Sight
  • EOTECH 512.A65 – Holographic Weapon Sight in black with 68 MOA ring & 1 MOA dot reticle

The Formula One car of optics. Faster, more precise, feature-rich, but requires more maintenance. Perfect when speed and precision matter most.

My verdict: Aimpoint for serious/defensive use, EOTech for competition/specialized applications. But the details matter, so keep reading.

Understanding the Technology Difference

Aimpoint: LED Simplicity

Aimpoints use a simple LED projected onto a coated lens. Think of a laser pointer bouncing off a mirror. This simplicity is their superpower.

Benefits of this design:

  • Minimal battery drain (LED uses microamps of power)
  • Fewer failure points (no complex electronics)
  • Temperature stable (LEDs don’t care about cold)
  • True “always on” capability

Drawbacks:

  • Dot can appear fuzzy with astigmatism
  • Limited reticle options
  • Dot size grows with magnification

EOTech: Holographic Complexity

EOTechs use laser-driven holographic technology. A laser illuminates a holographic film containing the reticle pattern. Think of it like a tiny 3D movie projected in your sight window.

Benefits of holographic design:

  • Reticle stays same size under magnification
  • Multiple reticle patterns possible
  • Clearer for people with astigmatism
  • Faster target acquisition with 68 MOA ring

Drawbacks:

  • Power hungry (laser needs serious juice)
  • Temperature sensitive electronics
  • More complex = more failure points
  • Cannot leave on continuously

Real-World Performance: 20 Years of Data

Battery Life: The Eternal Divide

Aimpoint Reality: My oldest Aimpoint PRO has been on continuously since 2018. Same battery. Still bright. That’s six years and counting. My CompM4s typically runs 7-8 years on one battery.

During a week-long backcountry elk hunt, I forgot spare batteries. Didn’t matter. The Aimpoint doesn’t care about your poor planning. It just works.

EOTech Reality: My EXPS3 needs new batteries every 2-3 months with regular use. The auto-shutoff helps (4 or 8 hours depending on button used), but forgetting to turn it on before a bump in the night? That’s a problem.

I budget $40 annually for EOTech batteries. That adds up over a decade of ownership.

Glass Clarity and Reticle Design

Through the Aimpoint: The view is crystal clear, but simple. You get a dot—2 MOA, 4 MOA, or 6 MOA depending on model. That’s it. No ranging features, no holdovers, just a dot.

For defensive use, this simplicity is perfect. Put dot on target, press trigger. My grandmother could figure it out in seconds.

The dot appears crisp to normal eyes but can bloom or starburst with astigmatism. My mild astigmatism makes a 2 MOA dot look like 4 MOA.

Through the EOTech: The 68 MOA ring with 1 MOA center dot is genius. The ring naturally draws your eye to center, making target acquisition notably faster. In timed drills, I’m consistently 0.2-0.3 seconds faster with EOTech.

The holographic reticle appears cleaner with my astigmatism—still not perfect, but better than the Aimpoint’s LED dot. The 1 MOA center allows precision shots that a 2 MOA Aimpoint dot would cover.

Durability: Combat vs. Competition

Aimpoint Torture Testing:

  • Frozen at -40°F in Montana: Worked perfectly
  • Submerged in river during crossing: No issues
  • Dropped 30 feet from helicopter (training accident): Held zero
  • 50,000+ rounds on same T2: Still perfect
  • Covered in concrete dust during construction: Didn’t care

My issued CompM4 survived two IED blasts mounted on my M4. The rifle needed replacing; the Aimpoint went on the new one.

EOTech Experiences:

  • Failed at -20°F during Montana predator hunt
  • Thermal drift issues (since addressed in new models)
  • Electronics died after hard drop onto rocks
  • Excellent through 30,000 rounds when babied
  • Reticle flickered after getting soaked

EOTechs are tough by civilian standards but fragile compared to Aimpoints. They’re competition tough, not combat tough.

Weight and Size Considerations

Aimpoint Footprint:

  • PRO: 11.6 oz (hefty but bombproof)
  • T2: 3.0 oz (perfect for lightweight builds)
  • CompM5: 5.2 oz (sweet spot)

Aimpoints are generally more compact. The tube design minimizes snag points and allows for lower mounting.

EOTech Profile:

  • 512: 11.5 oz
  • EXPS3: 11.2 oz
  • XPS2: 9.0 oz

EOTechs are wider and boxier. They snag on gear and brush more easily. The larger window is nice until you’re crawling through thick timber.

Temperature Performance

This is where EOTech’s Achilles heel shows. During a December coyote hunt at -25°F, my EXPS3 wouldn’t turn on. Meanwhile, my backup rifle’s Aimpoint worked perfectly.

EOTech has addressed cold weather issues in newer models, but they still struggle below -20°F. Aimpoints laugh at temperature extremes, functioning from -45°F to +160°F.

Magnification Compatibility

With Aimpoint

Adding a 3x magnifier to a 2 MOA dot makes it a 6 MOA dot. Fine for torso shots at 300 yards, but precision suffers. The dot covers too much target.

With EOTech

The 1 MOA center dot remains 1 MOA under magnification. The 68 MOA ring helps with holdovers. This is significantly better for precision work at distance.

If you plan to use magnification, EOTech wins decisively.

Night Vision Considerations

Both work with night vision, but differently:

Aimpoint: Dedicated NV settings that preserve both battery and your natural night vision. The lower settings are invisible to naked eye but perfect through NVGs.

EOTech: NV settings work but drain battery faster. The holographic technology requires more power even in NV mode.

For serious NV use, Aimpoint is superior.

Practical Applications: Which for What

Home Defense

Winner: Aimpoint

When something goes bump at 3 AM, I want a sight that’s always on, always ready. No buttons, no activation, just present rifle and the dot is there. Battery life means I check it annually, not daily.

Competition/3-Gun

Winner: EOTech

The 68 MOA ring is measurably faster for target transitions. The 1 MOA dot allows precision shots. Auto-shutoff isn’t a concern when you’re turning it on for each stage.

Patrol/Duty Use

Winner: Aimpoint

Duty guns sit in racks for months, get banged around, face temperature extremes. They need to work immediately when grabbed. Aimpoint’s always-on reliability is unmatched.

Hunting

Winner: Depends

For spot-and-stalk western hunting where shots might reach 300+ yards: EOTech with magnifier.

For tree stand whitetail hunting where reliability matters more than precision: Aimpoint.

Military/Combat

Winner: Aimpoint

No contest. When resupply is uncertain, conditions are harsh, and failure means death, Aimpoint’s reliability dominates. There’s a reason special operations units worldwide choose Aimpoint.

Cost Analysis: Total Ownership

Aimpoint Investment

  • Initial: $450-$850
  • Batteries (10 years): $10
  • Total 10-year cost: $460-$860
  • Cost per year: $46-$86

EOTech Investment

  • Initial: $400-$700
  • Batteries (10 years): $400
  • Total 10-year cost: $800-$1,100
  • Cost per year: $80-$110

EOTech’s lower initial price is offset by battery costs. Over a decade, Aimpoint is actually cheaper.

Models I Actually Recommend

Aimpoint Picks

Best Overall: Aimpoint PRO (~$450)

  • Bomb-proof reliability
  • 30,000-hour battery
  • Complete package with mount
  • Perfect for serious use

Best Lightweight: Aimpoint T2 (~$750)

  • 3 ounces total weight
  • 50,000-hour battery
  • Incredible durability
  • Worth the premium

Best Value: Aimpoint ACO (~$350)

  • Identical internals to PRO
  • Simpler mount
  • Same reliability
  • Budget friendly

EOTech Picks

Best Overall: EXPS3-0 (~$650)

  • Lower 1/3 co-witness height
  • Side buttons (better with magnifier)
  • Quick detach mount
  • Current generation improvements

Best Value: 512 (~$400)

  • Proven AA battery system
  • Same reticle and performance
  • Bulkier but cheaper
  • Good entry point

The Astigmatism Factor

If you have astigmatism, try before you buy. Generally:

  • Mild astigmatism: EOTech usually better
  • Severe astigmatism: Prism sights or irons
  • No astigmatism: Both work fine

Don’t trust internet opinions—your eyes are unique. Rent or borrow both before purchasing.

My Personal Setup

After 20 years of experimentation:

Home Defense AR: Aimpoint PRO

  • Always on, always ready
  • No thinking required
  • Proven reliability

Competition AR: EOTech EXPS3 + G33 Magnifier

  • Fast acquisition
  • Precision capability
  • Match-winning combination

Truck Gun: Aimpoint ACO

  • Affordable reliability
  • Don’t cry if stolen
  • Works despite neglect

Hunting Rifle: EOTech EXPS3

  • Better with magnification
  • Precise enough for ethical shots
  • Accept battery management

Common Misconceptions Corrected

“EOTechs Are Fragile”

False. They’re tough by normal standards, just not Aimpoint-tough. For 99% of users, EOTech is plenty durable.

“Aimpoint Dots Are Too Big”

The 2 MOA T2 is precise enough for head shots at 100 yards. If you need more precision than that, you need a magnified optic.

“EOTech Battery Life Is Terrible”

It’s shorter than Aimpoint but manageable with discipline. Auto-shutoff and spare batteries solve most issues.

“Holographic Is Always Better for Astigmatism”

Not true. Some astigmatic eyes prefer LED dots. Test both yourself.

The Bottom Line

After 20 years and hundreds of thousands of rounds, here’s my truth:

Choose Aimpoint when:

  • Reliability is paramount
  • Simplicity matters
  • Battery logistics are difficult
  • It’s for defensive use
  • Budget allows for higher initial cost

Choose EOTech when:

  • Speed is critical
  • Precision at distance matters
  • You’ll use magnification
  • Battery management isn’t an issue
  • Competition/sport use

Both are excellent optics that have earned their reputations. The “best” depends entirely on your specific needs.

For most people reading this, an Aimpoint PRO will serve better than an EOTech. It’s simpler, more reliable, and requires less thinking. But if you need EOTech’s specific advantages, accept the tradeoffs and battery costs.

Remember: Both have served successfully in combat worldwide. Both have won competitions. Both will outlast your barrel. Choose based on your actual needs, not internet arguments.

The best optic is the one that works when you need it. Everything else is just specs on paper.

Practice makes permanent, so practice it right.

See clearly,

Flint Marshall
Northern Montana


Questions about specific models or applications? Used both and have different experiences? Drop a comment below or check out more hard-tested gear reviews at Moosir.com. Remember—respect the gear, respect the mission, respect yourself.