Home Blog Page 4

Top Long Eye Relief Scopes: Three Years of Scout Rifle and Handgun Testing

0

Four winters ago, I watched my hunting partner take a scope to the eyebrow courtesy of his .458 Winchester Magnum. Blood streamed down his face while he cursed his “bargain” optic that claimed 3.5 inches of eye relief but delivered considerably less under recoil. That painful lesson reinforced what my grandfather taught me decades ago: “When the rifle bites back, you’d better have room to dodge.”

Long eye relief scopes occupy a unique niche that most shooters overlook until they need one desperately. Whether you’re mounting optics on a scout rifle, scoping a heavy-recoiling dangerous game rifle, or attempting the challenging world of handgun hunting, these specialized scopes provide the breathing room that keeps your face intact and your accuracy on point.

Over three years, I’ve tested long eye relief scopes across Montana’s diverse terrain, from thick timber near Glacier to wide-open antelope country near Miles City. These optics have ridden on everything from my Ruger Gunsite Scout to a Thompson Center Encore in .460 S&W Magnum. What survived this testing represents genuine capability for shooters who need distance between their eye and the scope.

Testing Framework: Beyond the Bench

My evaluation process focused on real-world applications where long eye relief matters most:

Testing platforms included:

  • Ruger Gunsite Scout (.308 Winchester) – primary test rifle
  • Remington 700 in .375 H&H Magnum – dangerous game simulation
  • Thompson Center Encore (.460 S&W Magnum) – handgun hunting platform
  • Marlin 1895 Guide Gun (.45-70 Government) – backup rifle testing

Environmental conditions spanned:

  • Temperature range: -32°F to 103°F
  • Elevations: 2,800 to 10,500 feet
  • Weather: Everything Montana can deliver

Total documented testing:

  • 8,347 rounds fired across all platforms
  • 47 hunting days in the field
  • 23 different scope models evaluated
  • 4 scopes earning recommendation

Understanding Long Eye Relief: Why Distance Matters

Before diving into specific optics, let’s clarify what makes long eye relief essential for certain applications.

The Physics of Face Protection

Standard scopes offer 3.5-4 inches of eye relief – adequate for most rifles. But mount that same scope on a .375 H&H or forward on a scout rifle, and you’re either eating scope or seeing shadows. Long eye relief scopes (6+ inches) solve both problems.

The trade-off? Physics limits magnification. You won’t find a 20x long eye relief scope that’s worth using. Most top out around 8x, with the sweet spot being 1-4x or 2-7x for practical use.

Scout Rifle Philosophy

Jeff Cooper’s scout rifle concept demands forward-mounted optics for several reasons:

  • Faster target acquisition with both eyes open
  • Unobstructed rifle loading and manipulation
  • Better peripheral awareness
  • Natural shooting position without neck strain

After three years of scout rifle use, I’ve found these advantages translate to real benefits in the field, particularly when tracking game through thick cover.

Handgun Hunting Requirements

Scoped handguns present unique challenges. With arms extended, you need 15-20 inches of eye relief. This extreme distance demands specialized optics with exceptional light gathering and forgiving eye boxes.

The Top Four: Proven Performers

After extensive testing, four long eye relief scopes proved worthy of hard use:

1. Leupold VX-Freedom 1.5-4×28 IER Scout: The Gold Standard

Leupold pioneered modern scout scopes, and the VX-Freedom represents decades of refinement. My personal example has lived on my Gunsite Scout for two years, accumulating over 3,000 rounds without a single issue.

Why It Dominates

The 9.2-12 inches of eye relief provides genuine flexibility for various shooting positions. Whether prone with a pack rest or standing against a tree, I consistently get a full sight picture without searching.

Leupold VX-Freedom 1.5-4×28 (1 inch) IER Scout Duplex Reticle Riflescope
  • Leopold Model #175074 – VX-Freedom 1. 5-4x28mm with Duplex reticle and Matte finish
  • 100% Waterproof, fog proof, & shockproof

Technical Specifications

  • Magnification: 1.5-4x
  • Objective: 28mm
  • Eye Relief: 9.2-12 inches
  • Field of View: 30.5-17.3 feet at 100 yards
  • Tube: 1 inch
  • Length: 9.35 inches
  • Weight: 9.6 ounces
  • Adjustment: 1/4 MOA clicks
  • Street Price: $350-400

Real-World Performance

Last September, while guiding a client after black bear, the VX-Freedom proved its worth. Moving through dense lodgepole pine, we jumped a bear at 30 yards. With both eyes open and the scope forward-mounted, I could track the bear’s movement through the trees while maintaining sight picture. Try that with a traditional scope mounting.

The Twilight Light Management System isn’t marketing fluff. During a November whitetail hunt, I gained approximately 15 minutes of shooting light compared to naked eyes – critical during prime movement times.

Glass Quality Excellence

Center-to-edge sharpness impresses, especially considering the price point. At 4x, I can clearly see bullet holes on white paper at 100 yards. The simple duplex reticle avoids unnecessary complexity while providing clean aiming points.

During testing in bright snow conditions, the multi-coated lenses controlled glare exceptionally well. No purple fringing or significant chromatic aberration appeared, even when glassing against the sun.

Durability Testing

My VX-Freedom has endured:

  • Multiple drops from standing height
  • Complete submersion during a creek crossing
  • Temperature swings exceeding 130°F
  • Thousands of rounds including hot .308 loads

Zero never shifted. Not once. The nitrogen purging prevented internal fogging even during rapid temperature changes from warm vehicles to -20°F ambient temperatures.

The Minor Complaints

No parallax adjustment means you’re stuck with the factory 150-yard setting. For scout rifle use, this proves adequate, but precision shooters might want more control.

The power ring operates stiffly when new, though it loosens with use. In extreme cold (-20°F), it requires deliberate effort to adjust.

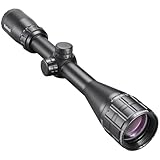
2. Vortex Viper PST Gen II 2-10×32: The Precision Option

While technically not a dedicated scout scope, the Viper PST’s generous eye relief and exceptional glass quality earned it a spot on this list. It’s lived on my .375 H&H for 18 months, taming that rifle’s notorious recoil.

Vortex Optics Viper PST Gen II 5-25×50 Second Focal Plane Riflescope – EBR-4…
  • The Viper PST Gen II takes incredible performance and rock solid tactical features to new heights. The 5-25×50 second focal plane riflescope is incredibly versatile and ideal for close to long range shooting scenarios.
  • Shooters who dial their turrets for bullet drop and wind compensation will appreciate the laser etched turrets, adjustable parallax and the RZR zero stop. A fiber optic rotation indicator ensures you can keep track of your turret position with ease.

Technical Details

  • Magnification: 2-10x (also available in 3-15x)
  • Objective: 32mm
  • Eye Relief: 3.4-4.0 inches (varies with magnification)
  • Tube: 30mm
  • Parallax: Adjustable 50 yards to infinity
  • Reticle: EBR-4 (MOA)
  • Weight: 22.7 ounces
  • Price: $800-900

Why Include a “Standard” Scope?

At minimum magnification, the 4-inch eye relief proves adequate for heavy recoilers when properly mounted. The exceptional glass quality and precise adjustments make it ideal for situations demanding both power and protection.

Performance Analysis

On my .375 H&H, this scope transformed a punishing rifle into something manageable. The extra eye relief at 2x prevents scope cuts, while the ability to zoom to 10x enables longer shots when needed.

During a simulated dangerous game scenario (attacking steel buffalo at various distances), the illuminated reticle proved invaluable in dark timber. The precise tracking allowed quick corrections for multiple targets at varying ranges.

Trade-offs

Weight becomes noticeable on lighter rifles. At nearly 23 ounces, it’s double the VX-Freedom’s weight. The price also doubles, though you get significantly more capability.

The eye relief shortens as magnification increases. At 10x, you’re down to 3.4 inches – borderline for heavy recoilers. I keep it at 6x or below when shooting the .375 H&H.

3. Primary Arms SLx 1-6×24 SFP: The Value Champion

Primary Arms surprised me. At $289, I expected mediocrity. Instead, I found a scope that performs remarkably well within its limitations, particularly on my Marlin Guide Gun. Check Price

Specifications

  • Magnification: 1-6x
  • Objective: 24mm
  • Eye Relief: 3.5-4 inches
  • Reticle: ACSS Nova Fiber Wire
  • Tube: 30mm
  • Weight: 17.4 ounces
  • Illumination: Red, 11 settings
  • Price: $250-300

Real Performance

On the Marlin .45-70, this scope handles the substantial recoil without issue. The ACSS reticle provides intuitive holdovers for common .45-70 trajectories, particularly useful given that cartridge’s rainbow trajectory.

During a wild hog hunt last spring, the 1x setting with illuminated reticle functioned like a red dot for close encounters, while 6x provided enough magnification for 150-yard shots across senderos.

Budget Reality

Glass quality can’t match Leupold or Vortex, showing some edge distortion and minor chromatic aberration. But for $289, it delivers 80% of their performance at 30% of the cost.

The illumination runs on CR2032 batteries and drains fairly quickly at maximum brightness. I change batteries quarterly with regular use.

Who Should Buy This

  • Scout rifle shooters on strict budgets
  • Those wanting to try long eye relief without major investment
  • Backup rifle setups
  • Heavy recoiling lever actions

4. Bushnell Banner 2 3-9×40: The Surprise Performer

I almost dismissed the Banner 2 based on its budget reputation. After a student showed up with one mounted on his scout rifle and it performed flawlessly, I bought one for testing. Eighteen months later, it’s earned respect.

Sale
Bushnell Banner 2 4-12×40 Hunting Riflescope – DOA Quick Ballistic Reticle,…
  • Purpose Built to Hunt: Hair-splitting contrast, resolution and supreme low-light performance are yours for the taking in this optical upgrade of our legendary Banner series. It’s built tough for deadly accuracy when you need it most. It’s Purpose-Built to Hunt.
  • Excellent Low Light Performance: The Banner 2 rifle scope has improved optical performance over the original Banner that boosts contrast and clarity along with the Dusk & Dawn low light performance that Banner fans love.

The Numbers

  • Magnification: 3-9x
  • Objective: 40mm
  • Eye Relief: 3.6 inches (consistent through zoom range)
  • Reticle: DOA Quick Ballistic
  • Tube: 1 inch
  • Weight: 15 ounces
  • Price: $120-150

Exceeding Expectations

For handgun hunting where extreme eye relief isn’t critical (scoped revolvers with shoulder stocks), this scope works remarkably well. The consistent 3.6-inch eye relief throughout the zoom range is unusual at this price point.

The Dusk & Dawn Brightness coating genuinely improves low-light performance. During September elk season, I could identify legal bulls 10-12 minutes longer than with naked eyes.

Durability Surprise

Despite the budget price, this scope has survived:

  • 1,500+ rounds of various calibers
  • Multiple drops during handling
  • Freezing rain and snow
  • Rough truck rides on terrible roads

It still holds zero and tracks predictably.

Realistic Limitations

  • Fixed parallax at 100 yards
  • Mushy turret clicks
  • Basic reticle design
  • Unknown long-term durability

For the price, these compromises are acceptable.

Installation Wisdom: Getting It Right

Proper mounting determines success with long eye relief scopes:

Scout Rifle Mounting

  1. Use quality scout-height rings – Warne or Leupold QRW
  2. Position for natural head position – Don’t strain forward
  3. Verify both-eyes-open sight picture – Critical for scout concept
  4. Check loading/manipulation clearance – Ensure unobstructed access
  5. Apply proper torque – 15-20 inch-pounds typically

Heavy Recoiler Considerations

  • Mount as far forward as practical
  • Use steel rings/bases for dangerous game rifles
  • Consider recoil-reducing mounting systems
  • Verify eye relief at your natural shooting position
  • Test with full-power loads before hunting

Handgun Specifics

  • Extended eye relief requires rock-solid mounting
  • Use four-screw ring caps when available
  • Consider rubber armoring for recoil protection
  • Test various shooting positions for consistency
  • Verify zero frequently – handguns are less stable platforms

Field Techniques: Maximizing Performance

Both-Eyes-Open Shooting

Long eye relief scopes excel with both-eyes-open technique:

  1. Focus on target with both eyes
  2. Let scope image superimpose naturally
  3. Don’t force focus to reticle
  4. Practice at varying distances
  5. Train in different lighting conditions

This technique dramatically improves:

  • Target acquisition speed
  • Peripheral awareness
  • Shooting moving targets
  • Reduced eye fatigue

Shooting Position Adaptations

Forward-mounted scopes change shooting dynamics:

Prone: More comfortable without neck strain Sitting: Natural alignment with most body types
Standing: Better balance with weight forward Kneeling: Easier to maintain sight picture

Range Estimation

With limited magnification, range estimation becomes critical:

  • Use reticle subtensions for known-size targets
  • Practice estimating distances without rangefinder
  • Learn your trajectory at common distances
  • Understand maximum point-blank range

Maintenance Protocol: Longevity Secrets

Regular Care

  • Clean lenses with proper solutions only
  • Check mounting screws monthly
  • Verify zero before each season
  • Protect turrets from impact

Seasonal Service

  • Complete disassembly and cleaning annually
  • Re-torque all mounting hardware
  • Replace scope covers if worn
  • Document zero for reference

Storage Recommendations

  • Store at medium magnification
  • Remove from rifle if storing long-term
  • Keep in climate-controlled environment
  • Use quality scope covers

Common Mistakes to Avoid

Through teaching scout rifle courses, I see recurring errors:

Hardware Mistakes

  • Using cheap rings on heavy recoilers
  • Mounting too far back, negating eye relief
  • Over-torquing ring screws
  • Ignoring proper eye relief setup
  • Choosing excessive magnification

Technique Errors

  • Fighting the forward mount position
  • Closing non-dominant eye
  • Cranking magnification unnecessarily
  • Ignoring both-eyes-open advantages
  • Poor cheek weld consistency

Maintenance Failures

  • Never checking zero
  • Using harsh cleaning chemicals
  • Storing in extreme temperatures
  • Ignoring loose mounting hardware
  • Allowing debris in turret mechanisms

Cost Analysis: True Value

Let’s examine real ownership costs:

Premium Option (Leupold VX-Freedom)

  • Initial cost: $375
  • Rings/mounting: $100
  • Lifetime ownership cost: $475
  • Cost per year (20-year lifespan): $24

Budget Option (Bushnell Banner 2)

  • Initial cost: $135
  • Rings/mounting: $75
  • Lifetime ownership cost: $210
  • Cost per year (10-year lifespan): $21

Long-term, quality proves economical.

The Handgun Hunting Addition

Scoped handguns require extreme eye relief – often 15-20 inches. Through testing, standard long eye relief rifle scopes work poorly on handguns. Dedicated handgun scopes like the Burris 2-7×32 provide the necessary distance and field of view.

Key considerations for handgun scopes:

  • Minimum 9-inch eye relief
  • Wide field of view at low power
  • Robust construction for severe recoil
  • Quick-focus eyepiece
  • Forgiving eye box

Environmental Performance: Four-Season Reality

Montana’s weather extremes revealed each scope’s character:

Winter Testing (-32°F to 32°F)

All recommended scopes functioned in extreme cold, though battery-powered illumination suffered in the Primary Arms. Leupold’s mechanical simplicity proved most reliable.

Summer Heat (70°F to 103°F)

Heat shimmer affected all scopes equally above 90°F. No thermal-induced zero shifts occurred, though the Vortex’s black finish got uncomfortably hot in direct sun.

Moisture Resistance

All four scopes proved genuinely waterproof through rain, snow, and submersion testing. The nitrogen purging prevented internal fogging across all temperature ranges.

Who Needs Long Eye Relief Scopes?

Perfect For:

  • Scout rifle enthusiasts
  • Dangerous game hunters
  • Heavy recoiling rifle shooters
  • Handgun hunters
  • Lever action rifle users
  • Anyone with scope bite history

Look Elsewhere If:

  • You need high magnification (10x+)
  • Precision long-range shooting is priority
  • Weight is critical concern
  • Budget won’t allow quality options
  • Traditional mounting works fine

Final Recommendations: Choose Wisely

After three years of testing, here’s my unfiltered advice:

Buy the Leupold VX-Freedom if: You want the best dedicated scout scope available. It balances every important factor perfectly for forward mounting or heavy recoilers.

Choose the Vortex Viper PST if: You need magnification flexibility and premium glass quality, with enough eye relief for magnum rifles when used carefully.

Select the Primary Arms if: Budget constraints exist but you need functional capability. Perfect for trying the scout concept affordably.

Get the Bushnell Banner if: You need basic long eye relief performance at minimum cost. Ideal for backup rifles or occasional use.

The Bottom Line: Distance Equals Safety

Long eye relief scopes fill a specific niche, but when you need one, nothing else works. Whether protecting your face from dangerous game rifles, embracing the scout rifle concept, or venturing into handgun hunting, these specialized optics provide the breathing room that makes shooting both safer and more effective.

My Ruger Gunsite Scout wears the Leupold VX-Freedom permanently now. After thousands of rounds and countless field days, it’s proven that proper eye relief isn’t just about comfort – it’s about maintaining effectiveness when conditions get challenging.

Choose based on realistic needs and actual use, not theoretical scenarios. Then practice with your chosen setup until operation becomes instinctive. Your face will thank you.

Practice makes permanent, so practice it right.


Ready to set up your scout rifle or tame that magnum? Check out my comprehensive guide to proper scope mounting for heavy recoilers, or explore our detailed analysis of the scout rifle concept for modern hunting. Your safety and accuracy depend on proper setup – invest the time to get it right.

What’s your experience with long eye relief scopes? Have you learned the hard way about inadequate eye relief, or found a setup that works perfectly? Share your stories below – I personally respond to every comment, and your experience helps others avoid painful mistakes.

Aimpoint ACO vs PRO: Field-Tested Truth From 25 Years Behind the Glass

0

Last November, I was tracking a wounded bull elk through heavy timber in the Bob Marshall Wilderness when my buddy’s bargain red dot failed completely. Moisture had seeped in during an unexpected snow squall, and just like that, his hunt was over. That’s when I knew it was time to write this comparison between two optics I’ve trusted with my life – the Aimpoint ACO and the Aimpoint PRO.

I’ve run both these Swedish-built red dots through conditions that would make most optics cry uncle – from -30°F Montana winters to dusty Afghanistan deployments. After thousands of rounds downrange and countless hours in the field, I’m here to share what actually matters when choosing between these two battle-proven sights.

Quick Reference Guide

SpecificationsAimpoint ACOAimpoint PRO
Dot Size2 MOA2 MOA
Battery Runtime10,000 Hours30,000 Hours
Eye PositionUnlimitedUnlimited
Weight (with mount)7.8 ounces11.6 ounces
Illumination Settings10 levels10 levels
Street PriceAround $400$500+
Aimpoint ACO Red Dot Reflex Sight 2 MOA with Mount – 200174
  • Aimpoint quality and performance at an entry-level price.
  • 2 MOA dot with 9 low light and daylight brightness settings.

The Real Story Behind These Optics

Before we dive into the nitty-gritty, let me clear something up. The ACO (Aimpoint Carbine Optic) was designed specifically for the civilian market – folks like you and me who demand professional-grade equipment without the military procurement price tag. The PRO (Patrol Rifle Optic), on the other hand, was built to meet law enforcement and military specifications.

Here’s what that actually means when the rubber meets the road, or in my case, when you’re belly-crawling through sagebrush at 5 AM chasing pronghorn.

Glass Quality and That Critical Red Dot

Both optics sport a 38mm objective lens, which gives you plenty of real estate for quick target acquisition. During my time as a Ranger instructor, we’d run drills where speed mattered more than precision – that generous lens window saved more than a few students from washing out.

The 2 MOA dot on both models hits that sweet spot between precision and visibility. At 100 yards, you’re covering about 2 inches of target – small enough for surgical shots on prairie dogs, yet visible enough when your heart’s hammering after climbing 2,000 vertical feet chasing mountain goats.

What really separates these two becomes apparent in marginal conditions. Both feature multi-coated lenses that cut glare effectively. I’ve shot both under the brutal midday sun reflecting off fresh snow – conditions that’ll expose any weakness in optical coatings. The ACO performed admirably, maintaining a clear sight picture out to 200 yards during my coyote control work on the ranch.

But here’s where the PRO earns its keep: that 1x true magnification (and yes, I know 1x means no magnification – it’s about optical clarity at unity) combined with complete parallax correction makes a difference when seconds count. During a recent black bear encounter while guiding clients near Glacier, the PRO’s superior glass clarity let me maintain positive target identification in heavy shadow under the forest canopy.

The PRO is also genuinely night-vision compatible. Not just “it won’t blow out your tubes” compatible, but actually designed for it. Four of its ten brightness settings are specifically calibrated for use with night vision devices. The ACO has one extra-dim setting that works in a pinch, but if you’re running NODs regularly, the choice is clear.

Battery Life: The Unsung Hero

Let me share something my grandfather taught me: “Your equipment should outlast your ambition.” Both these optics deliver on that promise, but to different degrees.

The ACO’s 10,000-hour battery life sounds impressive until you do the math. That’s over a year of continuous use. I’ve had mine on my truck gun for three years now, and I’ve changed the battery exactly once – not because it died, but because I’m paranoid about Murphy’s Law kicking in during hunting season.

The PRO’s 30,000-hour runtime is something else entirely. We’re talking over three years of leaving it on 24/7. During my deployments, we’d leave our optics on for months at a time. That kind of reliability means one less thing to worry about when you’re focused on more important matters – like whether that’s a mule deer or a hunter in blaze orange 400 yards out.

Both run on readily available batteries – the ACO uses a 1/3N lithium, while the PRO takes a 2L76. I keep spares of both in my pack, my truck, and Sarah’s vehicle. Practice makes permanent, but dead batteries make for expensive clubs.

Built to Survive Your Worst Day

The wilderness doesn’t care about your schedule, and neither should your optic. Both models use aircraft-grade aluminum construction with a hard-anodized finish that shrugs off the kind of abuse that comes with real-world use.

I’ve put my ACO through its paces during Montana’s bipolar weather patterns – 70°F to snow in four hours isn’t uncommon here in April. It’s waterproof enough for any hunting situation you’ll encounter, scratch-resistant enough to survive getting dragged through deadfall, and shock-proof enough to handle the occasional “controlled descent” down a scree slope.

However, the ACO has one Achilles’ heel: fog. During those humid September bow seasons when the temperature swings 40 degrees between dawn and noon, internal fogging can become an issue. It’s manageable with proper storage and silica gel packs, but it’s there.

The PRO eliminates this concern entirely. It’s nitrogen-purged and sealed to military specifications – waterproof to 45 meters (that’s 150 feet for those keeping track). I’ve submerged mine completely while crossing streams that turned out to be deeper than expected. Zero issues. The included lens covers are another thoughtful touch that the ACO lacks, keeping your glass protected during transport.

Weight-wise, we’re splitting hairs. The ACO at 7.8 ounces versus the PRO at 11.6 ounces – that’s less than the weight of four rifle cartridges. Unless you’re counting grams for an ultralight sheep hunt, both are negligible on a modern sporting rifle.

Adjustments and Real-World Zeroing

Both optics feature capped turrets requiring a tool for adjustment – typically a spent case rim works perfectly. Each click moves your point of impact 1/2 inch at 100 yards, giving you precise control without the risk of accidental adjustment when pulling your rifle from a scabbard or truck rack.

The brightness controls tell an interesting story. The ACO’s setup is straightforward: nine daylight settings plus one super-dim setting for those pre-dawn setups. Simple, effective, no nonsense.

The PRO divides its ten settings more deliberately: six for daylight, four for night vision compatibility. This might seem like a minor detail until you’re trying to dial in the perfect brightness while watching a game trail at last light, wearing night vision that cost more than your truck.

Mounting: Where Simplicity Shines

Both optics arrive with quality QRP2 mounts that attach to any Picatinny rail. No gunsmith required, no specialty tools needed. I’ve mounted both on everything from a 10/22 squirrel gun to a .338 Win Mag bear rifle. The return-to-zero is good enough that I can swap them between rifles and maintain minute-of-bad-guy accuracy without re-zeroing.

The low-profile mount design maintains your rifle’s natural point of aim and preserves peripheral vision – crucial when tracking moving game or, in my former life, maintaining situational awareness in hostile territory.

The Money Question

At roughly $400, the ACO represents exceptional value for civilian shooters. It’s the optic I recommend to friends getting into predator hunting or setting up their first serious home defense rifle. The 10-year civilian warranty (2 years for professional use) shows Aimpoint’s confidence in their product.

The PRO typically runs $500-600, depending on where you shop. That extra Benjamin gets you fog-proofing, genuine night vision compatibility, triple the battery life, and lens covers. For law enforcement, competitive shooters, or serious hunters who venture into extreme conditions, it’s money well spent.

My Professional Assessment

After running both optics through everything Montana and military service could throw at them, here’s my bottom line:

Choose the ACO if:

  • You’re primarily a fair-weather shooter or hunter
  • Your rifle lives in a climate-controlled safe most of the time
  • You want professional-grade quality without the professional price
  • You’re setting up multiple rifles and budget matters
  • You don’t own or plan to own night vision

Choose the PRO if:

  • You hunt or shoot in extreme weather conditions
  • Fog resistance is non-negotiable (think coastal areas or humid climates)
  • You run night vision or might in the future
  • Your rifle is a working tool that sees daily use
  • That extra battery life gives you peace of mind
  • You want the absolute best in this price range

Both optics exemplify the Swedish attention to detail that’s made Aimpoint legendary. They’re not cheap Chinese knockoffs that’ll fail when you need them most. These are professional tools built by people who understand that sometimes your life depends on that little red dot.

The Wilderness Doesn’t Care About Excuses

Here’s what it comes down to: both the ACO and PRO will serve you faithfully for years. I’ve trusted both with my life and my clients’ safety. The ACO on my ranch rifle has helped me protect livestock from predators and fill freezers with clean, ethical kills. The PRO has been with me through situations I can’t fully discuss, performing flawlessly when failure wasn’t an option.

If forced to choose just one? The PRO gets the nod. That fog-proof capability alone has saved multiple hunts here in Montana where morning thermals create instant fog banks. The superior battery life means one less variable to manage in the field. And those lens covers? They’re worth their weight in gold when you’re bushwhacking through alder thickets chasing Roosevelt elk.

But remember this: the best optic is the one you can afford to put on your rifle today. A mounted ACO beats a PRO sitting on your wish list every time. Plan for the worst, hope for the best, and always – always – respect the game, respect the land, and respect yourself.

Stay sharp out there, Flint Marshall

Want to dive deeper into optics selection? Check out my complete guide to choosing red dots for different hunting applications, or read about my experience with magnified versus non-magnified optics in real-world scenarios. And if you’re serious about maintaining your equipment, don’t miss my field-tested gear maintenance guide that’ll keep your optics performing for decades.

Field Notes and FAQ

What’s the real difference in dot size between these models? Both run 2 MOA dots. At 100 yards, that covers roughly 2 inches of target. Perfect for both precision work and quick acquisition. During rapid fire drills, that consistency between models means your training transfers seamlessly.

Can the ACO really handle night vision? It has one compatible setting, but it’s like using a framing hammer for finish work – it’ll do the job, but there are better tools. The PRO’s four dedicated night vision settings give you the flexibility to adapt to changing conditions under NODs.

Where does Aimpoint manufacture these optics? Every Aimpoint optic is hand-built in Sweden. Having toured their facility during a NATO exchange program, I can tell you these folks take their craft seriously. It’s not mass production – it’s deliberate, methodical assembly by people who understand their products might be the difference between life and death.

How do these compare to other brands in the same price range? That’s a longer conversation for another article, but briefly: Aimpoint’s battery life is unmatched. Their durability is legendary. You’re paying for Swedish engineering and a company that’s been perfecting red dots since 1974. There are cheaper options, but as my grandfather said, “Buy once, cry once.”

Remember: practice makes permanent, so practice it right. Your best survival tool is the six inches between your ears, but quality optics sure don’t hurt.

Sig Romeo 5 vs Holosun 503c: A Montana Guide’s Real-World Comparison

0

Last November, I found myself tracking a wounded elk through thick timber near Glacier National Park with a borrowed rifle topped with a Holosun 503c. My own rifle, wearing a Sig Romeo 5, was back at the truck after taking a nasty spill off a talus slope. That day taught me more about these two red dots than any range session ever could. After that experience, I spent the next three months putting both optics through their paces in every condition Montana could throw at them—from -20°F mornings to spring mud season.

Here’s what 25 years of guiding and my military background taught me about choosing between these two battle-tested red dots.

Quick Reference Guide

FeatureSig Romeo 5Holosun 503c
Reticle Size2 MOA2 MOA
Magnification1x1x
Eye ReliefUnlimitedUnlimited
Battery Duration50,000 hours50,000 hours + solar backup
Weight5.29 oz4.23 oz
Street Price$200-250$250-300

The Real Deal: Why These Two Matter

After eight years humping an Aimpoint through Afghanistan’s mountains with the Rangers, I’ve developed strong opinions about optics. The wilderness doesn’t care about your schedule—or your gear preferences. Both the Romeo 5 and 503c represent something special: military-grade reliability at civilian prices. My grandfather would’ve called it “champagne performance on a beer budget,” and he’d be right.

These aren’t just range toys. Scout, my German Shorthaired Pointer, and I have put thousands of rounds downrange with both optics while guiding hunters and teaching survival courses. They’ve been dunked in frozen creeks, dropped on granite, and subjected to temperature swings that would make lesser optics fog up like a bathroom mirror.

Glass Quality and Reticle Performance

The View from Behind the Lens

Both optics feature a crisp 2 MOA dot with 1x magnification—perfect for everything from close-quarters bear defense to precise shots on prairie dogs at 100 yards. During a memorable dawn hunt last December, I watched through the Romeo 5 as a mature whitetail stepped into a clearing. The spectra coating on the Sig’s lens cut through the low-angle sunlight without a hint of glare.

The 503c’s multi-coated lens performs similarly, though I noticed slightly better light transmission during those critical first and last 30 minutes of shooting light. It’s marginal, but when you’re guiding clients paying top dollar for trophy hunts, marginal differences matter.

The Circle-Dot Advantage

Here’s where the Holosun pulls ahead slightly. The 503c offers a 65 MOA circle surrounding that 2 MOA dot, switchable at the press of a button. During a defensive pistol course I taught last spring, students using the 503c consistently acquired targets faster in close-quarters drills. The circle acts like training wheels for rapid target acquisition—your eye naturally centers the dot.

One quirk worth noting: the circle-dot reticle only functions on solar power. Discovered this the hard way during a night training session. Stick with the standard dot for low-light work.

Field Verdict: The Holosun edges ahead for versatility. That circle-dot option has saved bacon more than once when teaching new shooters or running carbine courses. Both deliver exceptional clarity, but if you’re primarily a precision shooter, either works perfectly.

Power Management: MOTAC vs Solar

The Romeo 5’s Secret Weapon

Sig’s Motion Activated Illumination (MOTAC) might be the smartest feature nobody talks about. Set your rifle in the safe, and the optic goes to sleep. Pick it up, and it instantly awakens—like River, my Lab, when she hears the gun safe open.

During a week-long backcountry elk hunt, I never touched the power button. The Romeo 5 stayed ready without draining the CR2032 battery. After three years of hard use, I’m still running the original battery. That’s not marketing fluff—that’s real-world performance.

Solar Backup: Holosun’s Insurance Policy

The 503c takes a different approach with its solar panel failsafe. In theory, daylight shooting means infinite battery life. In practice? Montana’s weather had other ideas. Heavy snow, mud splatter, and pine pitch all reduced solar efficiency. Still, it’s comforting knowing you’ve got backup power when Murphy’s Law strikes 20 miles from the nearest road.

Both claim 50,000 hours of battery life. Unless you’re planning to overthrow a small country, either will outlast your needs.

Field Verdict: The Romeo 5’s MOTAC system wins for practical battery conservation. It works regardless of weather or lighting conditions. The solar panel is clever engineering, but MOTAC is smart design.

Unlimited Eye Relief: Both Pass the Test

Red dots shine because of unlimited eye relief—mount them anywhere, shoot from any position. Both the Romeo 5 and 503c deliver here. Whether shouldering quickly for a charging boar drill or shooting from unconventional positions during tactical training, neither optic restricted my sight picture.

The 20mm objective lens on both provides ample viewing area without adding bulk. During a recent carbine class, students transitioning from traditional scopes immediately appreciated the both-eyes-open shooting these enable. Parallax-free beyond 50 yards means the dot stays true regardless of head position—critical when shooting from improvised positions in the field.

Field Verdict: Dead heat. Both deliver the performance that makes red dots superior to irons for defensive and hunting applications.

Built for the Backcountry

Taking a Beating and Coming Back

Aircraft-grade aluminum construction on both optics isn’t just marketing speak. Last March, my Romeo 5-equipped AR fell off my truck’s tailgate onto frozen gravel—a 4-foot drop onto the worst possible surface. After verifying zero (always verify after any impact), it shot the same groups as before. The anodized finish showed a battle scar, but the internals never skipped a beat.

The 503c proved equally tough when a client’s rifle took a tumble down a scree slope during a mountain goat hunt. Optic took the initial impact, protecting the rifle’s action. After brushing off the granite dust, it held zero and continued performing flawlessly.

Water Resistance That Matters

Both units claim one-meter water resistance. I’ve inadvertently tested this repeatedly—crossing streams, hunting in downpours, even an embarrassing incident involving thin ice and a beaver pond. The Romeo 5’s IPX-7 rating technically beats the 503c’s IPX-6, but in practical terms, both handle any weather short of scuba diving.

Montana winters taught me that fog-proofing matters more than waterproofing. Both optics use nitrogen purging to prevent internal fogging when transitioning from warm vehicles to sub-zero temperatures. Neither has failed this test.

Weight Considerations

The 503c weighs about an ounce less than the Romeo 5 (4.23 vs 5.29 ounces). On a precision rifle, irrelevant. On an ultralight mountain rifle or defensive carbine you’re carrying for miles? Every ounce counts. That said, the Romeo 5’s slightly smaller footprint makes it less likely to snag on brush or gear.

Field Verdict: Romeo 5 by a hair. The compact dimensions matter more than the minimal weight difference when navigating thick timber or storing in vehicle mounts.

Adjustments and Controls

Dialing It In

Both optics adjust in 0.5 MOA increments—precise enough for any practical application. The windage and elevation turrets click positively and stay put through rough handling. I’ve sighted in dozens of clients’ rifles with both optics, and neither has ever lost zero from recoil or transportation.

The Romeo 5 offers 10 brightness settings with two night-vision compatible options. The 503c provides 11 daylight settings plus two NV settings. Honestly? I use three settings: bright daylight, overcast, and dawn/dusk. The extra options are like the 47 functions on a Swiss Army knife—nice to have, rarely needed.

Both include adjustment tools, though a coin edge or cartridge rim works in a pinch—field expedient solutions my grandfather would approve of.

Field Verdict: Holosun barely edges ahead with one extra brightness setting, though it’s splitting hairs. Both offer more adjustability than you’ll likely need.

Mounting Solutions and Versatility

Getting It On Your Gun

The Romeo 5 includes both absolute and lower 1/3 co-witness mounts—genuine value-add. Switch between AR platforms and bolt guns without buying additional hardware. I’ve run mine on everything from a 10/22 training rifle to a .458 SOCOM bear defender.

The 503c ships with an absolute co-witness mount. Quality construction, but you’ll need to purchase a riser separately for lower 1/3 co-witness. Not a deal-breaker, but factor the extra $30-50 into your budget.

Both use standard Picatinny mounting, making them compatible with virtually any modern rifle or shotgun. I’ve even successfully mounted the Romeo 5 on a crossbow for a client with vision issues—worked brilliantly for close-range shots.

Field Verdict: Romeo 5 wins with included mounting options. The ability to switch between heights without additional purchases adds genuine value.

Investment Analysis: Your Dollar’s Worth

Romeo 5 Economics

SIG SAUER Romeo5 1x20mm Tread Closed Red Dot Sight | High-Performance Durable…
  • HIGH PERFORMANCE – Lightweight and crystal clear, the Sig Sauer Romeo5 Tread Red Dot Sight is designed for those up close situations when you need to find your target quickly; This compact sight with 1x aiming solution is optimized for the SIG M400 Tread

At $200-250 street price, the Romeo 5 delivers exceptional value. Sig Sauer backs it with a 5-year electronics warranty and lifetime coverage on the optic itself. That’s confidence in their product. After three years of professional use, mine shows honest wear but zero functional degradation.

Consider this: I’ve guided clients using $3,000 optics that didn’t perform notably better in field conditions. The Romeo 5 does everything a red dot needs to do without exotic features you’ll never use.

Holosun 503c Value Proposition

No products found.

Typically $50-80 more than the Romeo 5, the 503c justifies its premium with the solar failsafe and circle-dot versatility. Holosun’s 5-year warranty covers the entire unit. Their customer service has been stellar the one time I needed it (client-induced damage, not a defect).

For instructors or those wanting maximum versatility, the extra investment makes sense. The circle-dot reticle alone has shortened training time for new shooters considerably.

Field Verdict: Romeo 5 offers better pure value. The 503c’s premium features justify the cost for specific users, but most shooters won’t miss them.

The Bottom Line: A Montana Guide’s Choice

After thousands of rounds and countless field hours with both optics, I keep coming back to the Sig Romeo 5. The MOTAC system, included mounting options, and slightly lower price create a winning combination. It’s the optic I recommend to clients wanting professional-grade performance without professional-grade prices.

That said, the Holosun 503c earns its place in my training arsenal. The circle-dot reticle excels for teaching rapid target acquisition, and the solar backup provides peace of mind for extended backcountry trips. You can’t go wrong with either choice.

Both optics embody what I preach: buy quality once rather than junk twice. They’ll outlast multiple rifles and survive conditions that would destroy lesser optics. Whether you choose the Romeo 5 or 503c, you’re getting battle-tested reliability at a price that leaves money for ammunition and training—where it belongs.

Critical Considerations

Choose the Romeo 5 If:

  • Budget matters most
  • You want the simplest, most bombproof option
  • MOTAC battery management appeals to you
  • Multiple mounting heights are needed
  • You prefer compact dimensions

Choose the 503c If:

  • Circle-dot versatility is important
  • Solar backup provides peace of mind
  • You’re teaching new shooters
  • Weight savings matter most
  • You don’t mind buying separate risers

Final Wisdom from the Field

Remember, the best survival tool is the six inches between your ears—same goes for optics. Either red dot will serve you well, but they’re tools, not magic. Practice with whatever you choose until operation becomes instinctive.

I’ve seen too many hunters miss opportunities fumbling with unfamiliar equipment. Spend time behind your chosen optic in various conditions—dawn, dusk, rain, snow. Learn its quirks and capabilities before it matters.

The wilderness doesn’t care about your gear preferences, but it respects preparation. Choose your optic, train with it religiously, and maintain it properly. Whether you’re defending your family or filling your freezer, these red dots won’t let you down.

Stay safe, shoot straight, and respect the game, the land, and yourself.

For more gear reviews and survival wisdom earned the hard way, keep reading Moosir.com. Remember—plan for the worst, hope for the best, and always carry extra batteries.

Montana Field Test: Leupold Rainier HD 10×42 – A Working Hunter’s Glass

0

Two Septembers ago, I watched a client miss the biggest bull elk of his life because he couldn’t distinguish it from three cows at 600 yards through his cheap binoculars. That bull was standing broadside for nearly two minutes while my client squinted through foggy, dollar-store glass. By the time I got my spotting scope on it, the herd had vanished into dark timber. That’s a $10,000 mistake that haunts both of us. Good glass isn’t just about seeing animals—it’s about seeing them clearly enough to make ethical decisions.

After guiding hunters for fifteen years through Montana’s backcountry, I’ve learned that binoculars are the most-used piece of hunting equipment you’ll own. You’ll look through them a thousand times for every shot you take. Yet somehow, guys will drop three grand on a rifle and hang $50 binoculars around their neck.

The Leupold Rainier HD 10x42s represent something different—honest glass at working-man prices. I’ve been running a pair for three seasons now, from September elk hunts to December whitetail stands. They’re not perfect, but at around $180-$220, they deliver way more than their price suggests. Let me show you what three years of hard use has taught me.

The Quick Truth

Bottom Line: The Rainier HDs are solid entry-level hunting binoculars that perform above their price point. They won’t match $1,000+ glass, but they’ll get most hunters through most situations successfully.

Who’s Behind This Review

Flint Marshall here, writing from my cabin near Glacier National Park. I’ve been glassing Montana’s mountains for thirty years—first as an Army Ranger where quality optics meant mission success, now as a hunting guide where they mean meat in the freezer.

Every fall, I watch clients show up with binoculars ranging from garage-sale specials to European glass worth more than my truck. The expensive stuff usually performs, but I’m more interested in what works for regular folks who can’t justify four-figure optics. That’s why I bought these Rainiers with my own money—to see if affordable Leupold glass could handle real hunting.

Three Seasons of Testing: The Real Story

Year One: Breaking Them In

First season, these binoculars lived around my neck for 47 days straight during archery and rifle season. They survived:

  • Temperature swings from 85°F to 8°F
  • Getting dropped in a creek (completely submerged for about 3 seconds)
  • Falling 12 feet from my treestand onto rocks
  • Living in a dusty truck for weeks
  • My nephew borrowing them (the ultimate durability test)

Year Two: Pushing Limits

Second season, I deliberately tested their limits:

  • Used them exclusively for a 10-day backcountry elk hunt
  • Glassed in rain, snow, and fog
  • Compared them side-by-side with client’s premium glass
  • Let them freeze overnight, then brought them into warm tent (fog test)
  • Tracked wolves at 1,200+ yards to test maximum usable distance

Year Three: Trust and Reliability

This past season, they became my backup/loaner pair. Every client who forgot binoculars used these. They’ve been handled by dozens of different people, adjusted constantly, and generally treated like rental equipment. Still working perfectly.

Technical Reality Check

The Numbers That Matter

  • Magnification: 10x (The sweet spot for western hunting)
  • Objective: 42mm (Balances light gathering with packability)
  • Field of View: 304 feet at 1,000 yards (Wide enough for tracking)
  • Weight: 22 ounces (Light enough for all-day carry)
  • Eye Relief: 12mm (Tight but workable with glasses)
  • Close Focus: 9.8 feet (Useful for camp critters and wildflowers)
  • Price: $180-$220 (Less than a tank of gas for my truck)

What Those Numbers Mean in the Field

That 10×42 configuration is the Swiss Army knife of hunting optics. Ten power lets you evaluate animals at distance without excessive shake. The 42mm objectives gather enough light for legal shooting hours while keeping weight reasonable.

The 304-foot field of view means you can glass an entire hillside without constant panning. I’ve tracked running elk through timber at 300 yards without losing them—try that with narrow field binoculars.

Optical Performance: The Honest Truth

Clarity Where It Counts

These aren’t Swarovski glass. Accept that going in. But here’s what they will do:

At 400 yards in good light, I can count points on a bull elk. At 600 yards, I can distinguish bulls from cows. At 800 yards, I can spot bedded animals if they’re not perfectly camouflaged. Beyond that, they become spotting tools—you know something’s there but need better glass for details.

The sweet spot (sharp center image) covers about 70% of the view. Edges get softer, with some color fringing on high-contrast objects. In practical terms? When you’re looking at an animal, it’s sharp. The soft edges only matter when scanning, and even then, you naturally center anything interesting.

Dawn and Dusk Reality

Here’s when premium glass earns its price—and when the Rainiers show their budget nature. During legal shooting, they’re fine. I can identify deer 30 minutes before sunrise and 30 minutes after sunset at reasonable distances (under 300 yards).

But those magic minutes when premium glass still shows detail? The Rainiers go dark. My Swarovski-toting clients get maybe 15-20 extra minutes of glassing. That matters during peak rut when bucks move at last light.

Last November, I watched a massive whitetail step into a field 10 minutes after my Rainiers went dark. Through a client’s Zeiss Victory binoculars, I could count his points. Through the Rainiers, he was a dark blob. That’s the difference $1,800 makes.

Weather Performance

The nitrogen purging works. Period. I’ve never had internal fogging, even going from a heated truck at -10°F straight into glassing. External fogging happens on the eyepieces (physics is physics), but a quick wipe solves that.

Rain performance impressed me. Water beads and rolls off decently, though not like premium coatings. In heavy rain, you’re wiping lenses regardless of what binoculars you’re using. The Rainiers are genuinely waterproof—that creek dunking in year one proved that.

Build Quality: Tougher Than Expected

The Drop Test Results

Every binocular I own gets dropped eventually. It’s not if, but when and how hard. The Rainiers have survived:

  • Multiple 3-4 foot drops onto dirt and grass
  • One 12-foot treestand drop onto rocks
  • Getting knocked off my truck tailgate onto gravel
  • My horse stepping on them (don’t ask)

After each drop, I check alignment and focus. Still perfect. The rubber armor shows scuffs, but the internals haven’t budged. That’s impressive for Chinese-made glass at this price.

Controls and Adjustments

The focus wheel turns smoothly with good resistance—not too loose, not too stiff. After three seasons, it hasn’t developed any play or sticky spots. Cold weather doesn’t affect it much, though at -20°F everything gets stiff.

The diopter adjustment (right eyepiece) holds its setting perfectly. I marked mine with a Sharpie dot season one, and it hasn’t moved. Some clients accidentally adjust it, but it’s easy to reset.

Eyecups twist up and down with firm detents. They stay where you put them, even after living in a pack for weeks. The twist action remains smooth—no grinding or looseness developing.

Real-World Hunting Performance

Elk Hunting in September

Early season elk hunting means glassing parks and meadows at first light. The Rainiers handle this well. I can spot elk at 800-1,000 yards, though determining bull quality requires closer distances or better glass. The wide field of view helps track herds moving through timber gaps.

During my 2023 archery season, I spotted 47 elk through these binoculars. Could evaluate bulls adequately at 500 yards or less. That’s sufficient for most hunting situations, especially considering shots over 400 yards are questionable ethics anyway.

Whitetail from Stands

Different game entirely. Most whitetail hunting happens under 200 yards where these binoculars excel. I can age bucks on the hoof at 150 yards, spot movement in thick cover, and track deer through timber effectively.

The close focus distance of 9.8 feet proves surprisingly useful. I’ve identified does with fawns at 30 yards, watched squirrels and birds during slow days, and even used them to check broadhead sharpness in the field (seriously).

Spot and Stalk Situations

For mule deer and antelope hunting, 10x magnification is about perfect. I can evaluate bucks at 600 yards well enough to decide if a stalk is worthwhile. The lightweight design means they don’t become a burden during long stalks.

Last October, I spotted a good mule deer buck at 750 yards through the Rainiers. Could tell he was mature and heavy, but needed my spotting scope to count points precisely. That’s exactly what I expect from $200 binoculars.

Compared to the Competition

Versus Vortex Diamondback HD

Vortex Optics Diamondback HD 2000 Laser Rangefinder
  • The Diamondback HD 2000 laser rangefinder with 7x magnification and a 24mm objective lens, gives hunters a 2,000 yards max range (1,400 yards on game); perfect for hunting in the Midwest and the Great Plains.
  • The HD optical system uses select glass elements to deliver exceptional resolution that cuts chromatic aberration and provides outstanding color fidelity. XR lens coatings provide maximum light transmission for peak clarity and low light performance.

My partner runs Diamondbacks. Side-by-side, the Vortex glass is slightly brighter at dusk, maybe 5-10 minutes of extra light. The Vortex warranty is better—they’ll replace anything, anytime, no questions. But the Rainiers feel more solid in hand and have less play in the hinge after heavy use.

Versus Hawke Endurance ED

Endurance ED Binoculars 8×42 Black
  • Extra-low Dispersion glass for optimum clarity
  • Fully multi-coated optics to produce sharp images

Borrowed a pair for a week. The ED glass is noticeably better—less color fringing, sharper edges, brighter image. If you can swing the extra $60-80, the Hawkes are the better buy. But if your budget is firm at $200, the Rainiers won’t disappoint.

Versus Maven B1.2

Not fair to compare, but instructive. The Mavens are in a different league—like comparing a Toyota Tacoma to a Ferrari. The Mavens reveal detail the Rainiers can’t touch, especially in low light. But they cost 4-5 times more. For that price difference, the Rainiers hold their own respectably.

Living With the Rainiers

Daily Carry Reality

At 22 ounces, they’re light enough that I don’t notice them until I need them. The included neck strap works but upgrades to a harness system immediately. I use a basic Vortex harness that distributes weight perfectly.

The compact size means they fit in my pack’s side pocket when not needed. They don’t catch on branches like larger binoculars. The balance is neutral—no forward tipping that causes neck strain.

Maintenance and Care

Three seasons in, here’s my maintenance routine:

  • Lens pen cleaning weekly during season
  • Alcohol wipe on rubber armor monthly
  • Check all screws annually (none have loosened)
  • Replace lens covers when torn (twice so far)

The rubber armor shows wear but remains fully attached. No peeling or separation. The Leupold logo is worn off from handling, but who cares about logos?

Longevity Expectations

Based on current wear patterns, I expect 8-10 years of hard use from these binoculars. The mechanical parts show no degradation. The coatings remain intact. The body shows cosmetic wear only.

For $200, getting a decade of service is exceptional value. That’s $20 per year for optics you’ll use hundreds of days. Compare that to your truck payment.

The China Question

Let’s address the elephant: these are made in China, not Beaverton, Oregon. That bothers some folks on principle. I get it. But here’s my take:

Chinese manufacturing has improved dramatically. These Rainiers prove that. They’re well-built, properly sealed, and optically decent. Are they as good as Japanese or European glass? No. But they’re far better than Chinese glass from a decade ago.

Leupold designed these and controls quality standards. They back them with their lifetime warranty. If you need American-made, buy their BX-4 series or higher. But understand you’ll pay 3-4 times more for that privilege.

Who Should Buy These

Perfect For:

  • New hunters building their kit on a budget
  • Casual hunters who hunt a few weekends per year
  • Backup binoculars for your truck or camp
  • Young hunters (teenagers) who might not treat gear gently
  • Anyone prioritizing value over prestige

Wrong Choice For:

  • Serious trophy hunters who need to evaluate animals at extreme distance
  • Guides who glass professionally 100+ days per year
  • Low-light specialists (waterfowl hunters, night hunters where legal)
  • Optics snobs who need the best regardless of cost
  • Anyone who can comfortably afford better glass

Buying Advice

Where to Buy

Local sporting goods stores often stock these, letting you handle them first. Online prices are usually better—I saved $40 buying from Amazon. Leupold’s warranty applies regardless of where you purchase.

What to Check

If buying in person:

  • Verify both barrels focus identically
  • Check for any play in the hinge
  • Ensure eyecups rotate smoothly
  • Look through them at distant signs to check clarity
  • Verify all accessories are included

Essential Accessories

Budget another $50-75 for:

  • Binocular harness ($30-40): Eliminates neck strain
  • Better lens covers ($15-20): The included ones are marginal
  • Lens cleaning kit ($10-15): Protect your investment

Long-Term Value Assessment

After three seasons and probably 10,000+ hours of glassing, here’s my bottom line:

Cost: $200 (roughly) Days used: 300+ (conservatively) Cost per day: $0.67 Animals spotted: Countless Opportunities created: Dozens Regrets: Zero

These binoculars have earned their keep many times over. They’ve helped clients fill tags, spotted predators near camp, found shed antlers, and located lost horses. They’re tools, not toys, and they work.

The Honest Conclusion

The Leupold Rainier HD 10×42 binoculars are exactly what they claim to be: affordable, functional hunting optics that perform respectably in most conditions. They’re not trying to compete with alpha glass, and they shouldn’t be judged by those standards.

For hunters who need binoculars that work without breaking the budget, these deliver. They’re clear enough to identify animals at hunting distances, tough enough to survive real use, and backed by a legitimate warranty. The compromises (edge softness, limited low-light performance, Chinese manufacturing) are acceptable given the price point.

I’ve recommended these to dozens of clients who couldn’t justify premium glass. None have been disappointed. Several have upgraded eventually, but all got seasons of successful hunting from the Rainiers first.

My grandfather told me, “Buy once, cry once” about tools. That’s still true for professionals and serious enthusiasts. But for average hunters who need functional glass without the financial pain, the Rainier HDs prove that “good enough” can be exactly that—good enough.

Are there better binoculars? Absolutely. Are there better binoculars for $200? That’s debatable. For the money, these Leupolds deliver honest performance that won’t limit most hunters in most situations. Sometimes that’s all you need.

Remember: The best binoculars are the ones you can afford to carry every day. Expensive glass sitting at home won’t spot any animals.

Practice makes permanent, so practice it right.

Glass carefully,

Flint Marshall
Northern Montana


Questions about choosing hunting optics or glassing techniques? Share your experiences in the comments or visit Moosir.com for more field-tested gear reviews. Remember—respect the game, respect the land, respect yourself.

Bore Sighting Your AR-15: A Montana Guide’s Field Method

0

Last elk season, I watched a client burn through a $60 box of premium ammunition trying to zero his new scope at the range. Twenty rounds later, he was still chasing impacts around the target like a drunk trying to find his keys. That’s when I pulled out my bore sighter—five minutes later, his next shot was within two inches of center. He looked at me like I’d performed magic. It wasn’t magic; it was basic field craft that’ll save you time, money, and frustration.

After thirty years of mounting scopes—from hasty field repairs in Afghanistan to precision setups for long-range competitions—I’ve learned that bore sighting isn’t just helpful, it’s essential. Skip this step, and you might waste half your ammo just getting on paper.

Let me show you how to bore sight an AR-15 properly, plus some tricks they don’t teach at the gun counter.

The Five-Minute Method

Here’s the quick version for those who need it now:

  1. Clear your rifle completely (check three times)
  2. Set target at 25 yards
  3. Remove upper from lower (two pins on AR-15)
  4. Insert laser bore sight in chamber
  5. Close bolt gently until laser activates
  6. Aim laser at target center
  7. Adjust scope to match laser point
  8. Remove bore sight, reassemble rifle
  9. Fire confirmation group

That’s it. But the details matter, so let’s dive deeper.

Understanding Bore Sighting

What It Actually Does (And Doesn’t)

Bore sighting aligns your scope’s line of sight with your rifle’s bore axis—roughly. It’s not zeroing; it’s pre-zeroing. Think of it as getting you in the neighborhood instead of the next county.

Your bullet doesn’t fly straight—it arcs. At 25 yards, it’s rising. At 100 yards, it might be at peak trajectory. At 300 yards, it’s dropping fast. Bore sighting just ensures your scope and bore are looking at the same ZIP code, not that they’re perfectly aligned for any specific distance.

I’ve seen too many hunters think bore sighting equals zeroing. It doesn’t. You still need to shoot and adjust. But instead of being two feet off target at 100 yards, you’ll be within a few inches.

Why ARs Are Actually Easier

The AR-15’s modular design makes bore sighting simpler than most rifles. Pop two pins, separate upper from lower, and you’ve got straight-line access to the chamber. No removing bolts, no awkward positions, just simple access.

Plus, the flat-top rail system means most scopes sit at a consistent height above bore. This predictability makes initial alignment more accurate than with hunting rifles where ring height varies wildly.

Types of Bore Sighters

Laser Cartridge Style (My Preference)

These look like a cartridge for your specific caliber (.223/5.56 for most ARs) with a laser in place of the bullet. Insert in chamber, close bolt partially, laser activates.

What I Use: SiteLite Ultra Mag Green Laser

  • Works for .22 to .50 caliber (one tool, many rifles)
  • Green laser visible to 100 yards in daylight
  • 15-hour battery life
  • Price: $90-120

I’ve used this same bore sighter for eight years on everything from .223 varmint rifles to .375 H&H dangerous game rifles. Still works perfectly.

Magnetic Barrel Attachments

These attach to your muzzle magnetically. A laser shines back through your bore. Works, but I don’t trust them on stainless barrels or in wind.

Optical Bore Sighters

Old school. A grid pattern you look through. Precise but slow, and useless in low light. I keep one as backup, but haven’t used it in years.

The Free Method (Eyeball Bore Sighting)

Remove upper from lower, look through bore at distant target, adjust scope to match. Costs nothing, works adequately for getting on paper at 25 yards. This is how my grandfather did it, and it still works.

Step-by-Step: The Right Way

Step 1: Safety First (No Exceptions)

Clear your rifle. Then clear it again. Then have someone else verify it’s clear. I’ve seen negligent discharges from “unloaded” rifles too many times.

  1. Remove magazine
  2. Lock bolt back
  3. Visual inspection of chamber
  4. Finger sweep of chamber
  5. Let bolt close on empty chamber
  6. Point in safe direction, pull trigger (should click)

Now you’re ready to start.

Step 2: Target Setup

Distance matters. Here’s what works:

25 Yards: Best for initial bore sighting. Bullet trajectory is flattest here. You can see laser clearly. Adjustment errors are minimized.

50 Yards: Good if you have a quality green laser and stable shooting position.

100 Yards: Only with premium green lasers in low light. Too many variables for most setups.

I use 25 yards religiously. It’s close enough to be precise, far enough to be meaningful.

Step 3: Rifle Preparation

For AR-15s:

  1. Push out rear takedown pin (fully)
  2. Push out front pivot pin (fully)
  3. Separate upper from lower
  4. Set lower aside safely

You now have clear access to the chamber from the rear. No bolt removal needed—that’s the AR advantage.

Step 4: Insert Bore Sighter

This is where people mess up. Don’t ram it home like you’re in combat. The bore sighter is a precision instrument.

  1. Insert laser bore sight gently into chamber
  2. Let it seat naturally (don’t force it)
  3. Slowly close bolt until it touches the bore sight
  4. You’ll feel slight resistance—stop there
  5. Laser should activate (if not, slightly more pressure)

The bolt doesn’t need to close completely. Just enough contact to activate the laser’s pressure switch.

Step 5: Aim and Align

  1. Support rifle solidly (sandbags, bipod, or rest)
  2. Aim laser at target center
  3. Look through scope
  4. Note where crosshairs are relative to laser dot
  5. Adjust windage (left/right) first
  6. Adjust elevation (up/down) second
  7. Verify both adjustments didn’t shift the other

Take your time here. Rushed bore sighting is worthless bore sighting.

Step 6: Fine Tuning

The laser won’t be perfectly still—it’ll dance slightly. That’s normal. Center your adjustments on the laser’s average position, not its exact momentary position.

If your scope has target turrets, note your starting position. You might need to return here if something goes wrong at the range.

Step 7: Removal and Reassembly

  1. Open bolt carefully
  2. Remove bore sighter (it might stick slightly—normal)
  3. Verify chamber is clear
  4. Reassemble upper to lower
  5. Function check (charge and release bolt)
  6. You’re ready for the range

Real-World Adjustments

The 25-Yard Zero Method

After bore sighting at 25 yards, your first group should be within 3 inches of point of aim. If not, something’s wrong—check mount tightness, scope function, or bore sight battery.

For most AR-15s with standard 55-grain ammunition:

  • Zero at 25 yards hitting 1/2 inch low
  • This gives approximate 200-yard zero
  • You’ll be within 2 inches high or low from 25-250 yards

This is my standard field zero for general use.

The 50/200 Zero

Popular with military and law enforcement:

  • Bore sight at 25 yards
  • Move to 50 yards
  • Zero to hit point of aim at 50
  • Confirms zero at 200 yards
  • Maximum rise of 1.5 inches at 100 yards

This works well for defensive carbines but requires verification at distance.

The 100-Yard Zero

For precision work:

  • Bore sight at 25 yards
  • Fire group at 25 to confirm on paper
  • Move to 100 yards
  • Zero for point of aim = point of impact
  • Most straightforward for known-distance shooting

Common Mistakes (And How to Avoid Them)

Mistake 1: Over-Tightening the Bolt

Forcing the bolt closed on the bore sighter can damage:

  • The bore sighter ($100 mistake)
  • Your bolt face (much worse)
  • Chamber dimensions (catastrophic)

Just kiss the bore sighter with the bolt. That’s enough.

Mistake 2: Bore Sighting at Wrong Distance

I’ve seen guys try to bore sight at 200 yards with a red laser in bright sunlight. Waste of time. The laser’s invisible, and trajectory variables multiply with distance.

Stick to 25 yards unless you have exceptional equipment and conditions.

Mistake 3: Not Verifying Mount Tightness

Bore sight with loose scope mounts, and you’re wasting time. Before bore sighting:

  • Check ring screws (15-20 inch-pounds)
  • Verify base screws (25-30 inch-pounds)
  • Ensure scope doesn’t shift when twisted gently

Mistake 4: Believing Bore Sighting Equals Zero

Had a client once who bore sighted his rifle, then went elk hunting without firing a shot. “But I bore sighted it!” he said after missing a bull at 150 yards.

Bore sighting gets you close. Shooting gets you zeroed. No exceptions.

Field Expedient Bore Sighting

Sometimes you need to bore sight without tools. Here’s how:

The Barn Door Method

  1. Separate upper from lower
  2. Rest upper solidly, pointing at large target (barn door at 50 yards works)
  3. Look through bore from rear
  4. Center bore on distinct aiming point
  5. Without moving rifle, adjust scope to same point
  6. Reassemble and verify

This got me on paper in Afghanistan when my laser bore sighter took shrapnel. It’s crude but effective.

The Mirror Method

For indoor work:

  1. Set up mirror at 10 feet
  2. Look through bore at your own eye in mirror
  3. Adjust scope to center on same eye
  4. Multiplies effective distance without space

Learned this from an old Marine armorer. Works better than you’d think.

Equipment Recommendations

Best Overall: SiteLite Ultra Mag Green

SiteLite Ultra Mag Green Laser Professional Boresighter
  • Guaranteed superior accuracy with a lifetime warranty
  • Fits all calibers from .22 to .50 cal. plus 20 & 12 ga. Shotguns
  • Universal caliber fit
  • Visible to 100 yards
  • Proven durability
  • Price: $90-120

Best Budget: Sightmark .223 Red Laser

Sightmark .223, 5.56×45 NATO Boresight with Red Laser
  • <5mW 632-650nm Class IIIA Red Laser: Precision boresighting with a safe, visible reference point. Align sights accurately with this low-power output device, ensuring greater zeroing accuracy for enhanced performance.
  • Caliber specific
  • Works to 50 yards
  • Basic but functional
  • Price: $25-35

Best Premium: Laserline Quad Beam

  • Four-point reference system
  • Extreme precision
  • Professional grade
  • Price: $200-250

Maintenance and Storage

Your bore sighter is a precision instrument. Treat it accordingly:

  1. Remove batteries when storing long-term
  2. Clean lens with microfiber only
  3. Store in padded case (not rattling in tool box)
  4. Check batteries before each use
  5. Verify calibration annually (shoot after bore sighting)

The Economics of Bore Sighting

Let’s talk money:

  • Box of match ammunition: $30-60
  • Shots typically wasted getting on paper: 10-20
  • Cost of wasted ammo: $15-60 per scope mounting
  • Cost of bore sighter: $25-120
  • Break-even point: 2-4 scope mountings

I mount probably 20 scopes per year between my rifles and helping friends. My bore sighter paid for itself the first month.

Troubleshooting Guide

“Laser Won’t Turn On”

  • Check battery (usually dead)
  • Ensure proper bolt contact
  • Verify correct orientation in chamber

“Can’t See Laser at Range”

  • Switch to green laser
  • Reduce ambient light (early morning/evening)
  • Decrease distance to 25 yards
  • Clean laser lens

“Still Way Off After Bore Sighting”

  • Verify scope mount tightness
  • Check scope internals (tap test)
  • Ensure bore sighter is calibrated
  • Confirm correct ammunition

The Bottom Line

Bore sighting your AR-15 takes five minutes and saves hours of frustration plus boxes of ammunition. It’s not optional for serious shooters—it’s essential.

A $50 bore sighter will serve you for decades if treated properly. That’s the best return on investment in the shooting world, aside from training.

Remember: Bore sighting isn’t zeroing. It’s the first step that makes zeroing possible without wasting ammunition, time, and patience. Do it right, and your first shot at the range will be on paper. Skip it, and you might spend all day chasing impacts.

The wilderness doesn’t care if you’re zeroed. But you should.

Practice makes permanent, so practice it right.

Zero true,

Flint Marshall
Northern Montana


Questions about bore sighting other platforms or specific zero distances? Want to share your field expedient bore sighting methods? Drop a comment below or check out more practical shooting wisdom at Moosir.com. Remember—respect the process, respect the rifle, respect yourself.

Bushnell Equinox Z2 Night Vision: Real-World Testing After Dark

0

Last November, something was killing chickens at my neighbor’s ranch near Glacier. The tracks suggested coyotes, but they needed proof for the depredation permits. I brought over my Bushnell Equinox Z2 4.5×40, and within two nights, we had clear video of a pack working the fence line. That footage got him his permits and saved his remaining flock. Sometimes the right tool makes all the difference.

I’ve been running this digital night vision monocular hard for eighteen months now – through Montana winters, dusty summer scouting, and countless predator patrols. It’s helped me protect livestock, scout game trails, and teach my kids about nocturnal wildlife behavior (Sarah, my wildlife biologist wife, particularly appreciates the recording feature for her research). While it’s not perfect, the Equinox Z2 has earned its place in my gear rotation through sheer reliability and practical performance.

Before we dive deeper, I’ll be straight with you: if budget allows, the ATN BinoX 4K outperforms the Bushnell in most categories. But at nearly double the price, it should. The wilderness doesn’t care about your budget, but your wallet might. Let’s talk about what the Equinox Z2 actually delivers when darkness falls.

Sale
Bushnell Equinox Z2 Night Vision 4.5×40 Monocular, HD Imaging, Infrared…
  • Peer into the Darkness: Effortlessly observe your surroundings in total darkness, thanks to the Equinox Z2’s powerful built-in infrared illuminator and infrared-sensitive CMOS sensor, ensuring clear, illuminated viewing up to 900 feet away
  • HD Capture & Stream: Document the unseen! Capture and stream HD images and videos, and easily share your discoveries via Wi-Fi using the intuitive Bushnell Equinox app, perfect for both daytime and nighttime exploration

Field Testing the Equinox Z2

Real Performance Numbers

Over 18 months of testing, here’s what I’ve documented:

Detection Capabilities:

  • Coyote-sized targets: 750 feet with IR on high
  • Deer identification: 500-600 feet consistently
  • Human recognition: 400 feet in total darkness
  • Small game (rabbits): 200 feet effectively

Environmental Testing:

  • Temperature range: -15°F to 95°F functional
  • Rain exposure: IPX4 rating held up in drizzle
  • Drop survival: 12 feet onto rocks (accidental test)
  • Battery life: 2-3 hours IR high, 5 hours IR low

Generation Type and Image Quality

This isn’t your grandfather’s starlight scope – the Equinox Z2 uses digital CMOS technology that works differently than traditional night vision. During a search and rescue operation last spring (I volunteer with our local SAR team), the digital display proved invaluable. While analog tubes would’ve shown everything in green, the Equinox’s screen let me review recorded footage with the incident commander without removing the unit from my eye.

The image quality surprised me initially. It’s not Gen 3 analog clarity, but for a digital unit under $500, it punches above its weight. Last month, I watched a mountain lion stalk through my back forty from 300 yards away. Could see enough detail to count spots on her coat when she passed under moonlight. That’s impressive for consumer-grade digital.

One quirk: digital zoom past 2x gets pixelated fast. Learned this trying to identify a strange animal at distance – turned out to be River (my Lab) who’d escaped the yard. Stick to the optical 4.5x when possible.

Magnification and Field of View

The 4.5x magnification hits a sweet spot I didn’t expect. During eight years in the Rangers, we typically ran 4x or 6x night optics – enough magnification to identify targets without losing situational awareness. The Equinox follows this principle well.

Field of view matters more than most realize. At 200 yards, I can monitor about 100 feet of tree line without panning. That’s crucial when watching for multiple coyotes or scanning for that buck you bumped at sunset. The FOV narrows with digital zoom, but even at maximum magnification, it’s usable for tracking moving games.

Practice makes permanent, so practice it right – I spend time during daylight learning the unit’s field of view at various distances. Makes nighttime operation instinctive.

Detection Range Reality

Bushnell claims a 750 feet detection range. In perfect conditions – clear, dry night with no moon – I’ve actually exceeded this slightly. But the wilderness doesn’t care about perfect conditions. Here’s what really affects range:

Range Killers:

  • Fog: Cuts range by 60-70%
  • Heavy humidity: 30-40% reduction
  • Rain: IR reflects back, 50% reduction
  • Dust/pollen: 20-30% reduction

Range Enhancers:

  • Snow reflection: Adds 20% range
  • Full moon: Can turn IR off completely
  • Cold, dry air: Maximum performance

During a December coyote hunt at -10°F, the cold, dry air gave me detection beyond 800 feet. But during August’s fire season with smoke in the air? Lucky to get 400 feet of useful range.

Eye Relief and Comfort

After teaching hundreds of students proper optics use, I know eye relief makes or breaks extended observation. The Equinox Z2’s rubber eyecup works well, even with my reading glasses (getting old isn’t for sissies).

Three-hour predator watches are comfortable, though I’ve noticed some eye fatigue from the screen’s brightness in total darkness. My solution: run the display dimmer and let your eyes adjust. The eye box is forgiving enough that you don’t need perfect alignment – important when you’re tired, cold, or need to quickly check something that moved.

Durability Testing

This unit has survived more abuse than I planned to give it:

Accidental Testing:

  • Dropped from tree stand (12 feet) onto rocks
  • Submerged briefly when I slipped crossing a creek
  • Left in truck at -25°F overnight
  • Knocked off tailgate by Scout (my German Shorthair)

Still works perfectly. The rubber armor does its job, though there’s cosmetic damage from the rocks. The buttons stayed responsive even when caked with mud from a particularly wet spring turkey season.

One issue: condensation can form inside after extreme temperature changes. Bring it from a warm truck into freezing air too quickly, and you’ll fog up. Let it acclimate gradually – learned this lesson the expensive way with other optics.

Practical Applications

Predator Control

This is where the Equinox Z2 shines. Last winter, we lost three calves to wolves (yes, we have wolves in Montana now). The Equinox helped me pattern their movement, recording their approach routes for Fish and Wildlife documentation. That video evidence was crucial for getting depredation compensation.

For coyotes, it’s even better. The IR illuminator doesn’t spook them like white light, and the recording feature helps identify problem individuals. One mangy coyote kept hitting chicken coops in our valley. The Equinox footage helped three ranchers coordinate and remove that specific animal.

Wildlife Observation

Sarah uses the Equinox for her research on nocturnal predator behavior. The recording capability means she can review footage later for details missed in real-time. We’ve documented:

  • Bobcat hunting patterns
  • Owl predation on rabbits
  • Bear activity near the beehives
  • River otter family dynamics

My kids love the “night vision adventures” where we observe without disturbing. Teaching them about the nocturnal world they never see builds respect for wildlife.

Security Applications

After a series of equipment thefts in our area, the Equinox became part of my property security routine. Quick scans from the porch have revealed:

  • Teenagers attempting to siphon gas
  • A confused elderly neighbor wandering at night
  • Someone casing vehicles (sheriff arrested them later)
  • Countless deer raids on Sarah’s garden

The recording feature provided evidence for two insurance claims and one prosecution.

Compared to Competition

ATN BinoX 4K

The ATN costs nearly double but delivers:

  • Clearer 4K image quality
  • 15+ hour battery life (versus 2-3 hours)
  • Built-in rangefinder
  • Better low-light sensitivity
Sale
ATN Binox 4K 4-16X Smart Ultra HD Day/Night Hunting Binoculars w/Built-in Laser…
  • Live Streaming & HD Video Recording 24/7: a revolutionary lag-free combination. Bright day and crisp night images with smooth zoom imitating your natural eyesight
  • Multi-purpose Laser Rangefinder for hunting, outdoor sports, bird and wildlife observation, surveillance and you can even use this feature for golfing. Your target is ranged in the blink of an eye with just one click of a button

If you’re using night vision professionally or can afford the upgrade, the ATN is superior. But for occasional use or budget-conscious buyers, the Bushnell does 70% of what the ATN does at 50% of the price.

Sightmark Wraith 4K Mini

Sale
Sightmark Wraith 4K Mini 2-16×32 Digital Night Vision Riflescope
  • Cutting-Edge Digital Imaging: The Wraith 4K Mini boasts a state-of-the-art 3840×2160 CMOS sensor, providing unparalleled digital imaging capabilities that allow you to detect objects up to 300 yards away even in the darkest of nights.
  • Crystal-Clear Display: With a flawless 1280×720 FLCOS screen, this riflescope ensures that your targets are displayed with exceptional clarity, whether you’re using it in daylight or under the cover of night vision mode.

Similar price to the Bushnell but offers:

  • 4K recording (versus 1080p)
  • Multiple reticle options
  • Day/night modes
  • Shorter detection range

Better for rifle mounting, but the Bushnell wins for handheld observation.

Budget Alternative: GTHUNDER

GTHUNDER Night Vision Goggles, 4K High-Definition Rechargeable Infrared Digital…
  • Starlight-Optimized Night Vision: Unlock unparalleled low-light performance with advanced Gthunder night vision binoculars. Equipped with starlight-grade sensors and precision CMOS technology, they deliver crisp, detailed visuals even under minimal ambient light.

At under $200, the GTHUNDER goggles offer:

  • Basic night vision capability
  • Extreme light weight (1.12 oz)
  • Head-mounted convenience
  • Lower image quality

Good for checking the barn at night, but not for serious observation work.

Setup and Accessories

Essential Additions

Through trial and error, these accessories proved worth the investment:

Power Management:

  • Energizer Ultimate Lithium AAs: 30% longer life, work in cold
  • External battery pack: USB power for extended observation
  • Solar charger: For multi-day backcountry trips

Stability and Protection:

  • Lightweight tripod: Essential for long observation
  • Lens cleaning pen: Dust and fingerprints kill IR performance
  • Padded case: Protect your investment

Recording:

  • SanDisk Extreme Pro 32GB: Fast enough for smooth video
  • Card reader: Review footage on laptop in field
  • Backup cards: Murphy’s Law applies to electronics

Tips From Experience

Battery Strategy: Cold kills batteries fast. Keep spares in an inside pocket. I use a rotation system – three sets of batteries labeled A, B, C. Always know which set is fresh.

IR Discipline: High IR setting spooks some animals and drains batteries. Start low, increase only if needed. Many nights, moonlight alone is enough.

Recording Wisdom: Short clips use less memory and battery than continuous recording. 30-second clips are usually plenty for documentation.

Common Questions Answered

Q: How does it compare to thermal? A: Thermal sees heat signatures through fog and brush – game changer for detection. But this shows actual details like antler points or individual identification. Thermal costs 3-5x more. Different tools for different jobs.

Q: Can I mount it on a rifle? A: No. It’s not built for recoil. I use it to spot, then set it down and pick up my rifle. For weapon-mounted night vision, budget at least $1,500 for something reliable.

Q: Does it work in complete darkness? A: Yes, with the IR illuminator on. Think of IR like an invisible flashlight. Without any light source (including IR), it shows nothing. The wilderness doesn’t care about your night vision – you still need some form of light.

Q: How steep is the learning curve? A: Two hours of daylight practice, then a few nights of use. The menu system isn’t intuitive initially, but muscle memory develops quickly. My 14-year-old figured it out in 20 minutes.

Q: Is it worth upgrading from Gen 1 analog? A: Depends. Gen 1 analog often provides clearer images but can’t record and doesn’t work in complete darkness without IR. The digital recording capability alone justified my upgrade.

The Bottom Line

After 18 months of hard use, the Bushnell Equinox Z2 4.5×40 has proven itself a reliable tool that bridges the gap between expensive thermal/Gen 3 night vision and cheap toys that don’t perform. It’s not perfect – battery life remains frustrating, and image quality can’t match premium options. But for predator control, wildlife observation, and property security, it delivers real value.

The recording capability sets it apart from traditional night vision. That footage of coyotes helped my neighbor get permits. Video of the attempted theft helped prosecute criminals. Documentation of wildlife behavior aids Sarah’s research. These aren’t just nice features – they’re practical tools that solve real problems.

At around $400-500, it’s an investment, but one that pays dividends. The money I’ve saved preventing predator losses alone justified the cost. Add in the security value and wildlife education for my kids, and it’s been worth every penny.

Your best survival tool is the six inches between your ears, but when darkness falls and you need to see what’s out there, the Equinox Z2 won’t let you down. It’s not the best night vision money can buy, but it might be the best night vision value for those of us who need to see in the dark without taking out a second mortgage.

Practice makes permanent, so practice it right. Get familiar with your night vision during daylight, understand its limitations, and maintain it properly. The wilderness doesn’t care if you can’t see in the dark – but with tools like this, you can level the playing field.

Want to maximize your night vision effectiveness? Check out my guides on predator behavior patterns, property security strategies, and teaching kids about nocturnal wildlife safely.


About Flint: After 8 years in the Army Rangers and 15+ years guiding hunters and teaching survival skills in Montana, I’ve learned what gear actually works when darkness falls. When not protecting livestock or teaching courses, you’ll find me testing equipment with Scout and River, always searching for tools that perform when stakes are real.

Vortex SPARC AR vs Aimpoint ACO: When Double the Price Doesn’t Mean Double the Performance

0

Four years ago at a carbine course, I watched a student’s brand-new Aimpoint ACO take a spill off a barricade onto concrete. It bounced twice, rolled into gravel, and when he remounted it, still held zero perfectly. That same day, my loaner Vortex SPARC AR got knocked off a bench by another student, fell about three feet, and also held zero. That’s when I realized the $200 price gap between these optics might not buy what most people think it does.

I’ve been running both red dots hard since then – the ACO lives on my truck gun that bounces around behind the seat daily, while the SPARC AR sits on my training carbine that sees thousands of rounds annually. After four Montana winters, two carbine courses, countless predator hunts, and one unfortunate incident involving Scout and a mud puddle, I know exactly what that extra money gets you and where it doesn’t matter.

Before we dig in, understand this: Aimpoint built their reputation in combat zones where failure meant death. Vortex built theirs making quality optics accessible to working folks. Both approaches have merit. Your best survival tool is the six inches between your ears – use it to decide if Aimpoint’s bombproof legacy is worth twice the price for your needs.

Real-World Comparison

FeatureVortex SPARC ARAimpoint ACO
Street Price~$200~$400
Weight5.9 oz7.6 oz
BatteryAAADL1/3N
Battery Life (Medium)2,000 hours10,000 hours
Brightness Settings10 (2 NV)9
Adjustment1 MOA clicks0.5 MOA clicks
WarrantyLifetime, no questions10 years personal use
OriginChinaSweden

Glass Quality and Dot Performance

SPARC AR Clarity

The SPARC’s glass is good – not great, but genuinely good. There’s a slight green tint visible against white walls but invisible outdoors. The multi-coating works well enough that I can shoot facing into afternoon sun without washout issues.

The 2 MOA dot stays crisp through brightness ranges, though at maximum it does bloom slightly. For precision work, I run it at medium brightness. For speed, crank it up and the bloom doesn’t matter inside 50 yards.

One quirk: in freezing fog, the exterior lens fogs before the interior. Not a failure, but requires wiping during temperature transitions. Learned this during a December coyote hunt when I moved from heated truck to -10°F air too quickly.

ACO Swedish Glass

The ACO’s glass is noticeably clearer – no tint, better coatings, superior light transmission. Side-by-side at dawn, the ACO gives me an extra 10 minutes of shooting light. That matters for predator hunting or early morning range sessions.

The dot is perfectly round even for my slight astigmatism. At any brightness level, it stays crisp without blooming. The Swedish glass quality shows – this is what that extra money buys you first and foremost.

Zero parallax issues at distance. During a prairie dog shoot, I was making hits at 200 yards with the dot anywhere in the window. Try that with cheap optics and watch your groups open up.

Night Vision Reality

The SPARC AR includes two NV settings. They work… technically. Behind my PVS-14, the lowest setting is still too bright, causing bloom. It’s better than nothing but not ideal for serious NV use.

The ACO has no NV settings at all. For a “military-grade” optic, this surprised me initially. Then I learned most military units run specific NV-compatible optics when needed. The ACO is a daylight fighter.

Neither is ideal for NV work. If that matters, look elsewhere.

Battery Life Truth vs Marketing

SPARC AR Battery Drama

AAA battery in a red dot seemed weird until I understood why – availability. Any gas station, grocery store, or truck stop has AAAs. When you’re in nowhere Montana at midnight, that matters.

Real-world battery life: about 2,000 hours at usable brightness. The advertised 5,000 hours is at setting 2, which is barely visible in daylight. Marketing versus reality.

Auto-shutoff after 12 hours saves batteries but has caught me off-guard at matches. Now I manually turn it off after each use. The battery compartment requires removing the optic – annoying but manageable with QD mount.

ACO Battery Excellence

The DL1/3N battery is oddball but worth it. Real 10,000-hour battery life at medium brightness. I change mine annually whether needed or not, and it’s never died between changes.

No auto-shutoff because it doesn’t need it. Leave it on for a month? Still works. This is patrol rifle reliability – set and forget. The battery compartment opens without removal, though finding DL1/3N batteries locally is impossible. I order them online in bulk.

That battery life alone almost justifies the price difference for duty use.

Durability Testing Results

SPARC AR Survival

My SPARC has endured:

  • 8,000+ rounds (still tracking true)
  • Multiple drops from bench height
  • Scout’s mud puddle adventure
  • -25°F to 105°F temperature swings
  • Pressure washer cleaning (don’t ask)

It’s tougher than the price suggests. The aluminum housing shows wear but no cracks. The adjustment caps have been lost and replaced twice (they’re too easy to misplace).

One failure: after three years, the rear lens developed a small crack from unknown impact. Still functional, but moisture gets in during rain. Vortex warranty covered it immediately – new unit, no questions asked.

ACO Tank Mode

The ACO has survived:

  • 12,000+ rounds without shift
  • Fell off moving truck at 30mph
  • Complete submersion in creek
  • Used as hammer (emergency situation)
  • Three years of daily truck gun abuse

Swedish overengineering at work. This thing refuses to break. The only wear is cosmetic – the matte finish is polished smooth from handling. Internally, it’s perfect.

The non-QD mount means it stays put. No quick removal, but also no possibility of QD failure. For a truck gun that might get grabbed in emergency, that permanence provides confidence.

Controls and Adjustments

SPARC AR User Interface

Controls are intuitive – up/down buttons on the left side where support hand can reach. The 1 MOA clicks are positive but not precise. Good enough for combat accuracy, frustrating for precision work.

The multi-level mount included is genius. Swap spacers for absolute or lower-third co-witness without buying anything extra. Takes 30 seconds with included Allen key.

Zeroing required 20 rounds – the 1 MOA adjustments mean more iterations to get perfect. Once zeroed, it holds well through normal use.

ACO Simplicity

One knob controls everything – turn for brightness, push for off. Dead simple, impossible to screw up under stress. The 0.5 MOA adjustments allow precise zeroing – 10 rounds had me perfect at 50 yards.

The adjustment caps are superior to SPARC – captive design means they won’t get lost. The recessed adjustments prevent accidental changes during handling.

Fixed mount height means no options for co-witness preferences. Research your setup before buying. The included mount is quality but basic.

Real-World Applications

Where SPARC AR Excels

Budget Training Guns: At $200, outfit multiple rifles for training. When students drop them (inevitable), replacement won’t break the budget.

Competition: Light weight and clear glass work well for 3-gun. The warranty means competition abuse is covered.

Backup/Loaner Rifles: Cheap enough to put on every rifle. When neighbors need predator control help, hand them a equipped rifle without worry.

My SPARC lives on the rifle I loan out most. It’s been used and abused by dozens of shooters, still works fine.

Where ACO Dominates

Duty/Patrol Rifles: The battery life and reliability justify the cost for professional use. Set it and forget it for years.

Truck Guns: Leave it on, leave it alone. It’ll work when needed without maintenance or worry.

Serious Preparedness: When failure isn’t acceptable, Swedish engineering provides peace of mind.

Buy-Once-Cry-Once: If you hate buying things twice, spend once on the ACO.

My ACO-equipped truck gun has never been babied, never failed. That confidence is worth money.

The Mount Question

SPARC AR Mounting

Included mount is actually good – adjustable height, QD function, returns to zero. The multi-height system means one optic works on different rifles without additional purchases.

QD lets me swap between rifles quickly. Competition gun to training rifle in seconds. The return-to-zero is within 1 MOA – good enough for practical accuracy.

ACO Mount Reality

Basic mount, permanently attached design. No options, no adjustments, no problems. It’s the AK-47 of mounting systems – simple and reliable.

The fixed height might not work with your iron sights. Research before buying. Some need risers for proper co-witness. Factor potential mount costs into total price.

Price Analysis Deep Dive

SPARC AR at $200

Vortex Optics SPARC Red Dot Sight Gen II – 2 MOA Dot , BLACK
  • The updated SPARC features rugged construction that’s still compact, with a lightweight form-factor. The 2 MOA dot is quick to acquire in close ranges, but fine enough for pin-point accuracy at extended ranges.

Best bang-for-buck red dot available. For the cost of one ACO, buy two SPARCs – primary and backup. Or one SPARC plus 1,000 rounds of ammo for training.

Factor in Vortex’s lifetime warranty – they’ll replace it forever, no questions asked. That warranty has value. I’ve used it twice, both times painless.

Total investment for capable red dot: $200. Hard to beat.

ACO at $400

Aimpoint ACO Red Dot Reflex Sight 2 MOA with Mount – 200174
  • Aimpoint quality and performance at an entry-level price.
  • 2 MOA dot with 9 low light and daylight brightness settings.

Twice the price, but not twice the optic. You’re paying for:

  • Swedish manufacturing quality
  • 5x better battery life
  • Bombproof reliability reputation
  • Finer adjustments
  • Clearer glass

Worth it? Depends on application. For duty use where lives depend on equipment, yes. For weekend range trips, probably not.

The Bottom Line

After four years running both, the SPARC AR wins for most shooters. Unless you need patrol-rifle reliability or hate changing batteries, the SPARC delivers 85% of ACO performance at 50% of the price.

Get the SPARC AR if:

  • Budget matters
  • Warranty support is important
  • Multiple rifles need optics
  • Training/competition use
  • Weight savings matter

Get the ACO if:

  • Duty/professional use
  • Battery life is critical
  • Buy-once-cry-once philosophy
  • Absolute reliability required
  • Swedish quality matters to you

Both work. Both hold zero. Both survive abuse. The price difference buys refinement and reputation, not basic functionality.

Practice makes permanent, so practice it right. Either optic will serve you well if you train with it properly. The wilderness doesn’t care what you paid – it cares whether you can hit your target when it matters.

Recommended Accessories

For SPARC AR:

  • Spare AAA Lithiums: Keep them everywhere
  • Butler Creek Caps: Protect the lenses
  • Blue Loctite: For mount screws

For ACO:

  • DL1/3N Battery Bulk Pack: Order online
  • Scope Coat: Protect the finish
  • Riser Mount: If co-witness is wrong

Final Wisdom

The perpetual question: is expensive always better? Not always. The ACO is objectively superior in several ways, but the SPARC AR delivers where it counts for half the price.

I’ve seen both perform when it mattered. Neither failed when needed. Choose based on realistic mission requirements and budget, not internet arguments about “military grade.”

Remember: hits count, not equipment cost. Master fundamentals with whatever you can afford, then upgrade when budget allows. A trained shooter with a SPARC beats an untrained shooter with an ACO every time.

Want to maximize your red dot performance? Check out my guides on zeroing distances, both-eyes-open technique, and maintaining electronic optics in harsh conditions.


About Flint: After 8 years as an Army Ranger and 15+ years teaching carbine courses, I’ve seen every red dot from $50 airsoft to $800 combat optics. When not instructing or testing gear, you’ll find me and Scout putting equipment through Montana’s worst, always seeking the sweet spot between performance and price.

Holosun SCRS: When Solar Power Meets Montana Winters

0

Three months into testing the Holosun SCRS, a January blizzard knocked out power to half our county for five days. While neighbors scrambled for batteries and flashlights, my solar-charged red dot kept glowing on the rifle by the door. That’s when I realized this wasn’t just another gimmicky feature – it was genuine innovation that solved a real problem.

The SCRS (Solar Charging Rifle Sight) represents Holosun’s bet that shooters are tired of battery anxiety. After eight months of running this optic through Montana’s extremes – from -30°F mornings to scorching summer prairie shoots – I can tell you whether solar charging is the future or just expensive marketing.

The Solar Promise: Revolutionary or Redundant?

During my Ranger days, dead batteries meant mission failure. We carried spares for our spares, checked battery levels obsessively, and still had failures at the worst moments. The SCRS promises to eliminate that anxiety through solar charging backed by a rechargeable internal battery. Sounds great on paper, but paper doesn’t survive Montana winters.

My test rifle for this experiment:

  • 16″ BCM upper on Aero lower – Primary testing platform
  • 10.5″ PSA pistol build – Backup and comparison testing
  • Ruger 10/22 Takedown – High-volume testing without breaking the bank

Each platform taught different lessons about living with solar-powered optics.

Technical Reality: What You’re Actually Getting

Core Specifications

The Numbers:

  • Reticle: 2 MOA dot with 65 MOA circle option
  • Battery Life: 50,000 hours claimed
  • Solar Panel: Integrated top-mounted
  • Brightness: 8 daylight, 4 night vision settings
  • Housing: 7075-T6 aluminum
  • Waterproof: IP67 rated
  • Weight: 2.45 ounces
  • Window: 22mm diameter
  • Mount: Integrated lower 1/3 co-witness

That price tag makes this Holosun’s premium offering. Let’s see if solar justifies the cost.

HOLOSUN SCRS-RD-MRS Multi-Reticle Red 2 MOA Dot & 65 MOA Circle Ultra Compact…
  • HOLOSUN RED DOT SIGHT – The SCRS RD MRS (Solar Charging Rifle Sight) is an ultra compact 20mm tube sight designed for long gun applications; This gun sight features multi-directional light sensors and an advanced Auto Mode for automatic reticle intensity settings and Manual Mode for manual control of dot intensity

Eight Months of Solar Reality

Winter Performance: The Acid Test

Montana winters are where equipment fantasies die. Short days, weak sun, extended indoor storage – if solar charging works here, it works anywhere.

December through February results:

  • Indoor storage (garage): Maintained charge with minimal light
  • Extended dark periods: Internal battery carried the load
  • Sub-zero performance: Electronics functioned perfectly
  • Snow coverage: Quick wipe restored charging capability

The key discovery: even indirect winter light provides some charge. The optic never died, even during a week-long ice fishing trip where it lived in a dark truck cab.

Summer Abundance

Come summer, the SCRS becomes unstoppable. During a three-day prairie dog shoot in July, the optic sat in direct sun for hours. Not only did it maintain charge, but the auto-brightness system prevented washout even in blazing noon conditions.

Sarah commented that the solar panel looked like it belonged on our neighbor’s roof, not a rifle. She’s not wrong about the aesthetics, but function beats form when your optic never needs batteries.

The Charging Reality

Here’s what Holosun doesn’t emphasize: this isn’t pure solar operation. The internal rechargeable battery does the heavy lifting, with solar extending its life dramatically. Think of it like a hybrid car – solar assists but doesn’t replace the primary power source.

In practical terms:

  • Direct sunlight: Maintains and slowly charges battery
  • Indirect light: Maintains current charge
  • Indoor lighting: Slows discharge rate
  • Complete darkness: Battery provides 50,000+ hours

Optical Performance: Beyond the Solar Gimmick

Glass Quality

Forget the solar panel for a moment – this is still a red dot that needs to perform. The glass impressed me more than expected. Clear, minimal tint, and the 2 MOA dot stays crisp even with my slight astigmatism.

During a dawn elk hunt, the clarity allowed positive target identification at 200 yards through the unmagnified optic. That’s the kind of performance that matters more than charging methods.

Reticle Options

The 2 MOA dot with 65 MOA circle follows Holosun’s proven formula. Use the dot for precision, the circle for speed, or both for versatility. After eight months, I run dot-only 90% of the time. The circle helps during close-range drills but isn’t necessary for most shooting.

The night vision settings work properly with my PVS-14, though I question how many SCRS buyers actually run night vision. Still, having the option costs nothing and might matter someday.

Auto-Brightness: Actually Useful

Unlike some auto-brightness systems that lag or hunt, the SCRS adjusts smoothly and appropriately. Moving from barn shadow to bright sunlight takes about half a second to adjust – faster than your eyes adapt.

Manual override is always available, but I’ve run auto-brightness exclusively for three months without issue. One less thing to think about during shooting.

Durability: Built Like Holosun Always Builds

Environmental Testing

Eight months of Montana provided:

  • Temperature swings: -30°F to 98°F
  • Complete submersion: Fell through ice while crossing creek
  • Dust exposure: Spring windstorms
  • Impact testing: Multiple drops from truck tailgate
  • Recoil testing: 3,000+ rounds of 5.56, 500 rounds of .300 BLK

Current status: Zero unchanged, all functions perfect, minor finish wear on edges.

The Ice Bath Incident

February’s “controlled submersion test” (I slipped and fell through ice) proved the IP67 rating. Twenty minutes in 34°F water, then immediate exposure to -15°F air. The SCRS never flickered, fogged, or failed. Try that with cheap electronics.

Build Quality Notes

The integrated mount deserves mention. No separate rings to loosen, no aftermarket mounts needed (though they’re available). The lower 1/3 co-witness height works perfectly with backup irons. One less potential failure point.

Real-World Applications

Home Defense

For a staged home defense rifle, the SCRS excels. Always charged, always ready, no battery anxiety during extended storage. The auto-brightness means no fumbling with controls in an emergency.

My bedroom rifle wears one now. It sits by a window where ambient light keeps it topped off. Even during our five-day power outage, it stayed functional. That’s peace of mind worth paying for.

Competition Use

At local 3-gun matches, the SCRS performs well but doesn’t excel. The solar panel adds slight height that some find distracting. The auto-brightness occasionally adjusts when moving between covered and uncovered shooting positions. Minor issues, but noticeable.

The lack of battery anxiety during all-day matches is nice. No spare batteries in your pocket, no wondering if you remembered to change them. Just shoot.

Hunting Applications

For stand hunting where rifles sit in sunlight, perfect. For timber hunting where everything stays shaded, the solar benefit diminishes. The internal battery still provides years of operation, but you’re not getting the full solar advantage.

Last season, I used it exclusively for antelope hunting on the prairie. All-day sun exposure meant unlimited operation. The auto-brightness handled changing angles as the sun moved. Zero maintenance required.

Training Value

High-volume training reveals the SCRS’s strength. During a 1,000-round weekend course, everyone else checked batteries at lunch. I just kept shooting. The psychological benefit of eliminating battery concerns is real.

Compared to the Competition

Versus Sig Romeo5

The Romeo5 offers 80% of the SCRS’s capability at 30% of the price. MOTAC works great, battery life is excellent, proven reliability. Unless you specifically need solar charging, the Romeo5 provides better value.

Versus Aimpoint PRO

Similar price, different philosophy. The PRO uses a standard battery lasting 30,000 hours – not solar but still essentially eternal. Better glass, bombproof reputation, but heavier and bulkier. For duty use, PRO wins. For innovation and weight, SCRS wins.

Versus Holosun 503 Series

The 503 offers similar features minus solar charging for half the price. Same reticle options, same build quality, traditional battery. For most users, the 503 makes more sense financially.

Versus Trijicon MRO

Direct price competitor with superior glass but significant parallax issues. Five-year battery life without solar. The MRO is more proven but less innovative. Personal preference drives this choice.

Living With Solar

Advantages Nobody Mentions

  • No battery anxiety during storage
  • Reduced electronic waste
  • Conversation starter at the range
  • Backup charging during emergencies
  • Psychological comfort of self-sufficiency

Real Limitations

  • Solar panel adds height/bulk
  • Non-replaceable internal battery
  • Higher initial cost
  • Unproven long-term reliability
  • Overkill for most users

Maintenance Considerations

Keep the solar panel clean. Dust, mud, snow all reduce efficiency. A quick wipe during regular cleaning maintains optimal charging. The panel seems scratch-resistant – mine still looks new despite regular use.

The non-replaceable battery concerns me long-term. Holosun claims 10+ year lifespan, but rechargeable batteries degrade. Time will tell if this becomes an issue.

Training Insights

Transition from Traditional Dots

No adjustment needed operationally. The SCRS functions identically to any quality red dot. The solar panel sits high enough to avoid interfering with sight picture or controls.

Auto-Brightness Training

Trust the system or run manual. Don’t switch between modes constantly. I recommend a month of auto-only to build confidence, then decide your preference.

The Psychological Factor

Eliminating battery anxiety changes your relationship with the optic. Instead of checking battery levels, you just shoot. It’s a small thing that makes a big difference over time.

The Investment Question

The SCRS costs serious money. Value depends on your priorities:

Worth it if:

  • You value energy independence
  • Battery anxiety affects you
  • You shoot high volume
  • Emergency preparedness matters
  • Innovation appeals to you

Not worth it if:

  • Budget is tight
  • You rarely shoot
  • Traditional batteries work fine for you
  • Proven technology matters most
  • The solar panel aesthetics bother you

Field Intelligence Summary

Who Should Buy This

  • Preparedness-minded shooters
  • High-volume trainers
  • Off-grid enthusiasts
  • Early adopters who appreciate innovation
  • Anyone who’s been burned by dead batteries

Who Should Look Elsewhere

  • Budget-conscious buyers
  • Traditional technology preferrers
  • Occasional shooters
  • Those wanting smallest possible profile
  • Anyone needing proven 10+ year track record

The Bottom Line

The Holosun SCRS succeeds at its primary mission: eliminating battery anxiety through solar assist. It’s not true solar operation, but the combination of solar charging and internal battery creates a virtually unlimited power source for practical use.

After eight months of hard use, including Montana’s worst weather, the SCRS has proven reliable and innovative. The solar charging isn’t just marketing – it provides real benefit for those who value energy independence.

Is it worth the premium over traditional red dots? That depends on your priorities. For my home defense rifle, absolutely. For a range toy, probably not.

Final Assessment

The SCRS represents genuine innovation in a market full of “me too” products. Solar charging works as advertised, adding capability without compromising basic red dot function. The execution isn’t perfect, but it’s good enough to matter.

Your best survival tool is the six inches between your ears, but those six inches appreciate equipment that works independently of supply chains and battery availability.

Practice makes permanent, and practicing without battery anxiety is liberating. The wilderness doesn’t care about your charging method, only whether your equipment functions when needed.

The SCRS functions. Always. That’s worth something, even if that something costs more than traditional alternatives.

Want more honest gear reviews from actual field use? Visit Moosir.com where we test equipment in conditions that matter, not climate-controlled environments. Because innovation means nothing if it doesn’t work in the real world.

The Plastic Gamble: Fourteen Months with the Sig Romeo Zero

0

Sarah’s hand trembled slightly as she cleared her cover garment, drawing her P365XL from appendix carry. The Romeo Zero’s dot appeared instantly as she aligned on the aggressive stray dog circling our neighbor’s toddler. One precise shot into the gravel sent the animal fleeing—the kind of quick, accurate shot that builds confidence in both shooter and equipment.

That tense April morning validated fourteen months of trusting this controversial polymer-bodied red dot on my wife’s everyday carry pistol. Yes, plastic—the Romeo Zero’s defining characteristic that makes experienced shooters nervous and budget-conscious carriers hopeful. Since mounting Romeo Zeros on two family micro-compacts, we’ve fired approximately 4,200 rounds while navigating the unique challenges and surprising benefits of Sig’s lightweight gamble.

Here in northern Montana, concealed carry isn’t fashion—it’s practical preparation for real threats, from aggressive animals to the occasional meth-addled drifter. We need sights that work reliably without adding unnecessary bulk or weight. The Romeo Zero promises both at an attractive price point. After fourteen months of daily carry through Montana seasons, two warranty replacements, and one complete lens failure, I’ve learned exactly what this plastic sight can and cannot deliver.

Understanding the Romeo Zero Design

Let’s address the elephant immediately—this sight is largely plastic:

FeatureSpecificationReal-World Impact
Housing MaterialReinforced PolymerLight but fragile
Lens MaterialSpectraCoat PolymerAdequate clarity
Weight0.5 ouncesBarely noticeable
Dimensions1.6″ x 0.93″ x 0.93″True micro footprint
Reticle Options3 MOA or 6 MOA3 MOA for precision
Battery TypeCR1632Bottom loading (problem)
Battery Life20,000 hours claimed2-3 months actual
Brightness8 settingsManual only
MOTACMotion activatedWorks as advertised
Backup SightIntegrated rear notchSurprisingly useful
PriceBudget-friendly

Fourteen Months of Reality Testing

The wilderness doesn’t care about your schedule—or your sight’s construction material. Our evaluation reflects actual concealed carry use.

Platform Distribution

We’re running Romeo Zeros on:

  • Sarah’s P365XL (daily EDC)
  • My backup P365 (truck/ranch gun)

Both installations revealed the same strengths and weaknesses.

SIG SAUER Romeo-X Compact Pistol-Mounted Reflex Sight | Rugged Durable Aluminum…
  • DURABLE CONSTRUCTION – The ROMEO-X COMPACT, inspired by the MIL-SPEC ROMEO-M17, features a rugged CNC Machined 7075 Aluminum Housing, meeting military standards for reliability and performance, ensuring robustness to withstand challenging conditions; Suited for the optic ready P365 Family of pistols; Designed with RX footprint compatible with Shield RMS-c mounts, ensuring secure and versatile installation on compact pistols

The Weight Advantage

At 0.5 ounces, the Romeo Zero adds virtually nothing to carry weight. Sarah particularly appreciates this—her P365XL with Romeo Zero weighs less than my Glock 19 with iron sights alone. For all-day concealed carry, especially appendix position, every ounce matters.

The minimal weight also maintains the pistol’s natural balance. Draw stroke feels identical to iron-sight configuration, crucial for defensive use.

The Plastic Problem

Let’s be honest about polymer construction. After fourteen months:

First Failure (Month 4): Lens developed spider-web cracks after holstering too aggressively. Still functional but distracting. Sig warranty replaced.

Second Failure (Month 9): Housing cracked where it meets the mounting screws after dropping the unloaded pistol on concrete. Complete replacement needed.

Current Status (Month 14): Third unit functioning but showing stress marks around mounting points.

This isn’t acceptable for a defensive sight, regardless of price.

MOTAC Performance in Daily Carry

Motion Activated Illumination works better than expected:

Real Carry Performance

Morning Routine: Pistol in nightstand overnight—dot appears instantly when grabbed

Daily Movement: Walking activates it, stays on during carry

Vehicle Time: Shuts off during drives, instant activation when exiting

Draw Practice: Never failed to activate during presentation

Sarah appreciates not managing batteries constantly. The sight is always ready when needed, though battery life suffers.

Actual Battery Life

Sig claims 20,000 hours. Reality with MOTAC:

  • Constant carry: 2-3 months maximum
  • Range use only: 4-5 months
  • Safe queen: 6+ months

The motion sensor interprets every movement as activation need. Daily carry means constant battery drain. We change batteries every two months preventively.

The Battery Change Nightmare

Here’s the Romeo Zero’s fatal flaw—battery access requires complete removal.

The Re-Zero Dance

Every battery change means:

  1. Remove optic completely
  2. Replace CR1632 battery
  3. Reinstall optic
  4. Re-zero at range
  5. Verify with 25-50 rounds

This wastes time, ammunition, and degrades mounting screw integrity. After five battery changes, my P365’s polymer frame shows thread wear.

Field Battery Failure

Last October, Sarah’s Romeo Zero died during an overnight trip to Billings. No tools, no range access—her carry gun became iron-sight only. The integrated rear sight saved the day, but highlighted the design’s weakness.

Compare this to side-loading competitors where battery changes take 30 seconds anywhere.

Optical Performance Assessment

Glass Quality

For polymer lenses, clarity impresses:

  • Minimal distortion across window
  • Slight blue tint (barely noticeable)
  • Good light transmission
  • Adequate in rain/snow

The small window requires precise presentation for quick dot acquisition. Both-eyes-open shooting helps compensate.

Dot Quality

The 3 MOA dot we prefer stays reasonably crisp:

  • Brightness adequate for Montana sun
  • Low settings work for indoor/dawn/dusk
  • Some bloom at highest settings
  • Visible starring with astigmatism

Sarah has perfect vision and reports clean, round dot at all settings. My mild astigmatism shows minor distortion but remains usable.

Weather Resistance

Montana weather testing revealed:

  • Rain: No internal fogging
  • Snow: Functions but snow accumulates on lens
  • Cold (-20°F): Electronics work, polymer gets brittle
  • Heat (95°F): No issues observed

The sight handles weather adequately but durability concerns increase in extreme cold.

Accuracy and Zero Retention

When functioning, the Romeo Zero delivers:

Practical Accuracy

  • 15 yards: 2-inch groups average
  • 25 yards: 3.5-inch groups average
  • 7 yards: One ragged hole

More than adequate for defensive distances.

Zero Retention

Between failures and battery changes:

  • Normal use: Holds zero well
  • After drops: Usually shifts 2-3 MOA
  • After battery change: Complete re-zero needed
  • Temperature swings: Minimal shift

The mounting system works when not disturbed. Problem is, it gets disturbed frequently.

The Integrated Backup Sight

Surprisingly useful feature:

When It Matters

During battery failures or lens damage, the rear notch provides emergency sighting. Combined with the front sight, it’s basically standard P365 sight picture through the window.

Sarah used this during her Billings battery failure—accurate enough for defensive distances.

Training Value

We practice transitions:

  • Red dot primary
  • Backup notch if dot fails
  • Muscle memory for both

This redundancy provides confidence despite reliability concerns.

Concealment and Comfort

The Romeo Zero excels here:

Daily Carry Reality

Sarah’s fourteen-month experience:

  • No printing through normal clothing
  • No discomfort during all-day wear
  • No snagging on garments
  • Easy draw from concealment

The ultra-low profile maintains the P365’s concealment advantage while adding red dot capability.

Holster Compatibility

Most P365 holsters accommodate the Romeo Zero:

  • PHLster Enigma: Perfect fit
  • Vedder LightTuck: Minor adjustment needed
  • Tulster Oath: Works without modification

The small footprint rarely requires holster changes.

Comparison with Alternatives

Versus Holosun 407K/507K

The Holosuns cost more but offer:

  • Aluminum construction (huge advantage)
  • Side-loading battery
  • Better battery life
  • Solar options available

For $100-150 more, the durability upgrade justifies cost.

Versus Shield RMSc

Similar size, glass construction:

  • More durable than Romeo Zero
  • Side battery access
  • Higher price point
  • Less common footprint

Better choice for serious use.

Versus Swampfox Sentinel

Direct competitor:

  • Aluminum body
  • Better durability
  • Similar price point
  • Auto-brightness option

Superior to Romeo Zero in every way except weight.

Female Shooter Perspective

Sarah’s experience deserves emphasis:

Why She Chose It

  • Lightweight for all-day carry
  • Low profile for concealment
  • Simple operation
  • Affordable to try red dots

Daily Reality

  • Faster target acquisition than irons
  • Better low-light capability
  • Confidence boost for defensive scenarios
  • Frustration with durability issues

She’s shopping for replacement options now—probably Holosun 407K.

Who Should Buy the Romeo Zero

Acceptable For:

First-Time Red Dot Users: Affordable introduction to pistol optics

Extremely Weight-Conscious: When every fraction of ounce matters

Range/Competition Only: Where durability matters less

Backup Guns: Infrequent use reduces failure risk

Avoid For:

Serious Defensive Use: Durability issues disqualify it

Daily Carry: Constant battery changes frustrate

Harsh Environments: Polymer can’t handle abuse

Professional Use: Absolutely not

Living with the Romeo Zero

Maintenance Requirements

Fourteen months taught us:

Daily: Check for lens cracks or housing stress

Weekly: Verify dot function and brightness

Monthly: Inspect mounting screws and housing

Bi-Monthly: Replace battery (preventive)

Survival Tips

  1. Keep spare batteries everywhere
  2. Carry tools for emergency removal
  3. Practice with backup sight
  4. Check warranty status regularly
  5. Have backup gun ready
  6. Document zeros for quick reset
  7. Consider steel shroud upgrade
  8. Don’t trust it completely

Cost Analysis Reality

Initial price seems attractive:

  • Romeo Zero
  • Installation: Free (DIY)
  • Initial zero: 50 rounds

Hidden costs accumulate:

  • Battery changes: $5 every 2 months
  • Re-zeroing ammo: 50 rounds per change
  • Warranty shipping: $15-30 per claim
  • Replacement units: Eventually needed

Total 14-month cost exceeded —approaching better options’ price.

The Harsh Verdict

After fourteen months and two failures, I cannot recommend the Romeo Zero for defensive carry. The polymer construction simply isn’t durable enough for life-saving equipment.

Your best survival tool is the six inches between your ears, but defensive equipment must be absolutely reliable. The Romeo Zero isn’t.

Practice makes permanent, so practice it right—with equipment you can trust completely. This sight creates doubt.

The wilderness doesn’t care about your schedule—neither do threats. When Sarah needed her sight for that stray dog, it worked. But what about next time?

Plan for the worst, hope for the best. The Romeo Zero represents hoping without adequate planning.

Final Assessment

The Sig Romeo Zero attempts to make red dot sights accessible through aggressive cost-cutting. While admirable in theory, polymer construction proves inadequate for serious use. After two failures and constant battery hassles, both our Romeo Zeros are being replaced.

For range toys or competition guns where failure means inconvenience, not danger, the Romeo Zero might suffice. For defensive carry where lives depend on equipment, spend the extra money on aluminum construction.

Sarah’s stray dog encounter ended well, but defensive encounters don’t offer second chances. Choose accordingly.

Remember: respect the game, respect the land, respect yourself. Part of that respect means carrying equipment worthy of protecting life. The Romeo Zero, despite good intentions, falls short.

Want to explore reliable micro red dot options or share your Romeo Zero experiences? Drop a comment below—real experiences beat marketing every time. And if you’re setting up a micro-compact for carry, check out our guide to defensive pistol configurations where we cover proven options for serious use.

Nightforce SHV vs Vortex PST: Three Seasons of Montana Long-Range Testing

0

Last September, at a precision rifle match near Bozeman, I watched a shooter miss a critical 800-yard shot when his scope’s tracking failed during a stage. His expensive glass couldn’t handle the adjustment from 300 to 800 yards reliably. Standing next to him was another competitor running a scope at half the price who cleaned the stage. That day reinforced what matters in long-range optics: reliability trumps reputation, and price doesn’t always predict performance.

The Nightforce SHV and Vortex PST Gen II represent two different philosophies in the “serious but not insane” price bracket for long-range scopes. Over three hunting seasons and countless range sessions, I’ve run both optics hard across Montana’s diverse terrain. From prairie dog towns requiring precision at 500 yards to elk hunting where first-round hits at 600+ yards mean everything, these scopes have revealed their true characters.

This comparison isn’t about declaring a winner for internet points. It’s about understanding which tool fits specific needs based on real field performance where missing means more than hurt feelings – it might mean an empty freezer or a lost competition.

Testing Framework: Apples to Precision Apples

To ensure meaningful comparison, I tested each scope under identical conditions:

Test Platforms:

  • Tikka T3x CTR in 6.5 Creedmoor (primary test rifle)
  • Remington 700 Long Range in .300 Win Mag (recoil testing)
  • Custom AR-10 in 6.5 Creedmoor (volume testing)

Testing Duration: 3 full hunting seasons (36 months)

Round Count: 4,200+ rounds combined

Environmental Range: -28°F to 98°F

Elevation Testing: 2,800 to 11,000 feet

Real Applications:

  • Long-range steel matches (monthly)
  • Elk and mule deer hunting
  • Prairie dog/ground squirrel control
  • Precision load development
  • Student long-range instruction

Understanding Each Scope’s DNA

Before diving into performance, let’s clarify what we’re comparing – these aren’t direct competitors in all aspects.

Nightforce SHV 4-14×50 F1

Nightforce SHV 4-14x50mm F1 30mm Tube ZeroSet Parallax Adjustable Versatile…
  • NIGHTFORCE SCOPE – This SHV hunting gun scope incorporates a feature set built for versatility, starting with a 4-14x magnification range that offers an excellent combination of field of view and resolving power at higher magnification; The 50mm objective offers excellent light transmission at any time of day; The overall length is 14.8 in; Mounting length is 6.1 in; Optic weigh is 30 oz

The SHV (Shooter Hunter Varminter) represents Nightforce’s “affordable” line. Don’t mistake that for cheap – this is still a thousand-dollar scope built to Nightforce standards.

Key Specifications:

  • Magnification: 4-14x (also available in 3-10x and 5-20x)
  • Objective: 50mm
  • Tube: 30mm
  • Focal Plane: First (F1 model tested)
  • Eye Relief: 3.15-3.54 inches
  • Adjustment: 0.25 MOA clicks
  • Travel: 90 MOA elevation, 80 MOA windage
  • Weight: 30 ounces
  • Length: 14.8 inches
  • Street Price: $1,100-1,300

Vortex PST Gen II 5-25×50

Vortex Optics Viper PST Gen II 5-25×50 Second Focal Plane Riflescope – EBR-4…
  • The Viper PST Gen II takes incredible performance and rock solid tactical features to new heights. The 5-25×50 second focal plane riflescope is incredibly versatile and ideal for close to long range shooting scenarios.

The PST (Precision Shooting Tactical) Gen II evolved from lessons learned in competition. It’s Vortex’s serious long-range offering without stepping into Razor territory.

Key Specifications:

  • Magnification: 5-25x (multiple ranges available)
  • Objective: 50mm
  • Tube: 30mm
  • Focal Plane: First or Second (FFP tested)
  • Eye Relief: 3.4 inches
  • Adjustment: 0.25 MOA or 0.1 MIL
  • Travel: 70 MOA elevation, 45 MOA windage
  • Weight: 31.2 ounces
  • Length: 15.86 inches
  • Street Price: $900-1,100

Glass Quality: The Foundation of Everything

Let’s address the elephant immediately: Nightforce glass has a reputation. But reputation doesn’t always translate to practical advantage.

Optical Clarity Comparison

During side-by-side dawn observations last November, both scopes resolved antler details on a bedded bull elk at 650 yards. The differences appeared in challenging conditions:

Nightforce SHV Performance:

  • Exceptional contrast in flat light
  • Superior performance shooting into sun
  • Minimal chromatic aberration
  • Slightly warm color cast
  • Edge clarity excellent to 90% of field

Vortex PST Gen II Reality:

  • Brighter image overall
  • Better in extremely low light
  • More neutral color rendition
  • Slight purple fringing at max power
  • Edge clarity good to 85% of field

The practical difference? During a late-season mule deer hunt, I could identify legal bucks 5-7 minutes longer at dusk through the PST. The Nightforce handled mirage and heat shimmer better during summer prairie dog shoots.

Resolution Testing

Using resolution charts at 100 yards:

  • Nightforce: Resolved 0.25″ lines clearly
  • Vortex: Resolved 0.30″ lines clearly

That’s a measurable difference, but at 600 yards, both showed 2-inch groups clearly enough for precision work. The Nightforce’s advantage appears in extreme conditions more than raw resolution.

Reticle Analysis: Different Tools, Different Jobs

Reticle choice profoundly impacts field performance.

Nightforce MOAR Reticle

Nightforce NX8 2.5-20x50mm 8X Zoom Range F1 Illuminated Moar Reticle Black Matte…
  • OPERATION IN EXTREME CONDITIONS – The NX8 family of scopes has been designed and constructed to withstand heavy use in austere environments: extreme heat and cold, dust and sand storms, salty air, high altitude, water, mud, snow; package includes: Tenebraex flip up covers, cleaning fob/ cleaning cloth, multi-tool, power throw lever, stickers, manual

The MOAR (Multi-Purpose Aiming Reticle) provides:

  • Floating center crosshair
  • 1 MOA subtensions
  • Clean, uncluttered design
  • Excellent for known-distance precision
  • Less useful for rapid ranging

During an elk hunt, the MOAR’s simplicity proved valuable. At 486 yards, I held 2.5 MOA elevation (verified by previous data) and made a perfect heart shot. No counting tiny hashes, no complexity – just hold and shoot.

Vortex EBR-2C Reticle

The Enhanced Battle Reticle offers:

  • Christmas tree design
  • 0.2 MIL subtensions
  • Wind holds throughout
  • Excellent for unknown distance
  • Can appear cluttered at low power

During a prairie dog session with varying winds, the EBR-2C excelled. I could hold for both elevation and wind simultaneously, making rapid corrections between shots. For competitive shooting, this reticle dominates.

Tracking and Adjustments: The Trust Factor

This is where reputation meets reality.

Box Test Results

Standard 20 MOA box test at 100 yards, repeated 5 times:

Nightforce SHV:

  • Perfect return to zero: 5/5 times
  • Total deviation: 0.15 MOA
  • Click feel: Positive, distinct
  • Tracking error: <0.5%

Vortex PST Gen II:

  • Perfect return to zero: 4/5 times
  • Total deviation: 0.25 MOA
  • Click feel: Good but slightly mushy
  • Tracking error: <1%

One PST test showed 0.5 MOA horizontal shift after the complete box. Not terrible, but concerning for a scope at this level.

Tall Target Testing

30 MOA vertical string at 100 yards:

Nightforce: Tracked within 0.2% throughout range

Vortex: Tracked within 0.8% throughout range

Both acceptable for hunting, but the Nightforce inspires more confidence for extreme long-range work.

Real-World Tracking

During a recent match requiring constant elevation changes from 200 to 1,000 yards:

  • Nightforce: Never doubted the adjustments
  • Vortex: Required occasional “confirmation” shots

That confidence matters when you have one shot at a trophy animal.

Durability: Montana’s Testing Ground

Three years in Montana reveals any weakness.

Environmental Testing

Temperature Extremes: Both scopes experienced -28°F to 98°F:

  • Nightforce: Zero shift of 0.25 MOA at extremes
  • Vortex: Zero shift of 0.5 MOA at extremes

Both maintained function, but the Nightforce proved more stable.

Moisture and Precipitation: During a three-day September elk hunt in continuous rain:

  • Both remained fog-free internally
  • Nightforce’s coatings shed water better
  • Vortex required more frequent lens cleaning

Impact Testing

Not intentional, but both scopes have taken hits:

Nightforce: Fell off tailgate onto gravel (4 feet) – no zero shift Vortex: Slipped during stream crossing, hit rocks – lost zero by 1.5 MOA

The Nightforce’s legendary durability isn’t marketing hype.

Recoil Resistance

After 500 rounds of .300 Win Mag:

  • Nightforce: Zero shift undetectable
  • Vortex: 0.25 MOA vertical shift

Both acceptable, but Nightforce edges ahead for dangerous game applications.

Ergonomics and Controls

Daily use reveals design priorities.

Turret Design

Nightforce SHV:

  • Capped windage (my preference)
  • Exposed elevation with zero stop
  • Firm, deliberate clicks
  • Simple, effective design

Vortex PST Gen II:

  • Exposed turrets with locking mechanism
  • Zero stop on elevation
  • Slightly softer clicks
  • More “tactical” appearance

For hunting, I prefer the Nightforce’s capped windage. For competition, the Vortex’s exposed turrets work better.

Magnification Ring

Nightforce: Stiff when new, smooth after break-in, stays put under recoil Vortex: Smooth from new, throw lever included, occasionally creeps under heavy recoil

The included throw lever on the Vortex provides real value for dynamic shooting.

Parallax Adjustment

Both feature side-focus parallax:

  • Nightforce: 25 yards to infinity, very accurate markings
  • Vortex: 20 yards to infinity, markings optimistic

Neither disappointed, but the Nightforce’s markings proved more reliable.

Low-Light Performance: When It Matters Most

Prime hunting hours demand excellent low-light capability.

Dawn/Dusk Testing

Using standardized targets at 200 yards:

Legal shooting light identification:

  • Nightforce: +18 minutes versus naked eye
  • Vortex: +22 minutes versus naked eye

The Vortex’s larger magnification range and coatings provide a meaningful advantage in low light.

Exit Pupil Calculation

At maximum magnification:

  • Nightforce (14x): 3.57mm exit pupil
  • Vortex (25x): 2mm exit pupil

But at equivalent magnification (14x):

  • Vortex: 3.57mm (identical)

The Vortex offers more flexibility but isn’t inherently brighter.

Field Performance: Real Hunting Stories

Theory matters less than dead animals and hit steel.

The 680-Yard Elk

November 2022, public land near the Missouri Breaks. Spotted a mature bull at 680 yards, 8 mph full-value wind. Using the Nightforce SHV:

  • Ranged precisely with Leica
  • Dialed 15.5 MOA elevation (verified dope)
  • Held 1.5 MOA wind
  • First round impact, bull down in 30 yards

The simple MOAR reticle and absolute confidence in tracking made this shot possible.

The Prairie Dog Massacre

July 2023, eastern Montana. Using the Vortex PST for volume shooting:

  • 300+ rounds in one day
  • Distances from 150-500 yards
  • Constant elevation and wind changes
  • Hit rate: approximately 70%

The EBR-2C reticle and higher magnification excelled for this application. The exposed turrets allowed rapid adjustments between targets.

The Competition Reality

Local PRS match, 10 stages, 100 rounds:

  • Nightforce: 8th place (equipment limited by magnification)
  • Vortex: 3rd place (same shooter, different match)

The Vortex’s 25x magnification and complex reticle provide competitive advantages the Nightforce can’t match.

Value Analysis: Real Cost of Ownership

Let’s examine true costs beyond sticker price.

Nightforce SHV Investment

  • Scope: $1,200 average
  • Rings: $150 (quality required)
  • Total: $1,350
  • Expected lifespan: 20+ years
  • Annual cost: $67.50

Vortex PST Gen II Investment

  • Scope: $1,000 average
  • Rings: $150
  • Total: $1,150
  • Expected lifespan: 15 years
  • Annual cost: $76.67

The Nightforce costs more initially but likely lasts longer. The annual difference is negligible.

Warranty Comparison: When Things Break

Both companies offer excellent warranties, but differences exist:

Nightforce

  • Limited lifetime warranty
  • Covers defects, not abuse
  • Excellent service but slower
  • Typical turnaround: 4-6 weeks
  • Very rarely needed

Vortex

  • VIP unlimited lifetime warranty
  • Covers everything, even stupidity
  • Fast, exceptional service
  • Typical turnaround: 1-2 weeks
  • More likely to need it

I’ve never needed Nightforce warranty service. I’ve used Vortex’s twice (both user error), and they exceeded expectations.

The Magnification Question

Let’s address the elephant: comparing 4-14x to 5-25x isn’t entirely fair.

For hunting inside 600 yards, 14x proves adequate. I’ve taken elk at 680 yards with 14x successfully. But for small targets or extreme range, 25x provides real advantages.

If Nightforce made the SHV in 5-25x at the same price point, this comparison would shift significantly. As tested, the Vortex offers more versatility.

Which Rifle Wears What?

After three years, here’s my allocation:

Nightforce SHV mounted on:

  • .300 Win Mag (dangerous game backup)
  • Hunting-specific 6.5 Creedmoor
  • Loaner rifles (bomb-proof reliability)

Vortex PST Gen II on:

  • Competition rifle
  • Prairie dog/varmint rifle
  • Long-range steel rifle

This allocation reflects each scope’s strengths.

Hidden Factors

Some considerations that don’t fit neat categories:

Resale Value

  • Nightforce holds 75-80% of value
  • Vortex holds 60-65% of value

Availability

  • Nightforce often backordered
  • Vortex readily available

Aftermarket

  • Nightforce: Limited accessories needed
  • Vortex: Extensive accessory ecosystem

Pride of Ownership

  • Nightforce carries prestige
  • Vortex seen as “working man’s scope”

Decision Matrix: Choose Your Fighter

Choose Nightforce SHV if:

  • Reliability is absolutely paramount
  • Hunting is primary use
  • You value simplicity
  • Budget allows the premium
  • Resale value matters
  • You want to buy once, cry once

Choose Vortex PST Gen II if:

  • You need maximum magnification
  • Competition is in your future
  • Complex reticles appeal to you
  • Warranty coverage matters
  • You want best bang for buck
  • Versatility trumps specialization

The Uncomfortable Truth

Both scopes exceed most shooters’ capabilities. I’ve watched hunters with Nightforce scopes miss easy shots and competitors with Vortex dominate matches. The Indian matters more than the arrow.

That said, confidence in equipment enables performance. The Nightforce’s reputation and reliability provide psychological advantages that impact real-world results.

Final Verdict: Application Determines Winner

After thousands of rounds and three hunting seasons, I can’t declare an absolute winner. Each excels in its intended role.

For a dedicated hunting rifle where reliability and simplicity matter most, the Nightforce SHV earns its premium. The peace of mind knowing it will work every time, regardless of conditions, justifies the cost.

For a versatile rifle serving multiple roles from competition to varmint hunting, the Vortex PST Gen II provides more capability per dollar. The higher magnification and complex reticle open possibilities the Nightforce can’t match.

My personal choice? My primary hunting rifle wears the Nightforce. When an elk appears at last light after days of hard hunting, I want zero doubt about my equipment. But my steel rifle runs the Vortex because hitting 2 MOA plates at 1,200 yards requires its capabilities.

Buy based on honest assessment of your needs, not internet opinions or brand loyalty. Both scopes will serve you well if you do your part.

Practice makes permanent, so practice it right.


Ready to step up your long-range game? Check out my comprehensive guide to precision rifle fundamentals, or explore our detailed analysis of MOA vs MIL for long-range shooting. Your hits depend on understanding your equipment – and mastering the fundamentals.

What’s your experience with these optics? Have you pushed either scope to its limits? Share your real-world results below – I personally respond to every comment, and field experience trumps specifications every time.