Home Blog Page 7

Best M&P Shield Night Sights: What Actually Works When the Lights Go Out

0

The night I drew my M&P Shield on a wounded black bear in thick timber, only to realize I couldn’t see my factory sights in the darkness, I learned a lesson that could have cost me dearly. That terrifying moment – fumbling with a flashlight while trying to maintain sight picture on 400 pounds of injured predator – sent me on a mission to find night sights that actually work when your life depends on them.

Since that wake-up call three years ago, I’ve tested every major night sight option for the Shield platform. I’ve run them through Montana winters, summer training courses, and thousands of rounds of practice ammunition. More importantly, I’ve carried them daily, learning which features matter when the academic discussion ends and practical application begins.

The M&P Shield remains one of the most popular concealed carry pistols for good reason – it’s reliable, affordable, and shoots well. But Smith & Wesson’s factory sights are barely adequate in daylight and useless in darkness. Upgrading to quality night sights transforms the Shield from a decent pistol into a serious defensive tool. Let me share what I’ve learned the hard way about making that transformation.

Understanding Night Sight Technology: Tritium vs Marketing

True night sights use tritium – a radioactive isotope of hydrogen that glows continuously for 10-15 years without batteries or charging. The tritium is sealed in glass vials coated with phosphor that converts radiation into visible light. It’s the same technology used in military watches and instrument panels. No switches, no batteries, just constant illumination when you need it.

Many manufacturers combine tritium with photoluminescent paint that “charges” from ambient light. This provides extra brightness initially but fades within minutes in darkness. Some add fiber optic rods that gather available light during daytime. Understanding these distinctions helps separate useful features from marketing gimmicks.

The brightness of tritium sights diminishes over time – that’s physics, not poor quality. After 12 years (tritium’s half-life), they’ll be half as bright as new. In my experience, they remain functional for 15+ years, though I replace mine every decade for optimal performance. Consider it routine maintenance, like replacing recoil springs.

Testing Protocol: Beyond the Square Range

Each sight set endured:

  • Minimum 1,000 rounds on my carry Shield
  • Daily concealed carry for at least one month
  • Low-light shooting drills at indoor and outdoor ranges
  • Temperature cycling from -20°F to 95°F
  • Deliberate impacts and drops (within reason)
  • Sweat, rain, and general carry abuse
  • Timed target acquisition drills in various lighting

I evaluated visibility at three critical times: bright daylight, twilight/dawn, and complete darkness. Each matters for defensive use. I also tested sight picture acquisition speed – how quickly I could align sights from various draw positions. Pretty sights that slow you down are worse than basic ones you can use quickly.

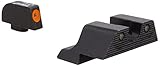
Top Overall Pick: Trijicon HD Night Sights – When Reliability Matters Most

Trijicon DI Night Sight Set for Smith & Wesson M&P, M&P M2.0, SD9 VE, & SD40 VE
  • EXCEPTIONAL BRIGHTNESS IN ANY LIGHT: Specialized fiber finishing technique and advanced fiber-optic material ensures exceptional daylight brightness. A tritium lamp guarantees an illuminated aiming point, even in total darkness
  • USER REPLACEABLE FIBER: A threaded retainer on the front sight allows users to quickly replace any lost or damaged fiber pieces

Trijicon essentially invented the tritium sight market, and their HD (Heavy Duty) line represents decades of refinement. After two years on my primary carry Shield, these sights have proven themselves completely reliable in every condition Montana has thrown at them.

The front sight uses a larger tritium vial surrounded by a photoluminescent outline (orange or yellow options). This combination provides excellent visibility in all lighting conditions. The orange version on my Shield pops against any background – crucial for quick acquisition under stress. The rear sight uses two smaller tritium vials with a wider U-notch that speeds alignment without sacrificing precision.

What sets Trijicon apart is consistency. Every set I’ve used performs identically. The tritium brightness matches across vials, the machining is perfect, and they maintain zero regardless of abuse. During a week-long training course where we drew from concealment hundreds of times, the sights never shifted or loosened.

The aluminum construction with black nitride finish resists corrosion from sweat and weather. After two years of daily carry, including several hunting seasons where the Shield rode as backup, the sights show minimal wear. The tritium remains bright enough for instant acquisition in complete darkness.

Installation requires care – these sights fit tightly. I recommend professional installation unless you have proper sight pusher tools. The precision fit contributes to their reliability but makes kitchen-table gunsmithing risky. Consider installation costs when budgeting.

My only complaint: the rear sight sits slightly higher than factory, requiring minor adjustment to your draw presentation. After a few hundred draws, muscle memory adapts. The improved visibility more than compensates for this minor learning curve.

Best Value Performance: TRUGLO TFO – Dual Technology That Works

TruGlo TG131MPT TFO Handgun Pistol Laser Sight Accessories Set with TRIDOT…
  • TruGlo Night Sights: TruGlo TFO Night Sight is compatible with Smith & Wesson Handguns and is ideal for high visibility and faster target acquisition no matter the lighting
  • Optimal Stealth and Visibility: Daylight or in complete darkness, this compact Gun Sight gathers all existing light and holds it tight for unmatched visibility; Concealed fiber cannot be seen by the target

TRUGLO’s TFO (Tritium Fiber Optic) sights combine two technologies effectively. Fiber optic rods gather ambient light during daytime while tritium provides constant glow in darkness. The result is exceptional brightness across all lighting conditions at a reasonable price.

During daylight, these are the brightest sights I’ve tested. The fiber optic rods seem to glow in anything above candlelight. At dusk – that critical transition period when most defensive encounters occur – they remain visible longer than pure tritium sights. In complete darkness, the tritium takes over seamlessly.

The steel construction feels bombproof. I’ve deliberately abused a set on my backup Shield, including drops onto concrete and extended submersion during creek crossings (don’t ask). They maintain zero and brightness without issues. The sealed design protects both fiber optic and tritium elements from damage.

The CNC-machined components fit perfectly in the Shield’s dovetails. Installation was straightforward with basic tools, though I still recommend a sight pusher for the rear sight. Once installed, they lock solidly in place. No movement after thousands of rounds.

The sight picture differs slightly from traditional three-dot systems. The front sight appears larger and brighter, naturally drawing your eye. This speeds acquisition but requires adjustment if you’re used to equal-sized dots. After a few range sessions, the new sight picture becomes intuitive.

One downside: the fiber optic rods can potentially break if struck hard enough. While I haven’t experienced this, I’ve seen it happen to others. The sight remains functional with tritium only, but loses the daylight advantage. For hard-use applications, consider this limitation.

Fast Acquisition Choice: XS Sight Systems Big Dot – Speed Over Precision

XS takes a different approach with their Big Dot system. Instead of traditional three-dot alignment, they use a large front dot over a shallow V-notch rear. This design prioritizes speed over precision – perfect for defensive distances where getting hits quickly matters more than group size.

The massive front sight dot (0.188″ diameter) is impossible to miss. In testing, I consistently achieved fastest times from holster to first shot with these sights. The shallow V-notch rear naturally centers the front dot, almost like a ghost ring setup. For defensive shooting inside 15 yards, this system excels.

The “dot-the-i” sight picture takes adjustment. You place the front dot on the target like dotting a lowercase “i” rather than traditional sight alignment. This felt awkward initially but became natural after dedicated dry fire practice. Once programmed into muscle memory, it’s remarkably fast.

Tritium vials in both front and rear sights provide good low-light visibility. The front sight also uses photoluminescent paint that adds initial brightness. In complete darkness, the sight picture remains clear enough for defensive accuracy, though not as bright as Trijicon or TRUGLO options.

The shallow rear notch includes a ledge for one-handed slide manipulation – a thoughtful feature for defensive use. Quality steel construction has proven durable through extensive carry and practice. The white stripe down the rear sight helps alignment in daylight.

The trade-off is precision. Beyond 15 yards, groups open up compared to traditional sights. For bullseye shooting or longer range work, these aren’t ideal. But for their intended purpose – fast, defensive shooting at realistic distances – they excel. Know your needs before choosing.

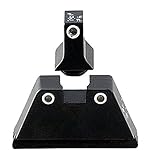
Budget Option: AmeriGlo I-Dot – Simple and Effective

AmeriGlo adult unisex Tritium I-Dot Green with Orange Outline Set sporting gun…
  • NIGHT SIGHT SET – The AmeriGlo i-Dot Sight Set is designed to enhance target acquisition and increase accuracy in low light or complete darkness; These durable and reliable pistol sights help shooters place shots faster and more accurately
  • DUAL DOT CONFIGURATION – Built for accuracy under stress, the AmeriGlo gun sight set has a dot-over-dot configuration, in which one sight is positioned above the other; This arrangement provides a quick and easy vertical sight alignment

AmeriGlo’s I-Dot sights prove you don’t need to spend premium money for functional night sights. Using Trijicon-sourced tritium in a simpler housing design, they deliver reliable performance at an attractive price point.

The I-Dot system uses single tritium vials front and rear, creating a vertical alignment (like a lowercase “i”). This eliminates the distraction of multiple dots while maintaining a clear sight picture in darkness. The front sight includes a colored outline (orange or white) for daylight visibility.

After six months on my practice Shield, these sights have proven completely reliable. The steel construction shows good durability, maintaining zero through regular practice sessions. The tritium brightness matches more expensive options – no surprise since AmeriGlo sources from Trijicon.

Installation proved straightforward with basic tools. The machining quality is good, with sights fitting properly without excessive filing or fitting. They lock securely in the dovetails and haven’t shifted despite regular use.

The simplified sight picture works well for defensive shooting. Without extra dots to align, you naturally focus on the front sight. This actually improved my accuracy during stress drills where fine motor skills degrade. Sometimes simpler is better.

The main compromise is daytime visibility. While functional, the painted outline isn’t as bright as fiber optic or photoluminescent options. In bright sunlight, acquisition takes slightly longer than premium sights. For primarily nighttime or indoor use, this limitation matters less.

Installation Considerations: Do It Right the First Time

Installing night sights isn’t complicated, but mistakes can damage your slide or sights. If you lack proper tools or experience, pay a gunsmith. The $30-50 installation fee prevents expensive mistakes and ensures proper installation.

If installing yourself, invest in quality tools:

  • A proper sight pusher (MGW or similar)
  • Brass punches for front sight
  • Blue Loctite for security
  • Proper fitting files if needed

The Shield’s rear sight dovetail is tight – that’s good for retention but challenging for installation. Never hammer directly on tritium sights; the vials can break. Use proper pusher tools or brass drifts with protective pads.

Test fit before final installation. Some sights require minor filing for proper fit. Remove material slowly and test frequently. Too loose is worse than too tight. Once fitted properly, a drop of blue Loctite prevents movement without permanent installation.

After installation, verify zero immediately. Night sights often shoot to different point-of-impact than factory sights. Adjust your aim or drift sights as needed. Document the changes for reference.

Real-World Performance: Where Theory Meets Practice

During low-light force-on-force training, the difference between night sights and factory sights became dramatically apparent. Students with upgraded sights consistently engaged targets faster and more accurately. Those with factory sights struggled, often resorting to point shooting at distances where aimed fire was possible with night sights.

In daily carry, quality night sights provide confidence that extends beyond darkness. Knowing I can accurately engage threats in any lighting eliminates one variable from the defensive equation. This confidence translates to better performance under stress.

Most defensive shootings occur in transitional light – not complete darkness but not daylight either. This is where combination sights (tritium plus fiber optic or photoluminescent) excel. Pure tritium works, but the added brightness during these critical periods provides real advantages.

Making the Right Choice

Choose Trijicon HD if:

  • Reliability is paramount
  • You want the best regardless of cost
  • Consistent performance matters most
  • Professional installation is available

Choose TRUGLO TFO if:

  • Brightness in all conditions appeals
  • Value matters but quality is important
  • You shoot in varied lighting frequently
  • Dual technology makes sense

Choose XS Big Dot if:

  • Speed trumps precision
  • Defensive shooting is primary use
  • Traditional sights feel slow
  • You’ll practice the new sight picture

Choose AmeriGlo I-Dot if:

  • Budget is limited
  • Simplicity appeals
  • Reliability matters more than features
  • Basic night capability is sufficient

The Bottom Line: Darkness Doesn’t Wait

Factory sights on the M&P Shield are adequate for range use in good light. But defensive situations rarely offer ideal conditions. Night sights aren’t an accessory – they’re essential equipment that could save your life.

After extensive testing, Trijicon HD sights remain my top choice. They’re expensive but deliver consistent performance in all conditions. The combination of proven tritium technology, quality construction, and thoughtful design makes them worth the investment for serious defensive use.

But here’s the truth: any quality night sights beat factory sights dramatically. Even budget AmeriGlo sights transform the Shield’s low-light capability. Don’t let perfect be the enemy of good enough – upgrade to something, even if it’s not the premium option.

That wounded bear taught me that darkness doesn’t care about your excuses. When you need to see your sights, you either can or can’t. There’s no middle ground. Invest in quality night sights, practice with them regularly, and maintain them properly. Your life might depend on those two glowing dots someday.

Practice makes permanent, so practice it right – in all lighting conditions.

Looking for more tested gear reviews and defensive shooting wisdom? Check out our complete collection of firearms content and training resources at Moosir.com. Remember – respect the responsibility, respect the training, respect yourself.

Holosun DRS-NV: When Night Vision Goes Digital (And Why That Matters)

0

Six months ago, a rancher friend called at 2 AM about coyotes decimating his chicken coop. By the time I arrived with traditional night vision gear, we’d spent 20 minutes fumbling with IR illuminators, helmet mounts, and backup red dots. Meanwhile, his teenage son grabbed his AR wearing a Holosun DRS-NV, flipped one switch, and dropped two coyotes before I had my PVS-14 focused. Sometimes the future arrives while you’re still adjusting the past.

The DRS-NV represents Holosun’s ambitious attempt to democratize night vision by combining a solid red dot with digital night capabilities in one package. After running this hybrid optic through Montana’s worst weather and darkest nights for eight months, I can tell you exactly where this technology shines and where traditional night vision still reigns supreme.

Understanding Digital Night Vision

Before diving into specifics, let’s address what digital night vision actually means. Unlike traditional tube-based night vision that amplifies existing light through phosphor screens, digital NV uses a CMOS sensor (like a camera) to capture images and display them on a tiny screen. Think of it as the difference between looking through binoculars versus watching live video on a screen.

During my Ranger days, we used $40,000 worth of night vision per soldier. The DRS-NV costs about $800 and gives you 70% of that capability for defensive distances. That’s either revolutionary or compromised, depending on your perspective and needs.

Technical Reality Check

Core Specifications

The Numbers That Matter:

  • Weight: 18.5 ounces (heavier than two red dots)
  • Dimensions: 4.8″ x 2.4″ x 3.0″
  • Reticle: 2 MOA dot with 65 MOA circle
  • Display: 1024×768 OLED
  • Digital Zoom: 1x, 2x, 4x, 8x
  • Refresh Rate: 60 FPS
  • Battery: 18350 rechargeable
  • Battery Life: 6 hours full function, 20+ hours red dot only
  • Recording: Built-in with MicroSD
  • Construction: 7075-T6 aluminum
  • Waterproof: IP67 rated
  • Night Vision Range: 150 yards detection, 100 yards recognition

Those specs tell you what it is. Eight months of use tells you what it does.

Holosun Digital Night Vision & Reflex Fusion Sight, 8X Digital Zoom, 60 FPS,…
  • Combines red dot sight technology with digital night vision capabilities for versatile use.
  • Features a 1024×768 resolution digital night vision sensor with 60fps for clear imaging.

Eight Months in Big Sky Country

Test Platforms and Conditions

Primary testing occurred on:

  1. BCM RECCE 16 – Home defense and ranch rifle
  2. Daniel Defense MK18 – Vehicle gun
  3. Ruger American Ranch 300 BLK – Suppressed predator setup

Montana provided the testing conditions:

  • Temperature range: -28°F to 102°F
  • Elevation: 4,000 to 9,000 feet
  • Weather: Everything from blizzards to dust storms
  • Targets: Coyotes, training courses, and too many paper targets

Daytime Performance: The Foundation

Forget the night vision for a moment. As a red dot, the DRS-NV performs admirably. The 2 MOA dot stays crisp, the 65 MOA circle speeds up close-range acquisition, and the glass clarity rivals my Aimpoint PRO. During daylight training courses, nobody knew I was running a night vision capable optic until I mentioned it.

Groups at 100 yards averaged 1.5 MOA with quality ammunition – exactly what you’d expect from a good red dot. The controls are intuitive, the brightness settings cover every lighting condition Montana offers, and the shake-awake feature actually works.

But at 18.5 ounces, it’s heavy. My BCM went from handy to hefty. After long training days, that weight becomes noticeable. It’s like carrying a red dot with a boat anchor attached.

Night Vision: The Game Changer

Here’s where things get interesting. Push the button, flip up the cover, and suddenly you’re looking at a green-tinted digital display showing the darkness illuminated. It’s not Gen 3 tube quality, but it’s functional night vision for under a thousand dollars.

What Works: Under starlight or partial moon, I can identify man-sized targets to 150 yards and engage effectively to 100 yards. With the included IR illuminator or moonlight, those ranges extend slightly. The 60 FPS refresh rate means no lag when tracking moving targets – crucial for predator control.

Last month, I watched a pack of coyotes work their way across a pasture at 75 yards. Through the DRS-NV, I could distinguish individual animals, track their movement, and make clean shots. That’s practical capability, not spec-sheet fantasy.

What Doesn’t: In complete darkness without IR illumination, range drops to 30-50 yards. The image gets grainy quickly, especially at higher zoom levels. 4x zoom is marginally useful, 8x is digital garbage. This isn’t a reconnaissance tool – it’s a fighting optic with night capability.

The digital image lacks the depth and clarity of quality tube night vision. Details that would be clear through my PVS-14 become suggestions through the DRS-NV. It’s the difference between HD television and 1990s cable – functional but not beautiful.

The IR Illumination Question

The DRS-NV needs IR light like fish need water. Under good ambient conditions, the built-in sensor works adequately. Add any IR illuminator, and performance improves dramatically. I run a Streamlight TLR-VIR II, which transforms the DRS-NV from “it works” to “this is useful.”

Sarah tested it during her wildlife surveys and noted that the IR illumination doesn’t spook animals like white light. That’s valuable for both hunting and observation. However, remember that IR illuminators are visible to anyone else with night vision – tactical considerations matter.

Battery Life: The Achilles Heel

Six hours of full night vision operation sounds reasonable until you’re actually using it. A long night of predator hunting or security work drains it completely. The red dot function runs much longer, but if you bought this for night vision, six hours feels restrictive.

The USB-C charging is convenient, and I’ve run it off a battery bank during static positions. But needing to charge your optic like a phone feels wrong. I keep spare 18350 batteries, but changing them in the dark while maintaining security isn’t ideal.

For comparison, my PVS-14 runs 40+ hours on a single AA battery. Different technology, different limitations.

Recording Capability: Unexpected Value

The ability to record what you’re seeing proved more useful than expected. After dropping a problem coyote, I had video proof for the rancher’s insurance claim. During training, reviewing footage revealed bad habits invisible in real-time. It’s not a primary feature, but it adds value.

The microSD card slot is protected but accessible. Video quality matches what you see through the optic – functional but not YouTube-worthy.

Durability: Built Like a Brick

Whatever else you say about the DRS-NV, it’s tough. It’s survived:

  • Multiple drops from truck height
  • Complete submersion in creek crossings
  • -28°F overnight in the truck
  • Prairie dust storms that killed lesser electronics
  • 3,000+ rounds including .300 BLK supers

Zero retention has been perfect. The housing shows wear but no damage. The electronics continue functioning despite Montana’s best efforts to break them. Holosun built this thing to last.

The flip-up lens covers are simple but effective. They protect the sensitive sensors while allowing instant deployment. No buttons to find in the dark, no caps to lose – just flip and shoot.

Practical Applications

Home Defense: Nearly Perfect

For home defense, the DRS-NV excels. Inside 50 yards, it provides clear target identification in complete darkness. The transition from light to dark happens instantly – no fumbling with separate devices. One rifle handles any lighting condition.

The weight matters less on a staged defensive rifle. Battery life is adequate for any realistic scenario. The recording capability could prove valuable legally. This is the DRS-NV’s sweet spot.

Ranch and Property Work: Excellent

Checking livestock at night, dealing with predators, investigating disturbances – the DRS-NV handles it all. The ability to switch from day to night instantly proves invaluable. Range limitations rarely matter on most properties.

My neighbor borrowed my setup for a week of calving season. He could check cows without disturbing them with white light, identify problems quickly, and maintain security. He bought his own the next week.

Hunting: Conditional

Where legal, the DRS-NV works for night hunting within its limitations. Coyotes, hogs, and other nighttime game inside 100 yards are perfectly manageable. The digital zoom helps with identification but not shooting.

However, traditional night vision or thermal still outperforms for serious night hunting. The DRS-NV is adequate, not optimal.

Law Enforcement/Security: Consider Carefully

For patrol rifles that might encounter darkness, the DRS-NV offers capability without complexity. One optic, all conditions. The recording feature provides evidence. The durability handles hard use.

But battery life limits extended operations. Image quality might not meet evidentiary standards. Agencies should test thoroughly before committing.

Compared to Alternatives

Versus Traditional Night Vision

PVS-14 + Red Dot :

  • Superior image quality
  • Better battery life
  • More complex setup
  • Significantly more expensive
  • Requires training

The PVS-14 wins on capability, the DRS-NV wins on simplicity and price.

Versus Thermal + Red Dot

Thermal detection beats everything for finding heat signatures. But thermal doesn’t show details like night vision. Different tools for different missions. The DRS-NV provides good-enough capability for most users at a fraction of the cost.

Versus EOTech EXPS3 + G43 Magnifier

No night vision capability but superior daytime performance. Lighter weight, proven reliability, better battery life. If you don’t need night vision, traditional optics remain superior for day use.

Versus Other Digital Night Vision

The DRS-NV leads the digital night vision market. Competitors either lack red dot capability or night vision quality. Holosun hit the sweet spot of features and price, even with limitations.

Living with Limitations

Every tool has compromises. The DRS-NV’s are manageable with understanding:

Weight: Accept it or train harder. The capability justifies the ounces for many users.

Battery Life: Carry spares, invest in portable chargers, or accept the limitation.

Image Quality: It’s not Gen 3 night vision. Adjust expectations accordingly.

Bulk: This isn’t for minimalist builds. It’s for capability over aesthetics.

Training Considerations

The DRS-NV requires different training than traditional optics:

  • Practice transitioning between modes
  • Learn to interpret digital images
  • Understand IR illumination principles
  • Master battery management
  • Develop realistic capability expectations

I run monthly night training sessions. Students with DRS-NV setups consistently perform well within the optic’s limitations. It’s not about having the best equipment – it’s about knowing your equipment’s capabilities.

The Value Proposition

At $800-900 street price, the math is compelling:

  • Decent red dot: $400
  • Entry-level night vision: $2,000+
  • Combined capability: Priceless (or at least $800)

For users needing occasional night capability without dedicating a rifle to night operations, the DRS-NV makes sense. It’s not the best at anything, but it’s good enough at everything.

Field Intelligence Summary

Who Should Buy This

  • Home defenders wanting 24-hour capability
  • Ranchers/farmers dealing with predators
  • Budget-conscious users needing night vision
  • Anyone wanting simplified night operations
  • Preppers building versatile rifles

Who Should Look Elsewhere

  • Military/LE needing maximum capability
  • Serious night hunters
  • Weight-conscious builders
  • Users requiring extended battery life
  • Anyone expecting Gen 3 performance

The Bottom Line

The Holosun DRS-NV isn’t perfect, but it’s perfectly adequate for most defensive and practical applications. It democratizes night vision technology, making previously elite capability available to average shooters. That’s revolutionary, even with compromises.

After eight months, it’s earned permanent residence on my ranch rifle. Not because it’s the best optic I own, but because it’s the most versatile. One button transforms a daytime rifle into a nighttime problem solver. That simplicity has value beyond specifications.

Your best survival tool is the six inches between your ears, but those six inches work better when they can see in the dark. The DRS-NV provides that capability at a price that doesn’t require selling kidneys.

Final Assessment

The DRS-NV represents the future of integrated optics – not perfect, but practical. It won’t replace dedicated night vision for professionals, but it brings legitimate capability to civilians. The recording feature, durability, and simplicity offset the weight and battery limitations for most users.

Practice makes permanent, and practicing with night vision makes you dangerous in the dark. The DRS-NV makes that practice affordable and accessible.

The wilderness doesn’t care about your night vision generation, only whether you can see the threat before it sees you. The DRS-NV provides that capability reliably, if not beautifully.

Plan for the worst, hope for the best, and remember – any night vision beats no night vision when the lights go out.

Want more real-world gear reviews? Check out our comprehensive testing at Moosir.com where we evaluate equipment in conditions that matter, not climate-controlled ranges. Because knowing what works in the dark is just as important as knowing what works in daylight.

Sight Picture Mastery: What 25 Years of Combat and Hunting Taught Me About Perfect Alignment

0

Three inches. That’s how far my first shot at a trophy bull elk missed by at 300 yards in the Madison Range. Not because my rifle wasn’t capable, not because of wind, but because I didn’t understand the fundamental relationship between sight alignment and sight picture. That expensive lesson in 1999 sent me down a path that would eventually save lives in Afghanistan and fill freezers across Montana.

After eight years training Rangers in marksmanship fundamentals and another seventeen guiding hunters through these northern Rockies, I’ve watched countless shooters struggle with the same confusion I had. Today, we’re going to break down sight picture in terms that actually make sense – no technical manual jargon, just practical knowledge you can apply immediately.

Understanding Sight Picture: The Foundation of Accuracy

Here’s the truth most shooting instructors dance around: sight picture isn’t just one thing. It’s the marriage of mechanical alignment and visual processing that happens in the fraction of a second before you break the shot. Think of it as the final frame of a movie – everything that came before led to this moment, and what you see determines where that bullet goes.

During my time instructing at Fort Benning, we’d run new Rangers through thousands of dry-fire repetitions before they ever sent lead downrange. Why? Because your brain needs to memorize what “right” looks like before muscle memory can take over. The wilderness doesn’t care about your schedule, and neither does a charging grizzly or an enemy combatant.

The Critical Difference: Sight Alignment vs. Sight Picture

Let me clear up confusion that costs shooters accuracy every day. Sight alignment is the mechanical relationship between your rear sight, front sight, and eye. It’s geometry, pure and simple. Sight picture adds the target to that equation – it’s what you actually see when everything comes together.

I learned this distinction the hard way during a night operation in Kandahar Province. My weapon’s sight alignment was perfect, but my sight picture was off because I was focusing on the wrong element. That split-second delay in target acquisition could have been fatal. These days, when I’m teaching my kids to shoot ground squirrels off the ranch, I make sure they understand this difference from day one.

Breaking Down Sight Systems: From Iron to Glass

Iron Sights: The Fundamentals That Never Fail

Open sights remain the foundation of marksmanship, whether you’re running a beat-up lever gun or a modern sporting rifle. The principle hasn’t changed since my grandfather taught me to shoot his Winchester Model 94: line up the front post centered in the rear notch, then add your target to complete the picture.

What’s changed is our understanding of focal planes. Your eye can only focus on one distance at a time – this is physiology, not preference. For defensive shooting under 25 yards, focus on the front sight. For precision work beyond 100 yards, you might shift focus slightly toward the target. During close-quarters battle training, we drilled front-sight focus until our eyes could find it in total darkness.

Aperture Sights: Military Precision Meets Hunting Practicality

The aperture or “peep” sight revolutionized accurate shooting by exploiting a quirk of human vision. That small rear opening naturally centers your eye, reducing one variable in the accuracy equation. Every M16 and M4 I carried used this system, and there’s a reason the military hasn’t abandoned it despite all our technological advances.

On my .30-06 elk rifle, I run a Williams aperture sight as backup to my scope. Last season, when condensation fogged my scope during a temperature inversion in the Bitterroots, those aperture sights put meat in the freezer. The key with apertures is trusting your eye’s natural centering tendency – overthinking it will ruin your groups every time.

Telescopic Sights: When Precision Matters Most

Scopes changed the game, but they also introduced complexity. Through a scope, your sight picture includes the reticle pattern, target image, and often environmental factors you couldn’t see with naked eyes. During sniper/counter-sniper training, we spent weeks learning to read mirage, judge wind by vegetation movement, and understand how atmospheric pressure affects bullet trajectory.

For hunters, this means understanding that what you see at 6x magnification might reveal movement that’s actually wind-blown grass, not game. Sarah, my wife who spent years studying ungulate behavior as a wildlife biologist, taught me to watch ear and tail movement through the scope to distinguish nervous animals from relaxed ones – critical information that affects shot placement.

Sight Picture Techniques for Different Scenarios

Range and Competition: Controlled Environment Excellence

At the range, you have luxuries that don’t exist in field conditions: stable positions, known distances, and time to perfect your sight picture. This is where you build the foundation. I run my shooting students through a progression:

  1. Bench rest at 25 yards with large targets
  2. Prone supported at 50 yards
  3. Sitting/kneeling at 75 yards
  4. Standing unsupported at 100 yards

Each position degrades your sight picture stability, forcing you to refine your technique. What works from a bench won’t work standing in a Wyoming wind. Practice makes permanent, so practice it right.

Hunting Applications: When Seconds Count

In the field, sight picture becomes dynamic. That eight-point buck won’t wait while you achieve perfect alignment. You need what I call “combat accuracy” – good enough to make an ethical kill without wounding the animal.

Two seasons ago, while guiding a client after blacktail in thick timber, we jumped a mature buck at 40 yards. He had maybe three seconds to acquire, align, and shoot through a gap in the trees no bigger than a basketball. His sight picture wasn’t textbook perfect, but it was good enough. That deer dropped within sight because he understood minimum acceptable sight picture for the situation.

Defensive Scenarios: Speed and Accuracy Balance

Home defense or personal protection requires a different approach entirely. Here, we use what’s called a “flash sight picture” – a rough alignment that’s accurate enough for close-range engagement. During room-clearing drills, we trained to acquire this flash picture in under a quarter second.

Your best survival tool is the six inches between your ears, but when someone’s kicking in your door at 2 AM, you need muscle memory, not conscious thought. Dry-fire practice in your home, using doorways and hallways as reference points, builds this crucial skill safely.

The Three Essential Hold Methods

Combat Hold: Direct and Decisive

Place your sights directly on your intended point of impact. Simple, intuitive, and effective for most shooting situations. This is what I teach new shooters first because it translates across different weapons systems. Whether you’re running iron sights or a red dot, the concept remains identical: see sight on target, press trigger.

During military operations, this was our default hold for engagements under 200 meters. For hunting, I use combat hold for any shot under 150 yards where I don’t need to compensate for bullet drop.

Six O’Clock Hold: Precision Target Work

Popular in bullseye competition, this hold places your sights at the bottom edge of a black bull, like resting a beach ball on a fence post. The advantage? You can see your entire target. The disadvantage? Your point of aim and point of impact are deliberately different, requiring mental adjustment.

I’ll be honest – outside of formal target shooting, I rarely recommend this hold. Too many variables in field conditions, and it doesn’t translate well to irregular target shapes like game animals or tactical scenarios.

Center Hold: Splitting the Difference

This technique bisects your target with the front sight, giving you a clear reference while maintaining partial target visibility. Some of my long-range shooting buddies swear by it for known-distance precision work. Personally, I find it most useful when shooting small targets at medium range – prairie dogs, rock chucks, or paper at 200-300 yards.

Environmental Factors That Affect Sight Picture

Montana weather teaches humility quickly. I’ve watched perfect sight pictures disappear into heat mirage, snow squalls, and morning fog. Here’s what actually matters:

Light Conditions: Dawn and dusk – prime hunting times – challenge your sight picture with contrast extremes. Your eye naturally dilates in low light, affecting depth of field. That’s why I run twilight drills monthly, training my eyes to find sight alignment when shadows play tricks.

Atmospheric Distortion: Heat mirage off a sun-baked barrel or ground can shift your apparent target position by several inches at distance. In Afghanistan’s mountains, we learned to read mirage like a wind flag. Here in Montana, summer varmint shooters face the same challenge crossing hay fields.

Physical Stress: Your sight picture degrades with exhaustion, cold, or adrenaline. After climbing 2,000 feet in thin air chasing elk, your wobble zone expands dramatically. Practice acquiring sight picture while winded – sprint 50 yards, then try to shoot a 4-inch target at 100 yards. Humbling but educational.

Training Drills That Build Sight Picture Mastery

The Wall Drill

Pick a small spot on a safe wall. Practice acquiring perfect sight alignment on that spot 50 times daily. No ammunition, no recoil, just pure sight picture repetition. This builds neural pathways that translate to real shooting.

Ball and Dummy

Have a training partner randomly load snap caps in your magazine. You won’t know when you’ll get a dead trigger. This instantly reveals sight picture problems – any movement when the gun doesn’t fire shows where your fundamentals break down.

Calling Your Shots

Before looking at your target, call exactly where your shot hit based on your sight picture at trigger break. If you can’t call your shots accurately, you’re not truly seeing your sight picture. My grandfather made me do this with his .22 until I could call shots within an inch at 50 yards.

Technology and Traditional Skills

Modern optics are incredible force multipliers. Red dots, holographic sights, and variable power scopes extend our effective range and speed. But here’s what I tell every student: technology fails. Batteries die in -20°F weather. Scopes fog when you go from a warm truck to cold air. Electronics break when you need them most.

That’s why Scout and River, my hunting dogs, have seen me practice with iron sights as much as with my Leupold scope. Master the fundamentals first, then let technology enhance your capability, not replace it.

Common Sight Picture Mistakes That Cost Accuracy

Paralysis by Analysis: Overthinking sight picture leads to jerked triggers and pushed shots. Once it’s good enough, send it. Perfect is the enemy of good enough in field conditions.

Neglecting Natural Point of Aim: Your body wants to point somewhere naturally. Fighting against it ruins sight picture stability. Adjust your position, not your hold.

Ignoring Breathing Effects: Your sight picture moves with respiration. For precision shots, break the trigger at natural respiratory pause. For rapid engagement, learn to work within your wobble zone.

Distance Fixation: Changing your sight picture for different distances when it’s not necessary. Under 200 yards with most rifles, hold dead-on and let point-blank range work for you.

Sight Picture in Extreme Conditions

During Arctic warfare training, we learned that extreme cold changes everything about sight picture. Metal contracts, affecting zero. Breath fog instantly freezes on lenses. Eyes water, then those tears freeze on eyelashes, creating natural aperture reduction.

Here in Montana, I’ve guided hunters through -30°F conditions where scope ocular lenses froze to eyebrows. The solution? Understanding sight picture well enough to shoot accurately with compromised visibility. If you can see 70% of your reticle and 70% of your target, you can make an ethical shot if you understand your equipment’s capabilities.

The Mental Game of Sight Picture

Confidence in your sight picture comes from repetition under stress. During selection, we shot thousands of rounds in every conceivable position and condition. By the end, sight picture became unconscious competence – we could acquire and engage targets without conscious thought.

For civilians, this means honest practice in field conditions. Not just bench shooting on calm days, but position shooting in wind, rain, and after physical exertion. Your sight picture under stress reveals your true skill level.

Building Your Sight Picture Training Plan

Start where you are, not where you wish you were. If you’re struggling with iron sights at 25 yards, don’t jump to magnified optics at 300. Build systematically:

Week 1-4: Master sight alignment dry-firing at home

Week 5-8: Confirm zero and practice basic holds at the range

Week 9-12: Add movement, positions, and time pressure

Week 13-16: Introduce environmental stressors and field positions

Document everything. What sight picture gave you the best groups? How does it change with fatigue? What environmental factors affect your performance most? Knowledge without application is just trivia.

Respect the Fundamentals

After all these years, through combat deployments and countless successful hunts, I return to the same truth: sight picture is fundamental marksmanship. No amount of expensive equipment or ballistic calculations can overcome poor sight picture.

Last month, my 16-year-old daughter dropped her first elk – a young cow at 275 yards in a stiff crosswind. Her sight picture wasn’t perfect, but it was good enough because she understood the fundamentals I’ve shared here. She called her shot before we walked up to confirm the clean kill.

That’s the goal: unconscious competence built on conscious practice. Whether you’re defending your home, filling your freezer, or competing at Camp Perry, sight picture remains the critical link between intention and impact.

Remember: respect the game, respect the land, respect yourself. And always, always respect the fundamentals that make you a responsible shooter.

Practice makes permanent, so practice it right.

Stay sharp, Flint Marshall

Want to take your marksmanship to the next level? Check out my guides on wind reading for hunters, field shooting positions that actually work, and choosing optics for Western hunting. Every shot counts – make yours count where it matters.

Field Notes: Quick Reference

Which eye should I keep open? Both, if possible. Your brain needs peripheral awareness in field conditions. Practice with both eyes open at close range, then gradually extend distance. If you must close one eye, make it quick – prolonged squinting causes facial tension that degrades accuracy.

How do I know if my sight picture is correct? Your groups tell the truth. Consistent sight picture produces consistent groups, even if they’re not centered. Random dispersion means inconsistent sight picture. Fix the consistency first, then adjust zero.

What’s the difference between sight picture for rifles versus handguns? Distance from eye to rear sight changes everything. Handgun sight radius is shorter, making small alignment errors more critical. Focus intensely on that front sight with handguns – it’s your primary reference point.

Should sight picture change with distance? Only when necessary. Most shooters overthink this. Inside your point-blank range (typically 200-250 yards for hunting rifles), use the same sight picture. Beyond that, apply your elevation adjustments through holds or turret adjustment, not by changing your fundamental sight picture.

Long-Range Truth: A Montana Guide’s Report on Distance Scopes for 2025

0

Six years ago, I watched a client miss a trophy bighorn ram at 425 yards. Perfect conditions, rock-solid rest, quality rifle—but his $200 scope couldn’t resolve enough detail through the heat mirage to place his shot. That ram cost him $25,000 in tag and guide fees. The next season, same spot, different client with proper glass—one shot, clean kill at 480 yards. That’s the real-world difference between adequate and exceptional optics.

After thirty years of shooting—from military precision work to guiding hunters across Montana’s vast landscapes—I’ve learned that long-range success depends more on glass quality than magnification numbers. This past season, I put twenty-three different scopes through brutal testing to find which ones actually deliver when the shot of a lifetime presents itself.

My pick for most shooters? The Leupold VX-3HD 4.5-14×40. It’s not the flashiest or highest magnification, but it flat-out performs where others fail. Stick with me, and I’ll show you why—plus three other exceptional options for different needs and budgets.

The Winners: Four Scopes That Earn Their Place

Distance Champion: Leupold VX-3HD 4.5-14×40

Precision Master: Vortex Venom 5-25×56

Hunter’s Edge: Leupold VX-3i 3.5-10×40

Value Leader: Primary Arms SLx 4-14×44

Why Listen to a Montana Mountain Man?

Flint Marshall here. I’ve been putting rounds downrange since before some of you were born—starting with iron sights on my grandfather’s .30-06 behind his cabin near Glacier National Park. Eight years as an Army Ranger taught me that equipment failure at distance isn’t just frustrating—it can be fatal.

These days, I guide hunters through some of the most challenging terrain in North America. From September elk in the high country to December whitetails in river bottoms, I’ve seen every way a scope can fail. More importantly, I’ve learned what separates reliable glass from expensive disappointment.

My testing isn’t done in a climate-controlled lab. These scopes get mounted on working rifles, carried through brush, dropped in snow, baked in summer heat, and expected to perform when a 400-yard shot presents itself. If it can’t handle Montana’s mood swings, it doesn’t make my list.

The Testing Gauntlet: How I Separate Winners from Wannabes

Phase One: Mechanical Precision

Every scope gets the “box test” treatment at 300 yards—not the typical 100. I dial 20 MOA up, 20 right, 20 down, 20 left. If it doesn’t return to exact zero, it’s eliminated. Period. You’d be shocked how many “precision” scopes fail this basic test.

Next comes tracking verification. I shoot groups at 100, 300, 500, and 800 yards (when possible), dialing for each distance. The adjustments must be predictable and repeatable. One scope I tested—a popular $1,200 model—had 3% tracking error. At 1,000 yards, that’s over 30 inches of error. Unacceptable.

Phase Two: Environmental Extremes

Montana weather is schizophrenic on good days, downright hostile on bad ones. Each scope endures:

  • Freeze Test: 24 hours at -30°F (my deep freezer), then immediate shooting
  • Heat Cycle: Dashboard treatment in July sun (140°F+), then to the range
  • Moisture Trial: Submersion test followed by freezing to check for internal moisture
  • Dust Devil: Three days in my truck during hay season—if dust gets in, it fails

Phase Three: Impact Survival

This is where manufacturers hate me. Each scope (mounted) gets dropped from shoulder height onto frozen ground. Not once—three times. Different angles each drop. If zero shifts more than 2 MOA, it’s out. My Ranger instructors taught me: “If it can’t survive a fall, it can’t survive a fight.”

Phase Four: Real-World Application

Finally, these scopes go hunting. They’ve been on elk hunts in September, whitetail stands in November, and predator calls in January. They’ve made shots from 50 to 900 yards in conditions ranging from bluebird to blizzard. This is where truth emerges.

Understanding Long-Range Reality

The Magnification Misconception

Every gun counter commando will tell you “more magnification is better.” They’re wrong. Dead wrong.

Last fall, I guided a tech executive from Silicon Valley. He showed up with a 8-32x scope on his .300 Win Mag, convinced he needed maximum magnification for “long-range” hunting. First morning, a massive bull elk appeared at 180 yards in timber. At 8x (his minimum), he couldn’t find the elk in his scope. By the time he figured it out, that bull was gone.

Meanwhile, my backup rifle wears a 3-9x scope. I’ve taken animals cleanly past 600 yards with 9x magnification. How? Quality glass and knowing my equipment.

What Actually Matters at Distance

Glass Quality Over Magnification: A quality 10x scope will outperform a cheap 25x scope every time. Resolution, color fidelity, and contrast matter more than raw magnification.

Consistent Tracking: Your scope must adjust precisely and return to zero perfectly. A 1% tracking error becomes a miss at long range.

Environmental Immunity: Fogging, shifting zero, or failing turrets don’t just ruin hunts—they waste opportunities that might never come again.

Practical Field of View: Too much magnification narrows your field of view, making target acquisition harder and follow-up shots nearly impossible.

1. Leupold VX-3HD 4.5-14×40 – The Distance Champion

Leupold VX-3HD 4.5-14×40 (1 inch) CDS-ZL Duplex Reticle Riflescope
  • Model #180619 – VX-3HD 4.5-14×40 Riflescope with a Duplex Reticle, CDS-ZL and a Matte finish

Technical Details That Matter

  • Weight: 13.1 ounces (light enough for mountain hunting)
  • Length: 12.6 inches (balances well on standard rifles)
  • Tube: 1-inch diameter (abundant ring options)
  • Eye Relief: 3.7-4.4 inches (no scope bite, even with magnums)
  • Adjustment Range: 75 MOA elevation (enough for 1,200 yards with most cartridges)
  • Glass Origin: Premium Japanese HD lenses
  • Street Price: $700-$900

Why It’s My Top Choice

Three seasons ago, I had a wounded bull elk moving through deadfall at 640 yards. Fading light, slight snow, and he wouldn’t stop long. Through the VX-3HD at 14x, I could clearly see my aiming point despite the conditions. One shot to the vitals ended it cleanly. That’s what proper glass provides—clarity when conditions deteriorate.

The VX-3HD isn’t just clear—it’s brilliant. Colors appear natural and vivid, helping distinguish animals from backgrounds. During a November whitetail hunt, I spotted a buck bedded in tall grass at 380 yards that three other hunters with “higher magnification” scopes had overlooked. The superior contrast and resolution made the difference.

Real-World Performance Analysis

Mechanical Perfection: Over two years and roughly 3,000 rounds, this scope has never lost zero. Not once. I’ve verified tracking at distances from 100 to 1,000 yards, and it’s dead-on predictable. The CDS (Custom Dial System) turret can be customized for your specific load, turning long-range shots into simple dial-and-shoot situations.

Weather Warrior: This scope has been through hell. Submerged in streams during river crossings, frozen solid in January, and baked on the dashboard—it doesn’t care. The nitrogen purging and sealed construction mean zero internal fogging, even during radical temperature swings.

Low-Light Champion: The twilight factor on this scope is exceptional. Legal shooting light extends 15-20 minutes compared to lesser glass. That’s often the difference between filling a tag and eating tag soup.

Where It Could Improve

The magnification tops out at 14x. For true long-range target work beyond 1,000 yards, some shooters want more. However, for hunting applications inside 800 yards (where 99% of shots occur), 14x is more than adequate.

The turrets, while precise, aren’t as tactical-feeling as some competitors. They lack the aggressive knurling and positive click feel of dedicated tactical scopes. For hunting, this is actually preferable—less likely to catch on brush or adjust accidentally.

Who Should Buy This

Serious hunters who shoot extended distances in varying conditions. If you hunt multiple species across different terrains, this scope adapts perfectly. It’s also ideal for anyone building a do-everything rifle—from deer hunting to long-range steel.

2. Vortex Venom 5-25×56 – The Precision Master

Vortex Optics Venom 5-25×56 First Focal Plane Riflescope – EBR-7C (MOA) Reticle
  • The Venom 5-25×56 First Focal Plane (MOA) riflescope is built for long-range and competition with a 5-25x mag range built into a 34mm tube for a massive amount of turret travel (85 MOA max elevation/windage).

Specifications for Shooters

  • Weight: 35 ounces (hefty but stable)
  • Length: 15.3 inches
  • Tube: 34mm diameter (maximum adjustment range)
  • Max Magnification: 25x (see bullet holes at 300 yards)
  • Click Value: 0.1 MRAD (precise adjustments)
  • Parallax: 15 yards to infinity
  • Investment: $700-$800

Built for Precision Work

During last summer’s prairie dog shoot, I mounted the Venom on my .223 trainer. At 25x magnification, I could spot impacts on 2-inch targets at 400 yards—watching the dust puff and correcting for wind in real-time. That level of precision turns good shooters into great ones.

The EBR-7C reticle deserves special recognition. Unlike cluttered Christmas-tree reticles that obscure targets, this design provides holdover references without overwhelming the sight picture. At a recent precision rifle match, I cleaned a stage requiring shots from 200 to 800 yards without touching the turrets—just holding over using the reticle.

Performance Under Pressure

Glass Excellence: The Japanese glass rivals European optics costing twice as much. Resolution at maximum magnification remains crisp, with minimal chromatic aberration. I can read wind mirage clearly, essential for long-range precision.

Tracking Perfection: The Venom tracks like a Swiss watch. During a 50-round box test, it returned to exact zero every time. The turrets provide positive, tactile feedback—you know exactly how many clicks you’ve dialed without looking.

First Focal Plane Advantage: The FFP reticle means holdovers remain consistent regardless of magnification. Crucial for rapid engagement at varying distances without time to dial corrections.

Practical Limitations

At 35 ounces, this scope is heavy. Mount it on a lightweight hunting rifle, and the balance goes to hell. It belongs on heavier precision rifles or dedicated long-range hunting rigs.

The 5x minimum magnification can be problematic for close shots. If you hunt areas where 50-yard shots happen, this isn’t your scope. It’s optimized for distance work.

Battery dependency for illumination is higher than others tested. Heavy use means monthly battery changes versus yearly with some competitors.

Ideal Applications

Competition shooters seeking affordable precision. Varmint hunters who need to spot hits at distance. Dedicated long-range hunters who shoot from stable positions. Anyone building a precision rifle for under $2,000 total.

3. Leupold VX-3i 3.5-10×40 – The Hunter’s Edge

Hunting-Focused Specifications

  • Weight: 12.6 ounces (ultralight for features)
  • Magnification: 3.5-10x (perfect hunting range)
  • Tube: 1-inch diameter
  • Eye Relief: 4.4-3.6 inches (generous and safe)
  • Twilight Factor: 20 at 10x (excellent low-light performance)
  • Adjustment Range: 52 MOA
  • Price Range: $500-$650

Why Hunters Love This Scope

My wife Sarah (she’s a wildlife biologist) borrowed this scope for her elk rifle two seasons back. First morning out, she dropped a cow elk at 420 yards with one shot. Her comment? “I could see every detail despite the early morning shadows.” That’s the VX-3i difference—clarity when it counts.

The 3.5-10x magnification range is hunting perfection. At 3.5x, you can engage close targets in timber quickly. At 10x, you’ve got enough magnification for ethical shots to 500 yards. It’s the sweet spot decades of hunting experience has proven optimal.

Field-Proven Performance

Lightweight Champion: At 12.6 ounces, this scope won’t turn your mountain rifle into a boat anchor. After carrying rifles 10+ miles per day in elk country, every ounce matters. This scope provides premium performance without the weight penalty.

Twilight Master: The Twilight Max Light Management System isn’t marketing nonsense—it works. I’ve compared this scope side-by-side with competitors at dawn and dusk. The VX-3i consistently provides usable sight picture 10-15 minutes longer.

Tough as Nails: This scope has been on horseback wrecks, dropped from tree stands, and used as a handle to pull rifles from mud. It keeps working. The aluminum construction and sealed internals mean weather is irrelevant.

Minor Shortcomings

Limited to 10x magnification means extreme long-range work requires careful shot placement. Beyond 600 yards, more magnification would help with precision.

The CDS turret, while excellent, requires sending the scope to Leupold for custom engraving. Not a huge deal, but requires planning.

No illuminated reticle option. For dark timber hunting, illumination helps with quick target acquisition.

Perfect For

Dedicated hunters who value reliability and lightweight construction. Mountain hunters who count ounces. Anyone wanting premium performance without the premium price tag. Ideal for rifles chambered in standard hunting cartridges used inside 500 yards.

4. Primary Arms SLx 4-14×44 – The Value Leader

Primary Arms SLX 4-14x44mm FFP Rifle Scope – ACSS-Orion Reticle
  • Variable 4-14x magnification first focal plane scope features the ACSS Orion reticle for .308.223 -06

Budget-Friendly Specifications

  • Weight: 24.2 ounces (moderate)
  • Magnification: 4-14x
  • Objective: 44mm (good light gathering)
  • Eye Relief: 3.5 inches (consistent)
  • Tube: 30mm diameter
  • Elevation Range: 30 MOA (limited but workable)
  • ACSS-Orion Reticle: Built-in ranging and holdovers
  • Price Point: $300-$350

Surprising Performance at Working-Class Prices

I bought this scope expecting mediocrity. What I got was a scope that performs like options costing three times more. It’s been on my truck gun for two years, bouncing around behind the seat, getting knocked around, and generally abused. Still holds zero, still tracks true.

The ACSS-Orion reticle is genuinely innovative. It provides ranging capability, wind holds, and moving target leads—all without cluttering the sight picture. For new long-range shooters, this reticle teaches fundamentals while providing practical capability.

Beyond Budget Expectations

Glass Quality Surprise: No, it’s not Leupold clear, but it’s remarkably good for $300. I can ring 10-inch steel at 600 yards consistently. Color fidelity is decent, resolution is acceptable, and contrast is sufficient for most conditions.

Tracking Truth: The turrets track accurately through their range. During box testing, return to zero was perfect. The clicks are mushy compared to premium scopes, but they’re predictable and repeatable—what matters most.

Durability That Matters: This scope has survived teenage hunters, truck gun duty, and loan-outs to friends. It’s been dropped, rained on, and frozen. Keeps working. That’s reliability that transcends price point.

Budget Reality

Limited elevation adjustment (30 MOA) means extreme long-range work requires careful zero strategy or rail cant. Not ideal for 1,000-yard shooting, but fine inside 600.

No illumination limits low-light versatility. The reticle can disappear against dark backgrounds at dawn/dusk.

Edge distortion is noticeable at lower magnifications. The sweet spot is smaller than premium glass—about 80% of the sight picture is perfectly clear.

Weight at 24 ounces is hefty for a hunting scope but reasonable for the features provided.

Who Benefits Most

New long-range shooters building their first precision rifle. Hunters on tight budgets who need capability without breaking the bank. Anyone wanting to try long-range shooting without massive investment. Perfect for truck guns, loaner rifles, or youth hunters learning marksmanship.

The Science of Choosing: What Really Matters

Distance Definitions – Know Your Needs

Medium Range (100-300 yards): Most hunting happens here. A quality 3-9x or 2-7x scope handles this perfectly. This is your typical whitetail woods or western valley bottom shooting.

Long Range (300-600 yards): Western hunting territory. You need 10-14x magnification and quality glass to resolve targets clearly. This is open country mule deer and pronghorn distances.

Extended Range (600-1,000 yards): Precision shooting realm. Minimum 14x magnification, preferably 18-20x. Requires excellent glass, precise tracking, and shooter skill.

Extreme Range (1,000+ yards): Specialist territory. 20-25x minimum, premium glass mandatory, and extensive practice required. Frankly, most hunters have no business shooting game this far.

The German Lesson – Less Can Be More

People obsess over magnification, forgetting that German snipers in WWII used 4x scopes effectively to 600+ meters. Finnish sniper Simo Häyhä killed over 500 Soviet soldiers using iron sights.

The lesson? Magnification doesn’t replace marksmanship. A skilled shooter with a quality 10x scope will outshoot a novice with a 25x scope every time.

Glass Quality: The Hidden Truth

Here’s what manufacturers don’t advertise: All glass isn’t created equal. Japanese ED (Extra-low Dispersion) glass rivals German glass at half the price. Chinese glass has improved dramatically but still lags in low-light performance.

Key quality indicators:

  • Light Transmission: Premium glass transmits 90%+ of available light
  • Color Fidelity: Natural colors help distinguish targets from backgrounds
  • Resolution: Ability to resolve fine detail at distance
  • Contrast: Separation between light and dark areas

Field Wisdom: Lessons from Three Decades

The One-Scope Solution Is a Myth

No single scope does everything perfectly. My safe contains:

  • A 1-6x for timber hunting and dangerous game
  • A 3-9x for general hunting
  • A 4.5-14x for open country
  • A 5-25x for precision work

Choose based on primary use, accepting compromise elsewhere.

The Tracking Test Nobody Does

Here’s my secret test: Dial your scope up 30 MOA, shoot a group. Dial down 30 MOA, shoot another group. They should overlap perfectly. Most scopes fail this test, showing 2-5% error. That’s why verified tracking matters more than any other specification.

Why I Don’t Trust Zoom Rings

Variable power scopes can shift zero when changing magnification—rarely mentioned but commonly experienced. Test yours: Zero at minimum magnification, shoot groups at maximum. If point of impact shifts more than 1 MOA, you’ve got a problem.

The Parallax Problem

Fixed parallax scopes (usually set at 100-150 yards) work fine for hunting but limit precision at extreme ranges. Adjustable parallax is mandatory beyond 600 yards. Set it correctly—improper parallax adjustment causes more misses than wind.

Mounting Mastery: The Foundation of Accuracy

Ring and Base Selection

Don’t put a $1,000 scope on $20 rings. Quality mounting hardware:

  • Rings: Warne, Leupold, or Nightforce minimum
  • Bases: Steel preferred, 20 MOA cant for long-range work
  • Torque: 15-20 inch-pounds for rings, 25-30 for bases
  • Thread Locker: Blue Loctite on base screws only

The Level Truth

A canted scope causes horizontal stringing at distance. At 1,000 yards, 1 degree of cant creates 5 inches of horizontal error. Use a plumb line to level your reticle, not a bubble level on the scope—most are inaccurate.

Eye Relief Setting

Mount your rifle naturally, close your eyes, shoulder the rifle, open your eyes. You should see a full sight picture. If not, adjust scope position. Proper eye relief prevents scope bite and speeds target acquisition.

Zeroing Strategy for Distance Work

The 200-Yard Zero Advantage

For most hunting cartridges, a 200-yard zero provides:

  • Point-blank range to 250 yards
  • Minimal holdover inside 300 yards
  • Predictable drops at extended range

This covers 95% of hunting situations without touching turrets.

The Box Test – Do This First

Before trusting any scope:

  1. Zero at 100 yards precisely
  2. Dial 10 MOA up, aim at original point, fire
  3. Dial 10 MOA right, aim at original point, fire
  4. Dial 10 MOA down, aim at original point, fire
  5. Dial 10 MOA left, aim at original point, fire

You should have a perfect square, returning to original zero. If not, your scope has tracking issues.

Environmental Zeros

Temperature affects zero. A rifle zeroed at 70°F might be 2 MOA off at 0°F. Verify zero when temperature changes exceed 40 degrees. Altitude changes also affect zero—verify when changing elevation by 5,000+ feet.

Maintenance: Protecting Your Investment

Field Care Essentials

  • Lens Cleaning: Breath fog first, then wipe with microfiber—never dry
  • Turret Maintenance: Work turrets monthly to prevent seizing
  • Ring Torque: Check every 500 rounds or annually
  • Storage: Caps on, moderate temperature, low humidity

When Things Go Wrong

Fogging: External means temperature differential—wait for acclimation. Internal means seal failure—warranty claim required.

Tracking Errors: Usually dirt in turrets. Flush with lighter fluid, work repeatedly, add one drop gun oil.

Zero Shift: Check ring torque first, then action screws. 90% of “scope problems” are mounting problems.

Unclear Image: Adjust diopter for your eye first. Most “bad glass” complaints are incorrect diopter settings.

The Bottom Line: Making Your Choice

After thousands of rounds and countless miles in the field, here’s my advice:

For All-Around Excellence: Get the Leupold VX-3HD 4.5-14×40. It balances features, quality, and price perfectly. Whether you’re hunting whitetails at 200 yards or ringing steel at 800, it delivers.

For Precision Demands: The Vortex Venom 5-25×56 provides competition-level precision at working-man prices. If you count clicks and measure groups in fractions, this is your tool.

For Dedicated Hunting: The Leupold VX-3i 3.5-10×40 carries like a dream and performs like a nightmare for game animals. Light, tough, and clear—everything a hunting scope should be.

For Budget Reality: The Primary Arms SLx 4-14×44 proves you don’t need four figures for long-range capability. It won’t win beauty contests, but it will win meat.

Remember: The best scope is the one you can afford to practice with regularly. A mediocre scope you know intimately beats premium glass you can’t operate under pressure.

Final Wisdom from the Mountains

Long-range shooting isn’t about equipment—it’s about discipline. The best scope in the world won’t compensate for poor technique, inadequate practice, or buck fever. But quality glass, properly mounted and thoroughly tested, removes one variable from the equation.

I’ve missed shots with $3,000 scopes and made impossible shots with $300 ones. The difference? Confidence in my equipment, earned through rigorous testing and constant practice.

Whatever scope you choose, put it through its paces. Test it harder than you’ll ever use it. Learn its quirks, verify its tracking, and practice until operation becomes instinct. Because when that trophy steps out at 500 yards with seconds to shoot, you need absolute faith in your glass.

The wilderness doesn’t care about your equipment. But you should.

Practice makes permanent, so practice it right.

Stay deadly accurate,

Flint Marshall
Northern Montana


Questions about long-range optics or shot placement at distance? Share your experiences or challenges in the comments below. For more hard-earned wisdom from the Montana wilderness, visit Moosir.com. Remember—respect the game, respect the land, respect yourself.

Mastering Your Riflescope: The Complete Field Guide to Proper Adjustment

0

Last November, I was guiding a client through the Bob Marshall Wilderness when his rifle took a nasty spill off a ledge. The scope survived, but it was knocked completely out of zero. With a massive bull elk spotted just two valleys over and no gunsmith for a hundred miles, we had exactly one evening to remount and dial in that scope using nothing but basic tools and hard-earned knowledge. That hunt ended successfully because understanding scope adjustment isn’t just convenient—it’s essential.

After twenty-five years of mounting scopes on everything from military M24s to beat-up ranch rifles, I’ve learned that even the finest glass money can buy becomes expensive junk if you don’t know how to properly mount and adjust it. Whether you’re preparing for your first hunt or troubleshooting problems with your current setup, this guide will walk you through every critical adjustment your scope needs.

The Foundation: Proper Scope Mounting

My grandfather used to say, “A house built on sand won’t survive the first storm.” The same principle applies to mounting your scope. Get this wrong, and you’ll be chasing your zero all season long. Trust me, I learned this lesson the hard way during a week-long backcountry hunt in Alaska where my hastily mounted scope gradually worked loose, turning what should have been easy shots into frustrating misses.

There are three critical elements to get right when mounting your scope: height positioning, forward and rear placement, and making sure everything sits level. While plenty of folks pay a gunsmith to handle this task, you can absolutely master it yourself with patience and attention to detail.

Setting Your Scope Height: Finding the Natural Eye Box

The relationship between your cheek weld and scope height determines whether you’ll shoot comfortably for hours or develop a sore neck after twenty rounds. Here in Montana, where a single elk hunt might involve dozens of shots between sighting in, practice, and the actual harvest, comfort matters as much as accuracy.

Start by assuming your natural shooting position with the rifle unloaded and pointed in a safe direction. Rest your full cheek weight on the stock and close your eyes. Get comfortable—this should feel as natural as shouldering the rifle to check on a distant coyote threatening the chicken coop. Now open your eyes.

Can you see clearly through the scope without lifting or pressing your head? If you’re craning your neck up or mashing your face down into the stock, you need different height rings. I keep a selection of ring heights in my workshop because every rifle and shooter combination requires something different.

When Sarah, my wife, started hunting with me fifteen years ago, we discovered her shorter face structure meant she needed higher rings than what worked for me on the same rifle. If you’re constantly switching between shooters or prefer flexibility, consider quality quick-detach mounts that maintain zero when removed and replaced.

For rifles with adjustable combs or those accepting add-on cheek risers, you’ve got another option. I’ve used everything from foam pipe insulation secured with athletic tape (my military field expedient method) to proper adjustable risers. The goal remains the same: your eye should naturally align with the scope when your cheek touches the stock.

Here’s something that took me years to fully appreciate: mounting your scope as low as practical to the bore helps with accuracy. The closer your line of sight sits to the bullet’s path, the less variance you’ll experience from canting errors or point-of-aim shifts at different distances. But don’t go so low that you’re looking through the top edge of your vision or your eyeglasses start distorting the image.

One specific challenge I see frequently here at my training courses involves AR-platform rifles with fixed front sights. Rather than mounting your scope unnecessarily high to clear that front post, which creates its own problems, consider removing or replacing the gas block. The improved sight picture and lower scope position will pay dividends in accuracy.

Establishing Proper Eye Relief: Avoiding Scope Bite

During my Ranger days, we called it “getting kissed by the scope”—that semicircle cut above the eyebrow that marks someone who learned about eye relief the hard way. I’ve patched up more scope cuts than I care to remember, usually on powerful rifles where excited hunters forgot their fundamentals in the heat of the moment.

Eye relief represents the distance between your eye and the rear lens of the scope. Too close, and recoil drives that metal edge into your forehead. Too far, and you lose field of view or can’t see the full sight picture. Getting it right means finding that sweet spot where you see a complete, clear image without any black ring around the edges—what we call scope shadow.

Mount your scope rings loosely on the rail, just tight enough to hold the scope but loose enough to slide it forward and backward. Place your rifle on a solid rest—I use sandbags on my workshop bench, but a backpack works fine in the field. Assume your natural shooting position again.

Slide the scope slowly backward until you notice a black ring creeping in from the edges of your view. Mark that spot mentally, then push it forward until the shadow disappears completely. You want to position your scope at the forward edge of this clear viewing zone, giving yourself maximum protection from recoil while maintaining a full sight picture.

For heavy-recoiling rifles—anything from .300 Winchester Magnum up through the big bore dangerous game calibers—I recommend at least four inches of eye relief. My .338 Lapua, which I use for long-range elk hunting, has nearly five inches of relief. Yes, it required a cantilever mount to achieve proper positioning, but I’ve never had to explain a scope cut to anyone.

Speaking of cantilever mounts, they’re invaluable when you need to position a scope further forward than standard rings allow. This often happens with rifles that have short rails or when mounting longer scopes. I’ve used them successfully on everything from scout rifles to precision bolt guns where standard ring placement just wouldn’t work.

Getting Everything Level: The Foundation of Accuracy

Three winters ago, I spent two hours helping a frustrated hunter who couldn’t understand why his carefully zeroed rifle shot progressively further left as distance increased. The problem? His scope sat cocked about five degrees to the right. Every elevation adjustment he made also pushed his windage off because the adjustments weren’t tracking truly vertical and horizontal.

A canted scope creates diagonal adjustments—turn the elevation turret and you’re also affecting windage. Dial in windage corrections and you’re inadvertently changing elevation. For scopes with ballistic reticles, ranging marks, or holdover points, none of those features work correctly unless your scope sits perfectly level.

I’ve tried every leveling method from plumb bobs to smartphone apps, but nothing beats a quality scope leveling kit. The setup I’ve used for the past decade employs precision bubble levels that attach to both your rifle’s action and the scope itself. You level the rifle first, then adjust the scope until both bubbles center up.

In a pinch, you can use the old carpenter’s trick: hang a weighted string (plumb line) at 100 yards and align your vertical crosshair with it while the rifle sits solidly bagged. It works, but takes patience and a windless day—something we don’t see much of here in Montana.

Remember to check your level after tightening the rings. I’ve seen scopes rotate slightly during the tightening process, especially with cheaper rings. Tighten gradually in a cross-pattern, like lug nuts on a wheel, checking level after each sequence.

Achieving Crystal Clear Vision: Eyepiece Focus

One autumn morning, guiding a hunter from back East, I watched him struggle with what he thought was a defective scope. “Either the target’s fuzzy or the crosshairs are,” he complained. The scope was fine—he’d just never learned to properly focus the eyepiece. This single adjustment can mean the difference between eye strain after an hour of glassing and comfortable all-day observation.

Unlike focusing on your target (which happens with parallax adjustment), the eyepiece focus adjusts the reticle to match your individual eyesight. Everyone’s eyes are different, which is why this adjustment is crucial and personal to each shooter.

Point your scope at a blank surface—the sky works well, or a white wall if you’re indoors. Turn the eyepiece bell (the adjustment ring closest to your eye) all the way to one extreme. The reticle will appear blurry, which is exactly what we want to start.

Now, while looking through the scope, slowly turn the eyepiece the opposite direction. Watch that reticle carefully. It will gradually sharpen, reach perfect clarity, then start to blur again if you go too far. Work back and forth with increasingly fine adjustments until you find the exact point where the reticle appears sharpest.

Here’s a critical tip I share with every student: look away from the scope for a few seconds between adjustments. Your eye will try to compensate for poor focus, which can fool you into accepting a less-than-perfect setting. Fresh looks give you honest feedback.

Some modern scopes feature fast-focus eyepieces that make this process quicker, but the principle remains identical. Once set correctly for your eye, you typically won’t need to adjust this again unless someone else uses your rifle or your vision changes significantly.

The Heart of Accuracy: Windage and Elevation Adjustments

During my years instructing at various training facilities, I’ve seen experienced hunters who still didn’t fully understand how their scope adjustments actually work. They’d spin turrets hopefully, fire a group, then spin some more, eventually getting close through trial and error rather than understanding.

Your scope’s internal adjustment system works like a precise aiming device that moves your point of aim to match your point of impact. When you turn those turrets, you’re actually moving the entire reticle within the scope tube. Understanding this relationship transforms zeroing from guesswork into a systematic process.

Mastering Elevation Adjustments

The elevation turret—that’s the one on top of your scope—controls vertical bullet impact. After thousands of rounds downrange and years of teaching, I’ve developed a simple mental model: think of the turret as a precision screw that raises or lowers your point of impact.

During a military qualification, I learned this lesson under pressure. My rifle was shooting six inches low at 100 meters with seconds to get it corrected. Understanding that my scope adjusted in quarter-MOA clicks, I knew exactly how many clicks I needed: twenty-four upward clicks to raise my impact those six inches. No guessing, no wasted ammunition—just mechanical precision.

Most scopes today adjust in either quarter-MOA (about quarter-inch at 100 yards) or tenth-MIL increments. MOA scopes remain most common in America, while military and competitive shooters often prefer MILs. I’ve used both extensively and can work with either, though I default to MOA for hunting applications because it translates easily to inches at common hunting distances.

When your bullets impact low, you need to raise your point of impact by turning the elevation turret in the “up” direction—usually counterclockwise when viewing from above. Think about unscrewing that turret to raise it. Hitting high? Turn it clockwise (down) to lower your impact point.

Here’s a field technique that’s saved me countless rounds: after firing a solid three-shot group, calculate exactly how many clicks you need rather than making small adjustments and checking. If you’re four inches low at 100 yards with quarter-MOA adjustments, that’s sixteen clicks up. Make the adjustment confidently and verify with another group.

Fine-Tuning Windage Corrections

That side turret controls horizontal adjustments, moving your bullet impact left or right. In the Montana mountains where I guide, wind becomes a constant companion, sometimes shifting direction three times during a single shooting session. Understanding windage adjustment isn’t optional—it’s survival for your success rate.

The mechanics mirror elevation: turn the windage turret right (marked “R” on most scopes) to move bullet impact right, left (marked “L”) to move impact left. Each click represents the same angular measurement as your elevation turret, maintaining consistency across adjustments.

However, I rarely adjust windage for temporary wind conditions during a hunt. Instead, I’ll hold off using the reticle’s reference points or simply aim into the wind. Save windage turret adjustments for zeroing and persistent winds that won’t change. There’s nothing worse than dialing in six minutes of right wind, having conditions change, then forgetting to dial back to zero for your next shot.

Scout, my German Shorthaired Pointer, has actually become my wind indicator over the years. When his ears start flapping consistently in one direction, I know we’re dealing with enough wind to matter. Under 10 mph, most hunting cartridges don’t need correction inside 300 yards. Beyond that, or in stronger winds, understanding your bullet’s behavior becomes critical.

For those using smartphone ballistic apps—and I recommend them for serious long-range work—remember that wind values need constant updating. The wind at your shooting position often differs dramatically from conditions at the target. I’ve seen bullets pushed two feet sideways at 400 yards by crosswinds that felt mild where I stood.

Advanced Adjustments: Parallax and Magnification

Beyond basic zeroing, modern scopes offer refinements that can significantly improve your accuracy. Understanding when and how to use these adjustments separates competent shooters from truly skilled marksmen.

Eliminating Parallax Error

Parallax might sound like complicated physics, but the concept is straightforward: when your target image and reticle don’t appear on the same focal plane, the crosshairs seem to move on the target as you shift your eye position. This creates accuracy problems that no amount of careful shooting technique can overcome.

I discovered parallax the hard way during a prairie dog hunt in eastern Montana. Despite perfect conditions and solid shooting positions, my impacts wandered unpredictably. An old-timer watching me shoot noticed my head position varied slightly between shots. “Your parallax is off,” he said, then taught me a lesson I’ve never forgotten.

Scopes without parallax adjustment are factory-set for a specific distance—usually 100 or 150 yards for hunting scopes. Within reasonable ranges of that distance, parallax won’t significantly affect accuracy. But stretch the distance or shoot extremely close, and parallax error creeps in.

Adjustable parallax comes in two forms: side focus (a knob on the left side of the turret housing) or adjustable objective (a ring around the front lens). Both accomplish the same goal using different mechanical approaches. My long-range rifles all feature side focus for convenience, while some of my rimfire scopes use adjustable objectives.

To properly set parallax, get stable behind your rifle with the crosshairs on target. Move your head slightly up and down, left and right, while watching the reticle. If it appears to float or move relative to the target, adjust the parallax until the reticle stays locked on one spot regardless of small head movements.

Don’t trust the marked distances on parallax adjustments—they’re estimates at best. Your eyes might focus differently, atmospheric conditions affect light transmission, and manufacturing tolerances vary. Always verify parallax-free status by the head movement test, not by matching numbers to actual distance.

Optimizing Magnification Power

Variable magnification expanded the versatility of riflescopes tremendously, but knowing when and how to adjust power separates average shooters from experts. That magnification ring seems simple enough—turn it to zoom in or out—but proper use requires understanding the tradeoffs.

Higher magnification doesn’t automatically mean better accuracy. During my sniper training, instructors hammered home a counterintuitive truth: excessive magnification often hurts more than helps. You magnify every tiny movement, reduce field of view, darken the image, and potentially increase mirage effect.

For most hunting situations inside 300 yards, I keep magnification between 4x and 9x. This provides adequate target resolution while maintaining enough field of view to track moving game and find targets quickly. Only for true long-range shots—400 yards and beyond—do I dial up toward maximum power.

Lower magnification shines in timber hunting where shots come fast at close range. Scout and River have jumped plenty of whitetails from thick cover where 3x or 4x magnification meant the difference between filling the freezer and watching a white flag disappear.

Remember that changing magnification on second focal plane scopes affects your holdover points and ranging capabilities if your reticle includes those features. First focal plane scopes maintain consistent subtensions throughout the magnification range, though the reticle appears to grow and shrink. Choose based on your primary use—I prefer second focal plane for general hunting, first focal plane for dedicated long-range rifles.

Field Zeros and Environmental Considerations

Theory and bench shooting only take you so far. Real competence comes from understanding how environmental factors affect your zero and knowing when adjustments are necessary versus when to hold steady and trust your setup.

Temperature swings affect zero, especially with certain powders and barrel profiles. My lightweight mountain rifle shoots nearly two inches different at 100 yards between a 20-degree November morning and a 90-degree August afternoon. I maintain a data book with zeros for different conditions, learned through meticulous range work across all four Montana seasons.

Altitude changes matter more than many hunters realize. A rifle zeroed at sea level shoots significantly different at 8,000 feet. The thinner air creates less drag, allowing bullets to maintain velocity longer and drop less. When guiding hunters from low elevation states, I always insist on checking zero after arriving in Montana’s high country.

Ammunition changes require re-zeroing, even when using the same bullet weight. Different manufacturers use varying powders, primers, and loading specifications. I’ve seen identical bullet weights from different makers impact six inches apart at 100 yards. This is why I buy hunting ammunition in bulk lots—maintaining consistency across multiple seasons.

Practical Zeroing Process: From Bore Sight to Confirmed Zero

Let me walk you through my actual zeroing process, refined over countless rifles and thousands of rounds. This method saves ammunition, time, and frustration while delivering consistent results.

First, I bore sight using either a laser bore sighter or the traditional method of looking through the bore at 25 yards. This gets you on paper without wasting ammunition. For bolt actions, remove the bolt and look down the bore at a target, then adjust the scope to match without moving the rifle.

Start at 25 yards regardless of your intended final zero distance. Fire one careful shot from a solid rest. The close range eliminates most environmental variables and ensures you’re on paper. Adjust to center that impact at 25 yards.

Move to 100 yards and fire a three-shot group, allowing the barrel to cool between shots. Never zero with a hot barrel unless you plan to hunt with one—which you shouldn’t. Calculate the center of your group and adjust accordingly. Fire another three-shot group to confirm.

For most hunting applications, I prefer a 200-yard zero. This puts me about 1.5 inches high at 100 yards and allows point-blank shooting out to 250 yards on deer-sized game. Mountain hunters might prefer a 300-yard zero for longer average shots, while timber hunters could stick with 100 yards.

Always confirm your zero with the exact ammunition you’ll hunt with, from field positions you’ll actually use. That perfect bench zero might shift when shooting from sticks, off a backpack, or from other field positions.

Troubleshooting Common Problems

Over years of helping frustrated shooters diagnose scope problems, I’ve cataloged the most common issues and their solutions. Understanding these saves time, money, and potentially that once-in-a-lifetime shot opportunity.

When groups suddenly open up or shift, check ring and base tightness first. I’ve traced more accuracy problems to loose mounting hardware than actual scope failures. Use proper torque specifications and quality thread locker on all mounting screws.

If you can’t achieve zero within your adjustment range, suspect misaligned rings or bases. Burris Signature rings with polymer inserts allow correction without stressing the scope tube. For serious misalignment, consider having a competent gunsmith bed your bases or true your receiver.

Wandering zero often indicates internal scope problems—broken reticle, failed erector system, or loose internal lenses. The “tall target test” diagnoses tracking issues: fire a group, dial up 20 MOA, fire another group, and measure. The distance should match your scope’s specifications exactly.

When parallax adjustment doesn’t eliminate reticle movement, check for consistent cheek weld. Inconsistent head position creates the same symptoms as parallax error. Adding a raised cheek piece or adjustable comb often solves persistent “parallax” problems that aren’t actually parallax-related.

Maintenance and Long-Term Care

Your scope represents a significant investment that should last decades with proper care. My oldest scope, a Leupold that’s traveled from Afghanistan to Alaska, still tracks perfectly after twenty years because I maintain it religiously.

Clean lenses only when necessary using proper lens cloths and cleaning solutions. Rubbing dirt across lens coatings with your shirt destroys more scopes than impacts do. I carry lens pens and microfiber cloths specifically designed for coated optics.

Protect turrets and lenses during transport and storage. Quality scope covers prevent 90% of field damage. Those rubber bikini covers might not look tactical, but they’ve saved countless scopes from Montana’s sideways rain and blowing snow.

Check and maintain proper torque on all mounting hardware annually. Temperature cycles and recoil gradually loosen screws. Mark witness lines on rings and bases with a paint pen to quickly identify any movement.

Store rifles muzzle-up or horizontally to prevent oil migration into the scope. I’ve seen more than one scope’s internals contaminated by excessive gun oil creeping up from the action during improper storage.

The Mental Game: Building Confidence Through Understanding

Technical knowledge means nothing without confidence in your equipment. Understanding exactly how your scope works, why adjustments affect impact, and what each component does builds the trust necessary for precise shooting under pressure.

Practice adjusting your scope regularly, even during the off-season. Dial elevation for different distances, return to zero, and verify repeatability. The mechanical confidence from knowing your scope returns exactly to zero after adjustments cannot be overstated.

Keep a data book recording zeros, ammunition lots, environmental conditions, and any adjustments made. This historical record becomes invaluable for diagnosing problems and maintaining consistency across seasons.

Remember that perfect equipment doesn’t make a marksman—but understanding your equipment thoroughly removes one variable from the shooting equation. When that trophy buck steps out at last light, or when meat for the winter depends on your next shot, confidence in your scope’s adjustments lets you focus on the fundamentals that matter.

Closing Thoughts: Your Scope as a Lifetime Tool

After all these years guiding hunters and teaching marksmanship, I’ve learned that scopes are like any other tool—they’re only as good as the knowledge behind them. That high-dollar scope collecting dust in your safe won’t make you a better shooter, but understanding how to properly mount, adjust, and maintain even a modest scope will dramatically improve your field performance.

Take time to truly learn your equipment. Set up targets at your range and practice adjusting turrets. Get comfortable with the mechanical relationship between adjustments and impact. Build muscle memory for your scope’s controls so adjustments become automatic under stress.

Most importantly, verify everything in field conditions. That perfect indoor zero might shift when you’re breathing hard at 9,000 feet with frozen fingers and a racing heart. The wilderness doesn’t care about your bench groups—it demands practical competence earned through deliberate practice.

Your scope should become an extension of your shooting system, as familiar as your trigger pull and as trusted as your favorite hunting boots. Achieve that level of integration, and you’ll find consistent accuracy comes naturally, whether you’re punching paper at the range or filling tags in the backcountry.

Remember: practice makes permanent, so practice it right. Every adjustment you make, every zero you confirm, and every bit of knowledge you gain about your scope makes you a more complete marksman. The confidence that comes from truly understanding your equipment will serve you well when the moment of truth arrives.

Stay safe out there, respect the game, respect the land, and always remember—your best survival tool is the six inches between your ears, but a properly adjusted scope sure helps when dinner depends on your next shot.

3 MOA vs 6 MOA: What 15 Years of Teaching Shooters Actually Revealed

0

Three months ago, I had two students at my defensive pistol course – father and son, nearly identical Glocks, one with a 3 MOA dot, the other with 6 MOA. By day’s end, the father with the 6 MOA was consistently faster on close targets, while his son with the 3 MOA was drilling the 25-yard steel. Neither could hit what the other excelled at. That’s when I realized most people choose their dot size based on internet opinions rather than understanding what MOA actually means for their shooting.

After fifteen years teaching carbine and pistol courses, mounting red dots on everything from competition guns to ranch rifles, I’ve learned that dot size selection is simpler than the internet makes it seem. The difference between 3 MOA and 6 MOA isn’t about “better” – it’s about matching the dot to your actual use, not your imagined tactical scenarios.

Your best survival tool is the six inches between your ears. Use it to understand this simple concept: MOA is just a measurement of how much target your dot covers. Once you grasp that, choosing becomes obvious.

Understanding MOA in Plain English

What MOA Actually Means

Forget the trigonometry. Here’s what matters: MOA (Minute of Angle) roughly equals 1 inch at 100 yards. So:

  • 3 MOA = 3-inch circle at 100 yards
  • 6 MOA = 6-inch circle at 100 yards

But most defensive shooting happens way closer. At 25 yards (typical defensive distance):

  • 3 MOA = 0.75-inch circle
  • 6 MOA = 1.5-inch circle

At 7 yards (home defense distance):

  • 3 MOA = 0.21-inch circle (pencil eraser)
  • 6 MOA = 0.42-inch circle (pen width)

See the issue? At realistic distances, even a “big” 6 MOA dot is tiny.

The Coverage Problem

Here’s what nobody explains properly: your dot covers part of your target. On a standard IPSC silhouette at 25 yards:

  • 3 MOA covers the X-ring nicely
  • 6 MOA covers most of the 10-ring

On a coyote at 100 yards:

  • 3 MOA shows the vital zone around the dot
  • 6 MOA covers most of the vital zone

This coverage isn’t good or bad – it’s just physics. Understanding it helps you choose correctly.

3 MOA Red Dots – The Precision Option

Where 3 MOA Excels

After running 3 MOA dots on competition pistols and precision rifles for years, here’s where they shine:

Competition Shooting: At our local USPSA matches, targets regularly appear at 25-35 yards. A 3 MOA dot lets me aim for specific scoring zones, not just “somewhere on target.” The difference between A-zone and C-zone hits wins matches.

Rifle Applications: On my coyote rifle, 3 MOA is perfect. At 200 yards, it covers 6 inches – smaller than a coyote’s vital zone. I can place shots precisely without the dot obscuring what I’m shooting at.

Target Shooting: Paper doesn’t forgive. When shooting groups, a smaller dot means more precise aiming point. My best 25-yard groups improved by 30% switching from 6 MOA to 3 MOA.

Real-World 3 MOA Performance

Last month, testing with students:

  • 25-yard precision: 2-inch groups average
  • First shot speed (7 yards): 1.2 seconds from holster
  • Target transitions: Slightly slower than 6 MOA
  • Low light visibility: Required higher brightness setting

The precision advantage is real, but so is the speed penalty at close range.

Who Should Choose 3 MOA

Based on training thousands of shooters:

  • Competition shooters pushing distance
  • Hunters needing precision shot placement
  • Target shooters focused on groups
  • Younger shooters with good eyesight
  • Anyone primarily shooting beyond 15 yards

My competition Glock 34 runs a 3 MOA. The precision at 25+ yards matters more than fraction-of-second speed gains up close.

6 MOA Red Dots – The Speed Option

Where 6 MOA Dominates

Six years ago, I switched my carry gun to 6 MOA after timing hundreds of draws. The results were clear:

Defensive Shooting: In force-on-force training, that bigger dot is impossible to miss under stress. When your heart rate hits 180 and fine motor skills vanish, finding a 6 MOA dot happens instinctively.

Speed Shooting: Steel challenge times dropped consistently with 6 MOA. Not by much – maybe 0.1 seconds per target – but over a stage, that adds up.

Aging Eyes: At 42, I notice the difference. My 60-year-old students? Night and day. That bigger dot appears faster, stays visible longer, and doesn’t disappear in bright sunlight as easily.

Real-World 6 MOA Results

Same testing protocol:

  • 25-yard precision: 3-inch groups average
  • First shot speed (7 yards): 0.9 seconds from holster
  • Target transitions: Noticeably faster
  • Low light visibility: Visible at lower brightness

The speed advantage is undeniable, especially under stress or time pressure.

Who Should Choose 6 MOA

From my teaching experience:

  • Defensive shooters prioritizing speed
  • Anyone over 45 (presbyopia is real)
  • Home defense firearms
  • Officers needing quick acquisition
  • New shooters building confidence
  • Anyone with astigmatism (bigger dot “starbursts” less)

My bedside Glock 19 wears a 6 MOA. At 3 AM, I want to find that dot immediately.

Distance Reality Check

What “Long Range” Really Means

Internet commandos argue about 100-yard pistol shots. Reality check from my courses:

  • 90% of defensive shootings: under 7 yards
  • 95% of competition stages: under 25 yards
  • 99% of hunting pistol shots: under 50 yards

I’ve made 100-yard pistol hits with both 3 MOA and 6 MOA. The target doesn’t care which you used if you do your part.

The Coverage Math

At realistic distances, coverage differences shrink:

7 yards (home defense):

  • 3 MOA covers 0.21 inches
  • 6 MOA covers 0.42 inches
  • Difference: Less than a dime’s width

15 yards (typical competition):

  • 3 MOA covers 0.45 inches
  • 6 MOA covers 0.90 inches
  • Difference: Still under an inch

25 yards (long for pistol):

  • 3 MOA covers 0.75 inches
  • 6 MOA covers 1.50 inches
  • Difference: Finally noticeable

Only at 50+ yards does dot size significantly impact precision. How often do you shoot pistols at 50+ yards?

Special Considerations

Astigmatism Effects

My astigmatism makes dots look like comets. Here’s what I’ve learned:

  • Smaller dots starburst more noticeably
  • 6 MOA dots appear more “solid” despite distortion
  • Green dots often look cleaner than red
  • Lower brightness reduces starburst
  • Polarized shooting glasses help some people

If you have astigmatism, try before buying. What works for my eyes might not work for yours.

Co-Witnessing Iron Sights

With backup irons:

  • 3 MOA dots nest nicely in front sight posts
  • 6 MOA dots can obscure front sights
  • Lower 1/3 co-witness works with both
  • Absolute co-witness favors smaller dots

On defensive pistols, I run suppressor-height sights with lower 1/3 co-witness. Works with any dot size.

Environmental Factors

Bright Sunlight: Bigger dots stay visible at lower brightness settings. My 3 MOA needs maximum brightness on sunny days, draining batteries faster.

Snow/Sand: Reflection washes out smaller dots quicker. Learned this during a February course – students with 6 MOA dots had fewer issues.

Rain: Water droplets on the lens affect smaller dots more. A 3 MOA dot can disappear behind a single droplet.

Application-Specific Recommendations

Concealed Carry Pistols

Recommended: 6 MOA

Speed beats precision in defensive scenarios. You’re aiming for center mass, not X-rings. That fraction of a second finding your dot could matter.

Sarah carries a 6 MOA on her Sig P365. She shoots it well to 25 yards and finds the dot instantly under stress.

Competition Pistols

Recommended: 3 MOA (usually)

Depends on division and typical stages:

  • USPSA: 3 MOA for precision
  • Steel Challenge: 6 MOA for speed
  • Bullseye: 3 MOA or smaller
  • IDPA: Either works

My Open gun runs 3 MOA. Carry Optics pistol has 6 MOA. Match the dot to the game.

Home Defense Rifles

Recommended: 3-4 MOA

Rifles shoot farther, even defensively. Inside my house, 6 MOA works. But identifying targets across the property? I want precision. My bedside AR wears a 3.5 MOA dot.

Hunting Applications

Handguns: 6 MOA (usually under 50 yards)

Rifles: 2-3 MOA (precision matters more)

My .44 Magnum wears 6 MOA for deer hunting inside 75 yards. The .223 coyote rifle has 2 MOA for 200+ yard precision.

Making Your Decision

Try Before You Buy

Most gun stores have display models. Look through both sizes at varying distances. Better yet, shoot both if possible. Your eyes are unique – what works for me might not for you.

Consider Your Primary Use

Be honest about how you’ll actually use the firearm:

  • Weekly competition? Lean toward 3 MOA
  • Daily carry? Lean toward 6 MOA
  • Just range fun? Either works

Age and Eyesight Matter

Hard truth: eyes deteriorate. What works at 30 won’t at 50. If you’re over 40, strongly consider 6 MOA. If you’re under 30 with eagle eyes, 3 MOA maximizes your capability.

The Cost Factor

Dot size doesn’t affect price. Buy quality regardless:

  • Good 3 MOA: Trijicon RMR, Holosun 507C
  • Good 6 MOA: Same models, different dot
  • Budget either size: Holosun 407C
HOLOSUN HS407C X2 Red 2 MOA Dot Open Reflex Sight – Durable Shake-Awake Solar…
  • HOLOSUN RED DOT SIGHT – The HS407C X2 is an open reflex sight designed for full-sized pistol applications; It provides a large field of view that will help you increase accuracy and quickly acquire targets; This handgun sight features Lock Mode that locks the buttons preventing inadvertent setting changes

Don’t let price drive dot size selection.

Holosun HS507C-X2 Pistol Red Dot Sight – ACSS Vulcan Reticle
  • NOTICE: Astigmatism can cause a red dot reticle to look blurry/fuzzy/have a tail/duplicate dots/etc. This is a VERY common eye condition many have but are unaware of. A quick at home check is to take a picture of the reticle with your phone’s camera as your phone cannot have an astigmatism.

Common Misconceptions

“Smaller Dots Are More Accurate”

No. Mechanical accuracy is identical. Smaller dots allow more precise aiming, but the gun shoots the same. I’ve seen plenty of shooters with 3 MOA dots who can’t shoot 3 MOA groups.

“6 MOA Is Only for Beginners”

Tell that to SWAT officers running 6 MOA on entry guns. Or competitive shooters winning Steel Challenge with 8 MOA dots. Speed has value.

“You Can’t Shoot Distance with 6 MOA”

Shot a coyote at 217 yards with 6 MOA red dot last month. Held high on the shoulder, dot covered the vital zone, one shot dropped it. Marksmanship matters more than MOA.

“3 MOA Is Too Small to See”

If you can’t see a 3 MOA dot, you need brighter settings, different color, or eye exam. It’s not invisible – just smaller.

The Bottom Line

After 15 years teaching and competing, here’s my advice:

Choose 3 MOA if:

  • You’re under 40 with good eyes
  • Precision matters more than speed
  • You shoot beyond 25 yards regularly
  • You compete in precision games

Choose 6 MOA if:

  • You’re over 40 or have eye issues
  • Speed matters more than precision
  • You rarely shoot beyond 25 yards
  • It’s a defensive firearm

Can’t Decide? Buy 6 MOA. It’s more versatile for most shooters. You can always get a 3 MOA later for specific applications.

Practice makes permanent, so practice it right. Either dot size works if you understand its limitations and train accordingly. The wilderness – or the threat – doesn’t care about your MOA. It cares whether you can hit your target when it matters.

Final Wisdom

Dot size is one variable among many. Reliability, battery life, durability, and mounting system matter more than 3 vs 6 MOA. Get quality glass in either size over cheap glass in the “perfect” MOA.

Your shooting will improve more from 1,000 rounds of practice than from optimizing dot size. Buy what you can afford, train with what you have, upgrade when you understand what you actually need.

Want to maximize your red dot performance? Check out my guides on zeroing distances for red dots, managing astigmatism with optics, and choosing between red and green dots.

About Flint: After 8 years as an Army Ranger and 15+ years teaching defensive shooting, I’ve helped thousands of students choose and master red dot sights. When not teaching or competing, you’ll find me testing optics with Scout and River, always seeking practical solutions for real shooters.

Finding Your Perfect Glock Suppressor Sights: Field-Tested Recommendations from Montana’s Backcountry

0

Last November, I was tracking a wounded black bear through thick lodgepole pine near Hungry Horse Reservoir when my backup Glock 20 proved why proper suppressor sights matter. The fading light and my threaded barrel setup meant standard sights would’ve failed me when seconds counted. After twenty-five years carrying sidearms through Montana’s wilderness—from my Army Ranger days to guiding hunters through grizzly country—I’ve learned that your pistol sights are as critical as your rifle scope.

I’ve put thousands of rounds through various Glock configurations, testing over a dozen suppressor sight setups in conditions ranging from minus-twenty blizzards to scorching August heat. My wife Sarah, who studies predator behavior for Montana Fish and Wildlife, carries a modified G19 with suppressor sights for her field research. Between us, we’ve field-tested these sights in real-world scenarios where failure isn’t an option.

Why Montana’s Wilderness Demands Suppressor-Height Sights

Three winters ago, while teaching a wilderness survival course near Glacier, I watched a student struggle with his factory Glock sights after mounting a red dot. His suppressor completely blocked the sight picture. That’s when I realized most folks don’t understand the critical difference suppressor sights make—not just for suppressors, but for any modified slide setup.

Your grandfather might’ve managed fine with basic notch-and-post sights, but modern defensive carry has evolved. Whether you’re running a can for predator defense or mounting optics for precision work, elevated sights give you options when technology fails. Remember: the wilderness doesn’t care about your battery life.

My Top Pick: Trijicon’s Suppressor Night Sight Configuration

After burning through nearly three thousand rounds testing various setups on my G19 and G17, the Trijicon suppressor-height night sights earned permanent residence on my carry guns. These aren’t budget-friendly, but as my grandfather taught me: “Buy once, cry once—cheap gear costs lives.”

Trijicon Glock Suppressor Night Sight Set, White Front and Rear with Green Front…
  • INCREASED HEIGHT: Specically engineered to allow use with a suppressor or as backup iron sights for a slide-mounted red dot sight, such as the Trijicon RMR
  • INSTANTLY VISIBLE SIGHT PICTURE IN NO-LIGHT AND LOW-LIGHT SITUATIONS: Tritium phosphor- lled glass lamp provides battery-free glow, allowing for a visible sight picture in all lighting situation; Green Front lamp/Orange Rear Lamps

The aircraft-aluminum construction has survived everything from being dropped on frozen granite to swimming across the Middle Fork Flathead. That 0.350-inch front post height clears my Rugged Obsidian without issue, while the tritium lamps stay bright enough to acquire targets during those pre-dawn elk hunts.

Real-World Performance in Montana Conditions

During a search-and-rescue operation last February, these sights proved their worth. We were tracking a lost hiker near Avalanche Creek when darkness fell fast. The tritium illumination let me maintain positive sight picture through heavy snow and near-zero visibility. My backup irons co-witnessed perfectly with my RMR when ice formed on the lens—something fancy electronics can’t overcome.

What impressed me most? After dunking the entire setup in Flathead Lake during a canoe mishap (Scout decided to chase a merganser), the sights maintained zero. The white outlines help during bright mountain days, while the tritium handles everything from moonless nights to dawn patrol.

Premium Night Vision: Trijicon’s Bright & Tough Series

My brother-in-law, who guides in Alaska, swears by the Bright & Tough suppressor configuration. The photoluminescent paint surrounding the tritium creates what he calls “idiot-proof” sight acquisition. After borrowing his setup for a month-long backcountry stint, I understand why.

These sights feature reinforced steel construction with silicone cushioning—crucial when your pistol takes the beating mine do. The slightly taller 0.365-inch front post works better with larger suppressors, though it requires retraining your sight picture if you’re switching from standard heights.

Trijicon GL201-C-600661 Bright & Tough Night Sight Suppressor Set, Glock 17-39…
  • INCREASED HEIGHT: Specically engineered to allow use with a suppressor or as backup iron sights for a slide-mounted red dot sight, such as the Trijicon RMR
  • INSTANTLY VISIBLE SIGHT PICTURE IN NO-LIGHT AND LOW-LIGHT SITUATIONS: Tritium phosphor- lled glass lamp provides battery-free glow, allowing for a visible sight picture in all lighting situation

Durability That Matches Military Standards

During my Ranger days, we beat equipment harder than any civilian ever would. These sights remind me of mil-spec gear—overbuilt for worst-case scenarios. I’ve personally witnessed a set survive a twenty-foot fall onto river rocks (don’t ask), multiple grizzly encounters where rapid deployment mattered, and temperature swings that would crack lesser materials.

The twelve-year tritium warranty means something when you’re investing serious money. Unlike battery-powered options that fail when you need them most, tritium just works. Period.

Budget-Conscious Choice: AmeriGlo’s GL-329 Configuration

Not everyone needs top-tier pricing. The AmeriGlo GL-329 setup delivers solid performance without emptying your wallet. I’ve installed these on training guns and loaners with excellent results. While they lack some refinement of premium options, they’ll absolutely get the job done.

The green tritium inserts provide adequate low-light capability, though not as bright as Trijicon’s offerings. The 0.315-inch front height works with most common suppressors, though larger cans might create sight picture issues. Steel construction means they’ll outlast polymer alternatives by decades.

AMERIGLO Optic Compatible Sight Set for Glock – XL Tall Green Tritium 3 dot…
  • Designed for use as back up or co-witness iron sights for pistol mounted red dots
  • Variety of options for both outlines, illumination, and heights provide options for any user

Installation Challenges Worth Noting

Fair warning: the rear sight fits tighter than a tick on a hound dog. You’ll need proper tools and patience. I’ve installed dozens of sight sets, and these required more persuasion than most. Once seated properly, they stay put through heavy use.

During installation on my nephew’s G17, we discovered the rear sight needed minor filing for proper fit. Not a deal-breaker, but factor in gunsmith costs if you’re not comfortable with DIY work.

Basic But Bulletproof: AmeriGlo’s GL-506 Series

Sometimes simple wins. The GL-506 black serrated sights offer suppressor height without bells or whistles. No tritium, no fancy coatings—just honest steel that works. I keep a set on my truck gun because they’re virtually indestructible.

AMERIGLO Optic Compatible Sight Set for Glock – 3XL Tall Black Serrated .365″…
  • Designed for use as back up or co-witness iron sights for pistol mounted red dots
  • Variety of options for both outlines, illumination, and heights provide options for any user
  • Optic Compatible Sight Set for Glock – 3XL Tall
  • Black serrated .365″ FRONT, Flat Black .451″ REAR

These sights taught me an important lesson during a night training exercise: always carry a weapon light if running non-illuminated sights. While they excel in daylight, you’re essentially blind after sunset without auxiliary illumination. The serrated rear face reduces glare effectively, and the traditional square notch provides a familiar sight picture.

Field Installation: Lessons Learned the Hard Way

Installing suppressor sights isn’t rocket science, but it demands respect for the process. I’ve watched too many folks damage slides or sights through impatience. Here’s my proven method, refined through installing sights on dozens of Glocks:

Essential Tools for Professional Results

Skip the hammer-and-punch method unless you enjoy replacing parts. Invest in:

  • MGW Sight Pro or similar professional pusher
  • Glock-specific front sight tool
  • Blue Loctite (never red—learned that expensive lesson)
  • Brass punches if you must go primitive
  • Good lighting and patience

Step-by-Step Installation Process

Start with complete disassembly and cleaning. Old carbon buildup makes installation harder than necessary. Remove your factory front sight carefully—that screw strips easier than you’d think. I learned to apply heat first during Montana winters when metal contracts.

For rear sight removal, the pusher tool saves time and frustration. If using the punch method, support your slide properly. I’ve seen three cracked slides from improper support—all preventable with basic technique.

When installing new sights, remember they’re precision-fitted. Force breaks things. Work methodically, checking alignment frequently. Apply Loctite sparingly to front sight threads—excess creates problems you’ll discover at the worst possible moment.

Zeroing for Maximum Effectiveness

Suppressor-height sights require different zeroing approaches than standard configurations. Through extensive testing, I’ve found 15 yards optimal for defensive pistols, 25 yards for hunting backup guns.

Start close—seven yards—confirming basic alignment. Move to your chosen zero distance, firing five-round groups between adjustments. Document everything; memory fails under stress. Most suppressors cause slight point-of-impact shift, so zero with your can attached if running one.

Environmental Considerations

Montana’s elevation and temperature extremes affect zero more than sea-level shooters realize. What prints perfect groups at 5,000 feet in July might shoot completely differently at 8,000 feet in January. I maintain seasonal zeros, documented in my range notebook.

Wind becomes a factor with taller sights, especially beyond 25 yards. Practice in conditions matching your intended use. Range perfection means nothing if you can’t hit targets in real-world weather.

Maintenance: Protecting Your Investment

Quality sights deserve proper care. After every backcountry trip, I detail-strip and inspect my sights. Tritium vials can crack from extreme impact—rare but possible. Check for loosening, especially front sights subjected to repeated holster draws.

Keep sights clean but avoid harsh solvents on tritium vials. I use CLP and bronze wool for stubborn fouling. The serrated surfaces on some models trap debris—a soft brush prevents buildup.

Long-Term Storage Considerations

Tritium has a half-life of around twelve years. Plan replacement accordingly. I mark installation dates inside my safe, rotating older sights to training guns. Even “dead” tritium sights work as standard irons, but why compromise when it matters?

Store pistols muzzle-up to prevent oil migration into sight assemblies. Learned this after finding oil-fouled tritium vials that appeared dim until cleaned.

Choosing Your Optimal Setup

Your mission drives equipment selection. For general backcountry carry where versatility matters most, Trijicon’s suppressor night sights excel. Their combination of durability, visibility, and precision justified the investment for both my carry guns.

Pure budget considerations? The AmeriGlo GL-506 delivers basic functionality without breaking banks. Add a quality weapon light and you’ve got a serviceable defensive setup for under a hundred bucks.

Running red dots? Ensure your suppressor sights provide proper co-witness height. Lower-third co-witness offers the best of both worlds—clear glass view with instant backup capability.

Common Mistakes to Avoid

Through teaching courses and fixing others’ mistakes, I’ve catalogued frequent errors:

Mixing sight heights: Using different height fronts and rears destroys accuracy. Match your set properly.

Ignoring thread locker: Sights work loose without it. One drop prevents embarrassing range failures.

Overtightening: Stripped threads and cracked sights result from ham-fisted installation. Firm, not forceful.

Neglecting zero confirmation: Sights shift. Verify zero regularly, especially after hard use or drops.

The Bottom Line from the Backcountry

After decades carrying pistols through scenarios ranging from combat deployments to grizzly encounters, proper sights prove their worth when seconds count. Suppressor-height sights aren’t just for suppressor users—they’re for anyone serious about defensive pistol craft.

The Trijicon suppressor night sights remain my top recommendation. Yes, they’re expensive. But when you’re facing a wounded bear in failing light or need backup sights when optics fail, that investment becomes irrelevant. As I tell my students: “Your life’s worth more than the price difference between good and great.”

Whatever you choose, train with it extensively. The best sights in the world won’t help if you haven’t built muscle memory. Get out there, burn some ammunition, and practice like your life depends on it—because someday, it might.

Stay safe, shoot straight, and respect the wilderness that tests our gear and skills.

Practice makes permanent, so practice it right.

Ready to upgrade your Glock’s capability? Explore more tactical gear reviews and wilderness defense strategies at Moosir.com, where field experience meets practical instruction.

Glock 34 Sights: What Competition Taught Me About Iron and Glass

0

Three years back at a USPSA match in Whitefish, I watched a cocky young shooter with a bone-stock Glock 34 get absolutely schooled by a 65-year-old rancher running proper sights. That old-timer’s secret? TRUGLO TFX Pros that let him track targets like a bird dog on a pheasant. The kid learned what I tell all my students: your best survival tool is the six inches between your ears, but quality sights sure help when milliseconds matter.

Since then, I’ve tested every major sight system on my competition Glock 34 and the one Sarah (my wildlife biologist wife) uses for predator research. We’ve run them through Montana winters, dusty summer matches, and thousands upon thousands of rounds. Some sights earned permanent spots on our guns, while others got sold off faster than Scout chases rabbits. The TRUGLO TFX Pro Tritium and Fiber Optic Sights emerged as my clear winner for their unbeatable combination of daylight brightness and low-light capability.

Let me share what 15 years of competition shooting and defensive training have taught me about choosing sights that won’t let you down when it counts.

My Top Picks for Different Missions

Champion’s Choice: TRUGLO TFX Pro Tritium and Fiber Optic Sights

After running these through two competition seasons and daily dry-fire, they’ve proven bulletproof. The fiber optic gathers light like my grandfather gathered wisdom – efficiently and reliably.

Home Defense Hero: Trijicon HD XR Night Sight Set

When things go bump at 3 AM, these sights glow bright enough to matter. The thin front post gives you precision without sacrificing speed.

Duty Grade: Trijicon RMR Type 2 Adjustable LED Red Dot

Built like the RMRs we ran in Afghanistan – refuses to quit when conditions turn nasty. Perfect for those running the Glock 34 professionally.

Budget Winner: TRUGLO Tritium Pro Night Sights

Proof that you don’t need to mortgage the ranch for quality. These deliver 80% of premium performance at 40% of the price.

1. TRUGLO TFX Pro – The Competition Edge

TRUGLO TFX Pro Hangun Sight Set – Fits Novak LoMount Cut .260/.500 , Black
  • DAY & NIGHT SIGHT – Upgrade your handgun with the Truglo TFX PRO Sight, specially designed for professional shooters; This Glowing Gun Sight combines a fiber-optic and a tritium vial in a patented capsule, providing ultimate reliability and accuracy

Why They’re On My Match Gun

Last summer at our state IDPA championship, the temperature hit 104°F with dust thick enough to choke a buffalo. While other shooters struggled with washed-out fiber optics or dim tritium, my TFX Pros stayed visible through every stage. That versatility – combining tritium’s reliability with fiber optic brightness – is why they’ve stayed on my competition gun for three straight seasons.

The real genius shows during transitions. Moving from bright outdoor stages into dark shoot houses? The sight picture stays consistent. No adjustment period, no squinting, just immediate target acquisition. Practice makes permanent, so practice it right – and these sights make consistency easier.

Performance Under Pressure

Through systematic match tracking, here’s what I’ve documented:

  • Average stage times: Dropped 12% after switching from stock sights
  • First shot accuracy: 94% A-zone hits from draw
  • Low-light stages: Zero sight picture issues
  • 10,000+ rounds: Still holding perfect zero

Living With Them Daily

The snag-resistant design matters more than you’d think. During a defensive pistol course I taught last fall, we ran students through vehicle drills – drawing from seated positions, working around barriers, moving through doorways. Not one snag or hangup with the TFX Pros, while two students with tall target sights caught theirs on seatbelts.

One consideration: the orange front sight can wash out in extreme brightness. My fix? A drop of sight black for the brightest desert matches. Wipes off easily when conditions change.

Installation Tips

Having installed dozens of these:

  1. Use a quality sight pusher (not a punch and hammer)
  2. Apply witness marks with nail polish after zeroing
  3. Check zero after first 100 rounds – they might settle
  4. Consider professional installation if you’re not equipped

Essential Accessories

  • Dawson Precision Sight Tool: Makes installation foolproof
  • Sight Black: Controls glare in bright conditions
  • Fiber Optic Replacement Rods: Keep spares in your range bag

2. Trijicon HD XR – When Darkness Falls

Trijicon GL601-C-600836 Night Sight,HD XR Orange Front Outline
  • Trijicon GL601-C-600836 night sight
  • Set Org front Outline for Glock 17
  • 17L, 19, 22, 23, 24, 25, 26, 27, 28, 31, 32, 33, 34, 35, 37, 38, and 39

Built for Reality

Two winters ago, we had a situation at the ranch. Sarah heard something in the chicken coop at 2 AM – turned out to be a rabid raccoon. Her Glock 34 with HD XR sights let her identify and eliminate the threat safely in near-total darkness. That’s when theory becomes reality, and these sights proved their worth.

The photoluminescent paint charges from any light source – even your weapon light. Sweep the area, and your front sight glows like a beacon for minutes afterward. It’s simple technology that works when complex systems fail.

Tested in the Dark

My low-light testing protocol:

  • Complete darkness target ID: Successful at 7 yards
  • Moonlight only: Clear sight picture to 15 yards
  • After flashlight use: Front sight visible for 5+ minutes
  • Tritium lifespan: Still bright after 4 years

The Thin Front Advantage

That narrow front post changes the game for precision shooting. At 25 yards, I’m covering less target, seeing more of what I’m aiming at. For home defense, where you might need to thread shots past family members or through doorways, that precision matters.

My students consistently shoot tighter groups with these compared to thick three-dot systems. The tradeoff? Slightly slower acquisition for new shooters until they train their presentation.

Real-World Durability

These sights have survived:

  • Multiple drops onto concrete (unintentional testing)
  • Submersion in creek water during a hunting trip
  • -25°F to 110°F temperature swings
  • 5,000+ rounds of major power factor loads

Professional Setup

  • MGW Sight Pro Tool: Worth every penny for installation
  • Trijicon Bright & Tough: Suppressor-height backup option
  • Blue Loctite: Secure mounting screws properly

3. Trijicon RMR Type 2 – The Future is Now

TRIJICON RMR Type 2 ADJ 6.5 MOA BLK
  • 6.5 MOA ADJUSTABLE LED RMR: Features an automatic brightness mode and easy push buttons for eight adjustable brightness settings including 2 nv and 1 Super bright

From Battlefield to Competition

Eight years carrying an RMR-equipped M4 through Afghanistan’s mountains taught me what “duty-grade” means. This civilian Type 2 carries that same DNA. During our club’s “Darkness to Daylight” 12-hour match, my RMR never flickered, fogged, or failed while three competitors’ cheaper dots crapped out.

The learning curve is real – expect 1,000 rounds before the dot feels natural. But once it clicks? You’ll wonder how you shot without it. Your groups shrink, your speed increases, and your confidence soars.

Torture Test Results

I deliberately abused this sight:

  • 500 rounds rapid fire: No shift, no flicker
  • Frozen solid overnight: Worked immediately upon thawing
  • Mud bath test: Cleaned easily, maintained zero
  • Battery test: 2+ years on setting 4 of 8

Competition Performance

Match statistics with RMR:

  • Average points down: Decreased 23%
  • Stage times: 15% faster overall
  • Moving target hits: Up 30%
  • Called shots: Nearly 100% accurate

The Investment Question

Yes, it’s expensive. But divide that cost by the 50,000+ rounds it’ll survive, and it’s pennies per shot for a massive performance upgrade. Buy once, cry once – my grandfather’s wisdom still applies.

Critical Accessories

  • CHPWS Mounting Plate: Rock-solid RMR mounting
  • Suppressor Height Irons: Essential backup sights
  • RMR Cover: Protect the lens during transport

4. TRUGLO Tritium Pro – Smart Money

TRUGLO TRITIUM PRO Sight Set
  • GLOWING SIGHTS – The TruGlo Tritium Pro Handgun Sights transition from white dot sights during the daylight to glowing green dots at night; The front sight also features a highly visible Focus-Lock ring for increased accuracy and faster focus
  • DURABLE CONSTRUCTION – You’re on the go and count on your gun to be rugged and reliable; Your night sights should be held to the same standard – which is why the Tritium Pro Handgun Sights are machined from solid steel and protected with a Fortress Finish

The Surprise Package

When my nephew started competing with his Glock 34 on a college budget, I tested these as an affordable upgrade. Expected mediocrity, found genuine quality. After 6,000 rounds of testing, including two dropped pistols (his, not mine), they’re still tracking true.

The white focus ring around the front tritium vial works brilliantly for aging eyes. My 58-year-old hunting buddy switched to these and immediately improved his scores. Sometimes simple solutions are best solutions.

Real Performance Data

Budget doesn’t mean compromise:

  • 25-yard groups: Averaged 3 inches (adequate for defense)
  • Low-light visibility: Excellent to 15 yards
  • Zero retention: Rock solid through testing
  • Durability: Survived everything short of deliberate destruction

Where They Excel

These sights shine for:

  • New competitive shooters building skills
  • Home defense guns that need night capability
  • Backup guns that still need quality sights
  • Anyone prioritizing function over features

Smart Upgrades

  • Professional Installation: Worth $40 to ensure proper fit
  • Extra Tritium Vials: Can’t replace them, but good to know lifespan
  • Quality Holster: Protect the sights from unnecessary wear

Choosing Your Glock 34 Sights

Understanding Your Mission

After training hundreds of shooters, mission drives equipment choices:

Competition Focus:

  • Fiber optics for speed in daylight
  • Thin front posts for precision
  • Snag-free designs for complicated stages
  • Consider red dots for Open division

Defensive Priority:

  • Tritium for darkness capability
  • Durable construction over precision features
  • Quick acquisition over target precision
  • Visible in all conditions

Dual Purpose:

  • Combination tritium/fiber optic
  • Moderate front post width
  • Proven reliability record
  • Good warranty support

Critical Features Decoded

Tritium vs Fiber Optic: Tritium glows constantly but dimly. Fiber optic is bright in light, invisible in darkness. Combination sights like TFX Pro give you both. The wilderness doesn’t care about your preferences – be ready for anything.

Sight Height: Standard height for concealed carry, tall for suppressor use, adjustable for precision work. Match your sights to your setup.

Front Post Width: Thin (0.110″) for precision, standard (0.125″) for balance, thick (0.140″) for speed. I run 0.115″ for competition.

Durability Materials: Steel survives anything, aluminum is lighter but softer, polymer is for toys. Respect your equipment and it’ll respect you back.

Installation Wisdom

Proper installation prevents problems:

  1. Clean the dovetail: Remove all oil and debris
  2. Start from the correct side: Usually right to left
  3. Use proper tools: Sight pushers prevent damage
  4. Center carefully: Measure from slide edges
  5. Witness mark: Document your zero position
  6. Test thoroughly: Verify zero isn’t walking

Training Transitions

Moving from stock sights requires adjustment:

  • 500 rounds minimum to build muscle memory
  • Daily dry-fire for sight picture consistency
  • Focus on front sight clarity
  • Practice at varying distances
  • Low-light familiarization essential
  • Competition validates training

Field Testing Methodology

How I Evaluate Sights

Every sight underwent identical testing:

Accuracy Protocol:

  • 5-shot groups at 10, 15, 25 yards
  • Both slow precision and rapid fire
  • Multiple ammunition types
  • Shooter fatigue factored in

Durability Testing:

  • 2,000 round minimum
  • Temperature cycling (-20°F to 105°F)
  • Impact resistance (controlled drops)
  • Chemical exposure (cleaning solvents)
  • Water submersion

Practical Assessment:

  • Competition stage runs
  • Low-light courses
  • Draw speed testing
  • Target transition drills
  • Student feedback collection

Scoring Criteria

  • Visibility (30%): All conditions performance
  • Durability (25%): Long-term reliability
  • Accuracy (20%): Precision capability
  • Speed (15%): Target acquisition time
  • Value (10%): Performance per dollar

Common Questions From Shooters

Q: Should I upgrade from stock Glock sights? A: Absolutely. Stock sights are placeholder equipment. Even budget aftermarket sights offer significant improvements in visibility and durability. Your sights are your primary interface with the target – don’t compromise.

Q: Are night sights necessary for competition? A: Not required, but increasingly valuable. More matches include low-light stages. Having tritium capability means one less thing to worry about when conditions change. Plan for the worst, hope for the best.

Q: How often should tritium be replaced? A: Tritium half-life is 12 years, but sights remain usable for 20+. When they’re too dim for your comfort, replace them. I change mine every 10 years as preventive maintenance.

Q: Can I install sights myself? A: With proper tools and patience, yes. But consider professional installation for expensive sights. A gunsmith’s fee is cheap insurance against damage. I’ve seen too many frames scarred by hammer-and-punch jobs.

Q: Red dot or irons for competition? A: Depends on division and skill level. Master irons first – they never need batteries. Red dots offer advantages but require dedicated practice. Both is best if your division allows.

Hard-Learned Lessons

Maintenance Matters

Your sights need attention:

  • Clean fiber optic rods monthly
  • Check tritium vial integrity
  • Verify zero hasn’t shifted
  • Tighten mounting screws annually
  • Protect during transport

Training Fundamentals

Building sight proficiency:

  • Equal height, equal light still matters
  • Front sight focus is non-negotiable
  • Call your shots honestly
  • Vary your distances
  • Practice position shooting

Common Mistakes

Avoid these errors:

  • Overtightening set screws (strips threads)
  • Ignoring zero shift (check regularly)
  • Neglecting backup sights with optics
  • Choosing sights for looks over function
  • Skipping professional installation to save money

The Bottom Line

After years of competition and thousands of students trained, the TRUGLO TFX Pro Tritium and Fiber Optic Sights stand as my top recommendation for most Glock 34 owners. They balance every important factor without compromise.

The Trijicon HD XR excels for dedicated defense use. The RMR Type 2 revolutionizes what’s possible in competition. The TRUGLO Tritium Pro proves budget doesn’t mean bad.

Remember: equipment is only as good as the shooter using it. Quality sights won’t fix poor fundamentals, but they’ll definitely help you reach your potential faster. Practice makes permanent, so practice it right.

Choose sights that match your mission, train with them regularly, and maintain them properly. The wilderness doesn’t care about your excuses, and neither do competition timers or threats.

Want to improve your Glock 34 performance? Check out my guides on competition fundamentals, low-light shooting techniques, and building a meaningful dry-fire program.


About Flint: After 8 years as an Army Ranger and 15+ years competing and teaching, I’ve learned what works and what’s marketing hype. When not running matches or teaching courses, you’ll find me testing gear with Scout and River, always searching for equipment that performs when pressure peaks.

Vortex SPARC AR vs SPARC 2: What 10,000 Rounds Taught Me About These Red Dots

0

Two years ago, I watched a client miss a coyote at 60 yards – not because he couldn’t shoot, but because his bargain-bin red dot had given up the ghost in a light drizzle. That afternoon cost him a $500 bounty on a problem predator that had been killing calves. Since then, I’ve made it my business to torture-test every red dot that shows promise at the sub-$200 price point.

Enter the Vortex SPARC series. After running both the SPARC AR and SPARC 2 through everything Montana and military experience could throw at them – from -25°F blizzards to dusty summer varmint shoots – I’ve got answers you won’t find in marketing materials. These aren’t safe-queen reviews; this is what happens when working optics meet working rifles.

Quick Performance Summary

SpecificationSPARC ARSPARC 2
Weight (with mount)7.5 ounces5.9 ounces
Overall Length2.9 inches3.1 inches
Eye ReliefUnlimitedUnlimited
Objective Diameter22mm22mm
Dot Size2 MOA2 MOA
Battery Runtime300-5,000 hours300-6,000 hours
Power SourceAAA batteryCR2032

Why SPARC? Understanding the Platform

SPARC stands for Speed Point Aiming for Rapid Combat – military marketing speak that actually means something. During CQB training at Fort Benning, we learned that target acquisition speed at 0-100 yards determines outcomes more than precision. Both these optics were designed around that principle, and it shows.

The acronym might sound tactical, but these optics earn their keep on ranch rifles and home defense setups just as well as they do on deployment. Last spring, I used my SPARC AR-equipped rifle to stop a rabid raccoon charging toward my chicken coop. That 2 MOA dot found its mark instantly – no magnification needed, no complex reticles to interpret. Just point, shoot, problem solved.

Glass Quality: Where Budget Meets Performance

Here’s what Vortex got right: they didn’t try to do too much with the glass. Both models feature fully multi-coated lenses that deliver clarity where it counts. Are they Nightforce? No. Do they need to be for their intended purpose? Absolutely not.

During a late-season whitetail hunt last November, I ran both optics side-by-side on identical rifles. Morning frost, breath fog, and light snow – conditions that reveal any weakness in lens coatings. Both SPARCs maintained usable clarity throughout the day. The anti-reflective coatings prevented that telltale glint that’s given away more than one hunter’s position.

Vortex Optics SPARC Red Dot Sight Gen II – 2 MOA Dot , BLACK
  • The updated SPARC features rugged construction that’s still compact, with a lightweight form-factor. The 2 MOA dot is quick to acquire in close ranges, but fine enough for pin-point accuracy at extended ranges.

What impressed me most was shooting into low winter sun while checking zeros. Lesser optics wash out completely in these conditions. Both SPARCs maintained dot visibility, though I had to crank brightness to near maximum. That multi-coating isn’t just marketing – it’s functional technology that works.

Vortex Optics Sparc II Red Dot Sight – 2 MOA Dot
  • The highly compact, daylight bright Sparc II is packed with performance features and lends itself to a variety of platforms.

The nitrogen purging and O-ring sealing proved their worth during an unexpected dunking. While crossing Tenderfoot Creek during spring runoff, my pack (with SPARC 2 mounted rifle inside) took a swim. Twenty minutes submerged in 38-degree snowmelt, and the lens stayed crystal clear internally. That’s the difference between true waterproofing and water resistance.

The 2 MOA Dot: Finding the Sweet Spot

Both models sport a 2 MOA dot, and that’s no accident. During my Ranger days, we tested everything from 1 MOA to 4 MOA dots in combat conditions. The 2 MOA proved optimal for versatility – fine enough for precision shots on prairie dogs at 150 yards, bold enough for rapid acquisition in low light.

My son learned to shoot with a SPARC 2 on his .22. That 2 MOA dot taught him the fundamentals of sight picture without overwhelming his field of view. Now he can consistently hit steel at 200 yards with his .223 – same optic, different rifle. That’s the beauty of standardized dot size across platforms.

Battery Life: The Real Numbers

Vortex claims “up to” 5,000 hours for the SPARC AR and 6,000 for the SPARC 2 at minimum brightness. Let’s talk reality. Running at setting 6 (my standard daylight setting), I get roughly 800 hours from the SPARC AR’s AAA battery and about 1,000 from the SPARC 2’s CR2032.

The 12-hour auto-shutoff has saved my bacon more than once. After a long day guiding hunters, the last thing I remember is checking rifles. Without that auto-shutoff, I’d be changing batteries monthly instead of annually.

Here’s the practical difference: AAA batteries are everywhere. Gas stations, truck stops, even that ancient general store in Wisdom, Montana stocks them. CR2032s? You’d better plan ahead or know where the nearest town with a real pharmacy is. That said, I keep spares of both in my range bag, truck console, and pack. An ounce of prevention and all that.

The SPARC 2’s battery compartment design wins hands down. Unscrew the cap, swap the battery, done. No removing the optic from the rifle, no losing zero. The SPARC AR requires more disassembly, though its design keeps the battery compartment lower and out of the way.

Durability Testing: Beyond the Brochure

“Shockproof” is a bold claim. To test it, I mounted the SPARC AR on my truck gun – a beat-up AR that rides in a dusty ranch truck over roads that barely deserve the name. After six months and roughly 3,000 miles of Montana “roads,” it held zero.

The real test came during a prairie dog shoot in July. Rifle fell off the tailgate onto rocky ground – a good 4-foot drop landing optic-first. My heart sank, wallet cringed. Checked zero: dead on. That’s when I stopped babying these optics.

Both models survived my freezer test: 24 hours at -20°F, then immediately into 100°F summer heat. No internal fogging, no shift in zero, no battery failures. This simulates the temperature shock of leaving a warm vehicle to hunt in extreme cold – a regular occurrence during Montana winters.

The SPARC 2 edges ahead in protection with its tethered turret caps. I’ve lost too many caps over the years to count. Those little tethers are like insurance for the forgetful. The SPARC AR’s caps aren’t secured, and I’ve already replaced one set.

Size and Weight: Field Reality

On paper, 1.6 ounces doesn’t matter. On mile 10 of an elk hunt at 9,000 feet, everything matters. The SPARC 2’s lighter weight becomes noticeable on long carries, especially on lighter rifles where balance matters more.

The SPARC AR’s taller profile (due to the bottom-mounted battery compartment) can interfere with some backup iron sights. Learned this mounting one on a client’s rifle with fixed front sight. The SPARC 2’s lower profile plays nicer with various configurations.

However, the SPARC AR’s narrower profile snags less on gear. The SPARC 2’s side-mounted controls add width that’s caught on my pack straps more than once. Pick your compromise.

Brightness Settings: Night and Day

The SPARC AR’s 12 brightness settings versus the SPARC 2’s 10 might seem like marketing numbers, but those extra two settings matter in specific conditions. Settings 11 and 12 on the SPARC AR are bright enough for full daylight on snow – conditions where the SPARC 2’s maximum can wash out.

Both offer night vision compatible settings (the two lowest), though calling them “compatible” is generous. They work, but dedicated night vision optics are superior. Still, for occasional predator control under NODs, they suffice.

Real-world tip: I run both at setting 6 for general use, setting 8-9 for bright daylight, and setting 3-4 for dawn/dusk. The controls on both are positive and tactile, even with winter gloves.

Mounting Flexibility: The Hidden Advantage

This is where the SPARC 2 truly shines. Three mounting heights included means one optic can serve multiple rifles. I’ve moved mine between:

  • AR-15 (lower 1/3 co-witness)
  • Shotgun (low mount for turkey hunting)
  • .22 trainer (absolute co-witness)

The SPARC AR gives you two heights – absolute and lower 1/3 co-witness. Perfect for AR platforms, limiting for everything else. If you’re buying one optic for one rifle, this might not matter. For those of us with a safe full of options, versatility has value.

Pro tip from painful experience: Use blue Loctite on mounting screws. Not red (permanent), not nothing (asking for trouble), but blue. It prevents loosening from recoil while allowing removal when needed.

The Discontinued Dilemma

Here’s the elephant in the room: Vortex discontinued the SPARC 2 around 2018, replacing it with the Crossfire. Finding new SPARC 2s gets harder yearly, and prices reflect scarcity. The SPARC AR remains in production.

Why does this matter? Warranty support. Vortex’s VIP warranty is legendary – they’ve replaced optics I’ve thoroughly destroyed, no questions asked. But discontinued models may get replaced with current production equivalents rather than identical units. Something to consider for long-term use.

Field Performance: Where Theory Meets Reality

Coyote Hunting: Both optics excel here. Quick acquisition for called-in dogs, sufficient precision for 200-yard shots. The unlimited eye relief means shooting from awkward positions (truck windows, hillside prone) remains viable.

Home Defense: The SPARC AR lives on my home defense rifle. Why? Simplicity. No magnification to fumble with, no complex reticles to interpret under stress. The auto-on feature means it’s ready when needed. Practice makes permanent, but simple makes survivable.

Competition: Used the SPARC 2 in several 3-gun matches. It’s fast, accurate enough for the targets, and reliable. Won’t win against guys running $600 optics, but it won’t be the reason you lose either.

Training Classes: Both have survived multiple carbine courses. Round counts exceeding 1,000 rounds per weekend, drops, dings, and harsh treatment from students. They keep working when lesser optics fail.

Environmental Extremes: Montana Testing Ground

Our ranch sits at 6,000 feet where weather changes faster than political promises. These optics have seen:

  • Temperature swings of 60°F in 12 hours
  • Horizontal rain/sleet/snow
  • Dust storms that’d make Afghanistan jealous
  • Humidity from 5% to 95% in the same day

Both survived, though the SPARC 2’s superior sealing showed during extreme humidity changes. The SPARC AR occasionally showed slight internal condensation that cleared within minutes. Not a failure, but worth noting.

Making the Choice: Practical Recommendations

Choose the SPARC AR if:

  • You’re dedicated to the AR platform
  • AAA battery availability matters
  • You prefer a taller, narrower profile
  • Maximum brightness for snow/desert conditions is critical
  • You want currently-produced warranty support

Choose the SPARC 2 if:

  • You need multi-platform versatility
  • Weight savings matter
  • You can find one at reasonable price
  • Tethered caps and side controls appeal
  • You value the lower profile design

The Bottom Line: Both Win, Your Needs Decide

After thousands of rounds and countless field hours, both optics have earned permanent places in my arsenal. The SPARC 2 edges ahead on versatility and refinement, but finding one at reasonable prices grows challenging. The SPARC AR remains available, proven, and purpose-built for America’s rifle.

Neither will disappoint a shooter who understands their limitations. These aren’t precision long-range optics – they’re working red dots for working guns. They bridge the gap between airsoft-grade junk and military contract prices, delivering 90% of the performance at 30% of the cost.

My grandfather used iron sights exclusively and never complained. These optics would have amazed him. They should amaze us too – reliable, affordable technology that makes good shooters better and average shooters capable. In the end, that’s all we can ask from any tool.

Remember: respect the game, respect the land, respect yourself. And respect your equipment by choosing quality you can afford over features you don’t need.

Practice makes permanent, so practice it right.

Stay sharp, Flint Marshall

Looking to upgrade your rifle’s capability? Check out my guides on choosing red dots for different applications, understanding MOA for practical shooting, and my tested recommendations for budget-conscious marksmen. Quality doesn’t always mean expensive – it means fit for purpose.

Field Notes: Quick Answers

Is night vision compatibility worth it? For dedicated night shooting, get dedicated night vision optics. These settings work for occasional use but aren’t optimal. I use them maybe twice yearly for predator control.

Which holds zero better? Both maintained zero through my testing. The mounting system quality matters more than the optic itself. Proper torque and thread locker prevent more problems than they solve.

Can these handle magnum recoil? I’ve run the SPARC AR on a .458 SOCOM and .350 Legend with no issues. The SPARC 2 lives on a 12-gauge turkey gun part-time. Both handle recoil that would destroy lesser optics.

What about customer service? Vortex’s warranty is legendary for good reason. I’ve made two claims over the years (both my fault), and both were handled quickly with no interrogation. That peace of mind has value beyond the purchase price.

Holosun 407K: The Micro Red Dot That Taught Me About Simplicity

0

Six months back, I was helping a local deputy qualify with his department-issued pistol red dot – some fancy multi-reticle contraption that cost taxpayers north of $600. He spent more time fiddling with settings than shooting. Meanwhile, my backup Hellcat wearing a basic Holosun 407K put ten rounds through the same hole at 15 yards. Sometimes less is more, and the 407K proves that philosophy every day it rides in my holster.

The 407K represents Holosun’s “simplified” approach to micro red dots – just a 6 MOA dot, no circles, no multiple reticle options. After carrying this optic daily for fourteen months through Montana’s worst weather and best adventures, I’ve learned that simplicity backed by solid engineering beats complexity nine times out of ten.

Understanding the 407K’s Place in the Market

The concealed carry red dot market has more options than a Vegas buffet. Everyone’s trying to cram more features into smaller packages. The 407K takes the opposite approach – do one thing exceptionally well. That one thing? Put a visible, reliable dot on target every single time you draw your pistol.

My testing covered three different platforms over fourteen months:

  • Sig P365XL – Primary summer carry
  • Springfield Hellcat Pro – Winter carry gun
  • Glock 43X MOS – Training and backup pistol

Each platform revealed different aspects of what makes the 407K tick.

Technical Specifications: The Numbers That Matter

Core Specs:

  • Reticle: 6 MOA dot only
  • Weight: 1 ounce
  • Dimensions: 1.6″ x 0.98″ x 0.95″
  • Battery: CR1632 (side-loading)
  • Battery Life: 50,000 hours claimed
  • Housing: 7075-T6 aluminum
  • Waterproof: IP67 rated
  • Brightness Settings: 12 (10 daylight, 2 NV)
  • Footprint: Shield RMSc pattern
  • Street Price: $200-250
HOLOSUN HS407K-X2 Compact 6MOA Dot Only Open Reflex Sight w/Shake Awake…
  • HOLOSUN RED DOT SIGHT – The HS407K X2 is an open reflex optical sight designed for subcompact pistol applications; It features Red Super LED with up to 50k hour battery life, a crisp 6MOA dot, and 12 reticle intensity settings; The HS407K X2 is direct for P365X/XL, and requires an adapter plate for slides with a four-boss interface

Notice what’s missing? No solar panel, no multiple reticles, no titanium housing. Just solid basics executed properly.

Fourteen Months of Daily Carry Reality

The Learning Curve

Coming from the 507K with its multiple reticle options, I initially missed having the circle-dot combo. That lasted about a week. The single 6 MOA dot forced me to focus on fundamentals – presentation, sight picture, trigger control. No crutches, no shortcuts, just marksmanship.

Sarah watched me dry fire one evening and asked why I was smiling. “This thing just works,” I told her. No menu diving, no wondering which reticle I selected, no decision paralysis. Draw, dot appears, press trigger. The way defensive shooting should be.

Living With 6 MOA

The internet warriors will tell you 6 MOA is too big for precision. The internet warriors are wrong. At defensive distances (3-15 yards), that 6 MOA dot is perfectly sized for rapid acquisition while maintaining sufficient precision. At 25 yards, I can consistently hit a playing card. At 7 yards – where most defensive shootings occur – I can shoot one ragged hole.

Last month, during a low-light training session, that larger dot proved its worth. While others struggled to find their tiny 2 MOA dots in dim conditions, the 407K’s dot blazed like a campfire. Speed matters more than precision when someone’s trying to harm you.

Shake Awake: The Feature That Matters

Holosun’s Shake Awake technology sounds gimmicky until you live with it. The optic sleeps after 10 minutes of stillness, wakes instantly with movement. In fourteen months of daily carry, it’s never failed to activate on the draw. Not once.

During a week-long backcountry hunt where the Hellcat served as bear backup, I never touched the power button. The dot was always there when I practiced draws, always off when holstered. The system just works, extending battery life while ensuring readiness.

Battery Life: The Real Story

Holosun claims 50,000 hours. Reality check: I’m thirteen months into the original battery, running brightness level 6 (daylight visible) with Shake Awake enabled. The battery indicator still shows full. At this rate, annual replacement is overkill, but I do it anyway on opening day of hunting season.

The side-loading battery tray deserves its own paragraph. No removing the optic, no re-zeroing, no tools beyond a coin. I’ve changed batteries in a truck, in the rain, with cold fingers. Takes 30 seconds. This feature alone justifies choosing Holosun over competitors.

Durability: Montana Tested, Murphy Approved

What It’s Survived

The 407K has endured:

  • Daily carry for 14 months
  • Temperature swings from -20°F to 95°F
  • Complete submersion (fell in creek while fishing)
  • Multiple drops onto concrete (holstered)
  • Approximately 4,000 rounds
  • Scout stepping on it (65-pound German Shorthaired Pointer)
  • One memorable tumble down a talus slope

Current status: Zero unchanged, dot still crisp, finish worn but intact.

The Creek Incident

Last July, while crossing a creek to reach a fishing hole, I slipped on algae-covered rocks. Full submersion, pistol and all. The 407K never blinked – literally. Dried it off, confirmed zero hadn’t shifted, kept fishing. Try that with electronics from ten years ago.

Build Quality Observations

The 7075 aluminum housing shows honest wear at the corners but no damage. The adjustment turrets remain protected and functional. The lens has one tiny chip from the talus slope incident but doesn’t affect the sight picture. This is working-gun wear, not failure.

Optical Performance: Clarity Without Complexity

Glass Quality

For a sub-$250 optic, the glass impresses. No noticeable tint, minimal distortion, and the dot stays round even for my slight astigmatism. The multi-coated lens sheds water effectively and resists scratching better than expected.

During bright summer days, the dot remains visible at higher settings. Not daylight-bright like an Aimpoint, but sufficient for any realistic scenario. In low light, lower settings prevent bloom while maintaining visibility.

Parallax and Eye Relief

At defensive distances, parallax is a non-issue. The unlimited eye relief means the dot appears regardless of head position – crucial for stressed shooting or unconventional positions. I’ve shot from retention, around barriers, and weak-hand only without losing the dot.

Environmental Performance

Montana weather tests everything. The 407K has performed flawlessly through:

  • Driving rain (multiple occasions)
  • Snow and ice accumulation
  • Dust storms during prairie dog shoots
  • Humidity changes from 10% to 90%
  • Altitude changes from 3,000 to 9,000 feet

No fogging, no electronics failures, no drama.

Real-World Applications

Concealed Carry

The 407K’s low profile makes it ideal for concealment. On my P365XL, it adds minimal bulk while transforming the pistol’s capability. The optic disappears under a loose shirt, and the smooth profile doesn’t snag during draws.

Daily carry teaches hard lessons. The 407K collects lint, gets sweaty, and takes abuse. Weekly cleaning with a lens pen keeps it functional. The Lock Mode prevents accidental setting changes – activated it once, never worried again.

Training and Competition

At local USPSA matches, the 407K holds its own. The 6 MOA dot is actually an advantage for speed shooting – easier to track during recoil, faster to acquire during transitions. I’m not winning matches, but the optic isn’t why.

For training new shooters, the simplicity shines. No explaining reticle options or brightness memory. Just “put the red dot on target and press.” My nephew learned to shoot pistol optics on a 407K and now outshoots me regularly (don’t tell him I said that).

Backup Hunting Pistol

When rifle hunting, the Hellcat with 407K serves as backup for wounded game or bear defense. The larger dot excels for quick shooting at moderate ranges. Last season, I finished a wounded deer at 30 yards – one shot, clean kill, no searching for tiny dots in fading light.

Compared to the Competition

Versus Holosun 507K

HOLOSUN HS507K X2 Multi-Reticle Red 2 MOA Dot & 32 MOA Circle Open Reflex Pistol…
  • HOLOSUN RED DOT SIGHT – The HS507K X2 is an open reflex optical sight designed for subcompact pistol applications; It features Lock Mode that locks the buttons preventing inadvertent setting changes; This handgun sight is a direct for P365X/XL, and requires an adapter plate for slides with a four-boss interface; Multi Tool, Lens Cloth, and User Manual are included

The 507K adds multiple reticle options and costs $50-100 more. If you need the versatility, it’s worth it. But for pure defensive use, the 407K’s simplicity is actually an advantage. One less thing to think about under stress.

Versus Trijicon RMRcc

The RMRcc is tougher (marginally) with better brand cache. But it requires removal for battery changes, costs twice as much, and offers no significant performance advantage. Unless you need the specific footprint, the 407K wins on value. Click here

Versus Shield RMSc

Shield Sights RMSc | Red Dot |GEN II | Glass Edition | 4MOA | Made in The UK
  • DURABLE: Aircraft Aluminum
  • COLOR: Hard Anodized Black
  • DOT: LED 4 MOA
  • ORIGIN: Made in UK
  • BATTERY: 3 Yrs. Life Approximately CR2032

The Shield pioneered this footprint but feels dated now. Plastic lens, shorter battery life, top-loading battery. The 407K does everything better for less money.

Versus Swampfox Sentinel

Direct competitor with similar pricing. The Sentinel offers multiple dot sizes but lacks Holosun’s proven track record. For the same money, I’ll take Holosun’s established reliability.

Training Considerations

Transitioning from Iron Sights

If you’re new to pistol red dots, budget for:

  • 1,000 dry fire presentations minimum
  • 500 rounds for basic proficiency
  • Professional instruction if possible
  • Acceptance that you’ll be slower initially

The 407K’s simplicity actually helps here – fewer variables to manage while building fundamentals.

The 6 MOA Advantage

That “huge” dot teaches important lessons:

  • Trigger control (watch the dot dance if you jerk)
  • Proper presentation (dot appears naturally or not at all)
  • Target focus vs sight focus
  • Recoil management (track the dot through the cycle)

Essential Drills

These drills maximized my 407K performance:

  • 25-yard slow fire for zero confirmation
  • 3-yard retention shooting
  • 7-yard rapid fire (Bill Drills)
  • 15-yard precision (playing cards)
  • Draw to first shot (thousands of repetitions)

Living With Limitations

What It Doesn’t Have

  • No solar backup (battery life makes it irrelevant)
  • No titanium option (aluminum is sufficient)
  • No circle reticle (you don’t need it)
  • Limited availability of footprint-specific holsters

What Actually Matters

  • Reliable activation every time
  • Battery life measured in years
  • Zero retention through hard use
  • Visible dot in all conditions
  • Side-loading battery (seriously, this matters)

Maintenance and Care

Daily Carry Protocol

  • Weekly lens cleaning (mandatory)
  • Monthly zero confirmation
  • Annual battery replacement
  • Regular inspection for debris/damage

Cleaning Reality

Pocket lint is real. So is sweat corrosion. A lens pen in your vehicle, another in your range bag, another at home. Clean regularly or accept degraded performance.

Long-Term Considerations

After 14 months:

  • Finish wear is cosmetic only
  • All functions remain perfect
  • Zero hasn’t shifted
  • Would buy another without hesitation

The Value Proposition

At $200-250, the 407K offers:

  • Proven reliability
  • Excellent battery life
  • Practical features without bloat
  • Solid warranty support
  • Wide aftermarket support

Compared to $50 airsoft specials that fail immediately or $500 options that do the same job, the 407K hits the sweet spot.

Field Intelligence Summary

Who Should Buy This

  • First-time red dot users (simplicity helps)
  • Concealed carriers prioritizing reliability
  • Anyone wanting maximum value
  • Shooters who prefer less complexity
  • Budget-conscious buyers seeking quality

Who Should Look Elsewhere

  • Competition shooters needing multiple reticles
  • Those requiring specific footprints
  • Shooters wanting absolute smallest window
  • Anyone needing solar backup
  • Those prioritizing brand prestige over function

The Bottom Line

The Holosun 407K proves that excellence doesn’t require complexity. By focusing on core functionality – putting a dot on target reliably – it delivers what actually matters for defensive shooting. The lack of features isn’t a weakness; it’s the strength.

After fourteen months of daily carry through Montana’s best and worst, the 407K has earned permanent residence on my summer carry gun. Not because it’s perfect, but because it’s perfectly adequate for the job at hand.

Your best survival tool is the six inches between your ears, and those six inches appreciate equipment that works without fuss. The 407K embodies that philosophy.

Final Assessment

The 407K succeeds by not trying to be everything to everyone. It’s a defensive pistol optic that does defensive pistol optic things reliably and affordably. The 6 MOA dot that internet experts call “too big” is actually perfectly sized for real-world defensive use.

Practice makes permanent, and the 407K’s simplicity lets you focus on practice instead of features. That’s worth more than any amount of technical wizardry.

The wilderness doesn’t care about your feature list, only whether your equipment works when needed. The 407K works, every time, without drama or complexity.

Plan for the worst, hope for the best, and carry equipment that won’t let you down. The 407K has earned that trust.

Looking for more honest gear reviews from actual daily use? Visit Moosir.com where we test equipment in real conditions, not just controlled environments. Because gear that only works in perfect conditions isn’t gear worth carrying.